Overview #
This document provides all the necessary steps to create / edit a product (item). Products can have multiple images, descriptions, prices that may vary according to specified rules, multiple sizes, colors and other unique attributes that can be part of a single product or created as child SKUs of a parent item, Increase the search-ability of the product by adding tags, collection, brand etc, Set start dates and end dates for the products to be available at the store, change inventory and create sales or discounts on any product in the store, Add multiple different languages for the product name and description.
All features will be detailed and explained step by step throughout this document.
Manage Items #
The Manage Items section is located under Catalog | Products. This page is mainly used to search for products, create new products, delete products and view or edit the details of the products.
On this page, all previously created items are displayed in a table, as well as, multiple action buttons and a search item section:
To access the page follow these steps:
- Go to the menu and click on Catalog.
- Click on Products.
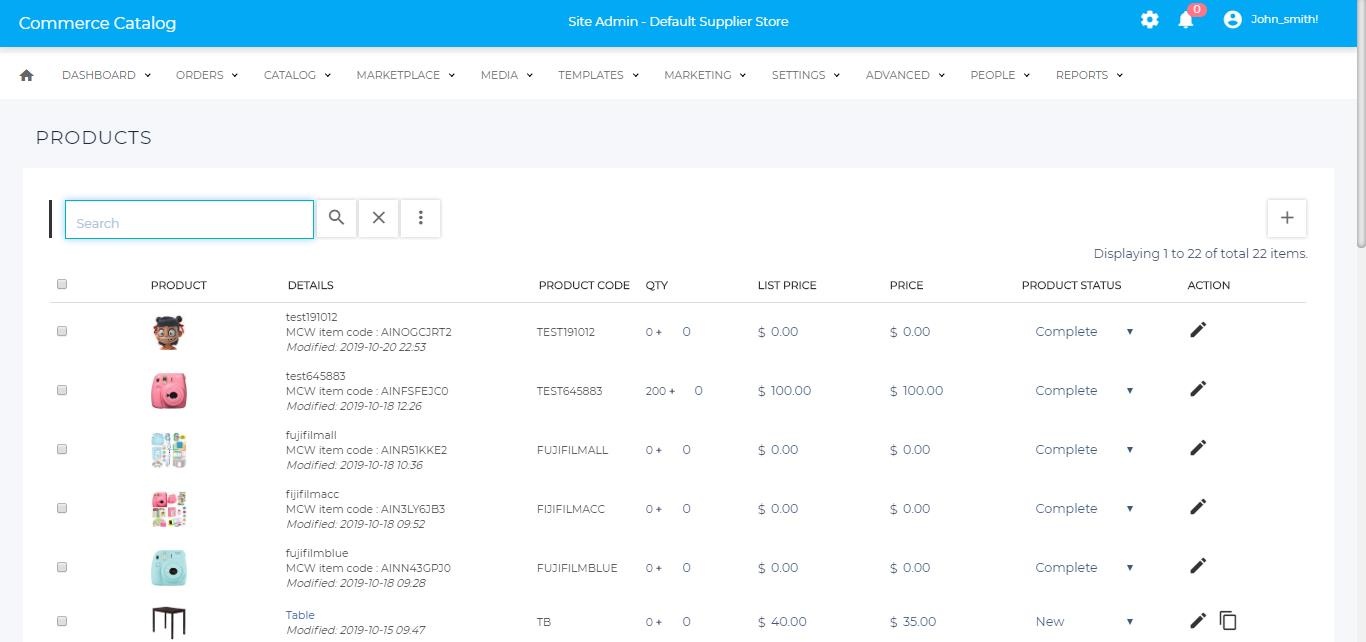
The Products administration page contains the following elements:
| Element | Icon | Description |
|---|---|---|
| Search tool | The search tool consists of three buttons:Search | |
| Add Product button | Click to start the process of creating a new product. Find details on Adding a product in the next section of this document. | |
| Delete | The delete button will only appear after at least only one product of the table has been selected. When the delete button is clicked, a warning pop-up message will be displayed with the following message:”If you click OK you will permanently delete checked item(s)”. For more information, go to the Delete section on this document. | |
| Pagination | The pagination buttons will be displayed if there are more than 50 products in the store. The number of displayed products and total products will be shown on under the Add product button. |
The Product’s table contains the following columns:
| Heading | Description |
|---|---|
| Checkbox | To the left of each item title, there is a checkbox used to select the item. Selecting multiple products allows applying an action to all selected items at once. |
| SKUs | The SKU column is used to identify parent products. If the product is a parent product a ‘greater than’ symbol with a number beside it will be displayed. Showing the number of child products attached to that specific parent product. Example:Click on the number to view the details of the child products on the same table. |
| Product | The product’s images are displayed on this column. If the image of the product has not been uploaded, the image that will be displayed on this column would be the one specified on Manage Media > Media > Assets > Items > Small image > noimage.jpgThe noimage.jpg could be replaced by the image your company prefers, could be a logo or a personalized image. |
| Title | There are two components in the title column:The title, which is is given to the product when its created, such as the name of a book, TV model, etc.If the product is set to any status except ‘Product is complete’: The title link will redirect us to the Advanced Edit Product admin page, where detailed information of the product can be modified. Refer to the Advanced Edit section.The MCW item code: The MCW code or also called AIN code is randomly generated on the MCW after the item is set to ‘Complete’ status on the supplier store.The MCW item code is unique and cannot change, this code will be mainly used on the MCW and Marketplace stores.The MCW code will not be displayed on this column if the product hasn’t been supplied to the MCW, by setting the item to ‘Complete’ status. If the status of the item changes after it was supplied, the MCW code will remain on the column.The date the product was last modified. The day and time of the last modification of the product will be displayed. |
| Product Code | This code is given to the product when its created, the supplier can specify any product code using spreadsheets or enter the product code on the ‘Add product’ feature on this admin page.The product code is a unique identifier, therefore, two items cannot have the same Product Code.The product code cannot contain special characters except for dashes (example: ABD-123) and it is limited to 50 characters. |
| Qty | The quantity is divided in two:The in-stock quantity on shop (read-only) – This is the quantity that has already been supplied to the Marketplace (by setting the item to Complete).When items are purchased on the marketplace, this qty will change to the actual in-stock qty of the marketplace.The in-stock quantity on the supplier store (editable) – This field is used as a simpler way to supply additional inventory qty from the supplier store to the marketplace. The supplier will need to enter the qty on this field and press Enter to confirm the inventory increase. After the inventory has been increased, the first field on this column will be updated showing the total qty of the product.The changes will also be automatically applied to the marketplace after a few minutes.There are other ways to increase/change the inventory. For more information refer to the Supplier Edit section on this manual or go to the Inventory manual.There are other ways to increase/change the inventory. For more information refer to the Supplier Edit section on this manual or go to the Inventory manual. |
| List Price | The List Price column shows the current recommended retail price of the product.The List Price must be higher than or equal to the Price and it can be modified directly on the List Price column. Just change the list price and press enter, a green pop-up will be displayed with the following message: “Price Updated successfully”.There are other ways to modify prices. For more information refer to the Simple Edit section, Advanced Edit section on this manual or go to the Prices manual. |
| Price | The Price column shows the actual price of the product set by the supplier.The Price must be lower than or equal to the List Price and it can be modified directly on the Price column. Just change the list price and press enter, a green pop-up will be displayed with the following message: “Price Updated successfully”.There are other ways to modify prices. For more information refer to the Simple Edit section, Advanced Edit section on this manual or go to the Prices manual. |
| Product Status | This column shows the status of each product based on the workflow states. The product status can be modified using the dropdown menu on this column.-When products are newly created, they are automatically set to ‘New’.-Setting the products to a ‘Complete’ status will update and supply the MCW store.To set all products to a particular status, go to Catalog > Approve Products, for more information, refer to the Approve Products manual.To learn more about the different product status, go to the Item Status Settings manual. |
| Action | There are two actions available on this column:Edit – This button will allow us to perform different actions depending on the product status:-If the product is set to ‘Complete’: The Edit button will open a pop-up on the same window to allow the supplier to edit limited aspects of the product, such as prices and the inventory. Refer to the Supplier Edit section.-If the product is set to any status except ‘Complete’: The Edit button will redirect us to the Simple Edit Product admin page, where detailed information of the product can be modified. Refer to the Simple Edit section described in this manual-If the Manage Products page is opened from the MCW store: the Edit button always redirects to the Simple Edit Product admin page, regardless of the product status.Copy – On a supplier store, this button is only available when the product status is other than ‘Complete’. Click on this button to create a copy of the item. This document contains a section with details on copying items.-On a MCW store, the Copy button will be available for each product regardless of the product status. |
Adding A Product #
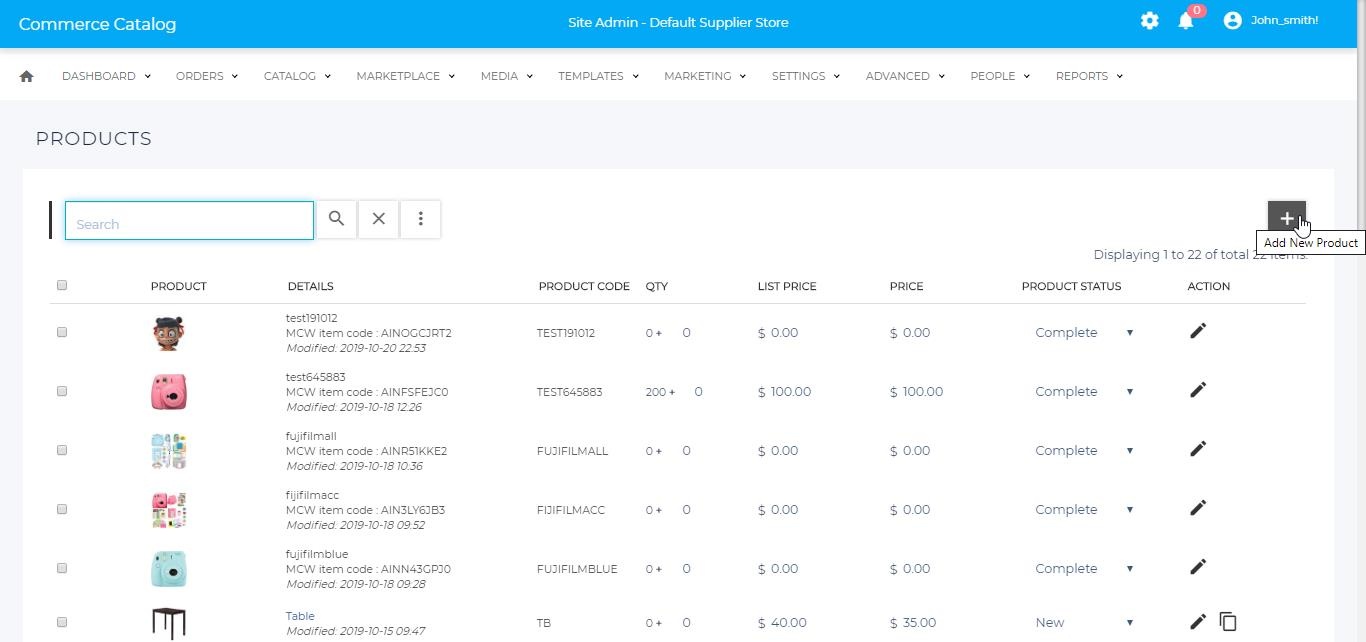
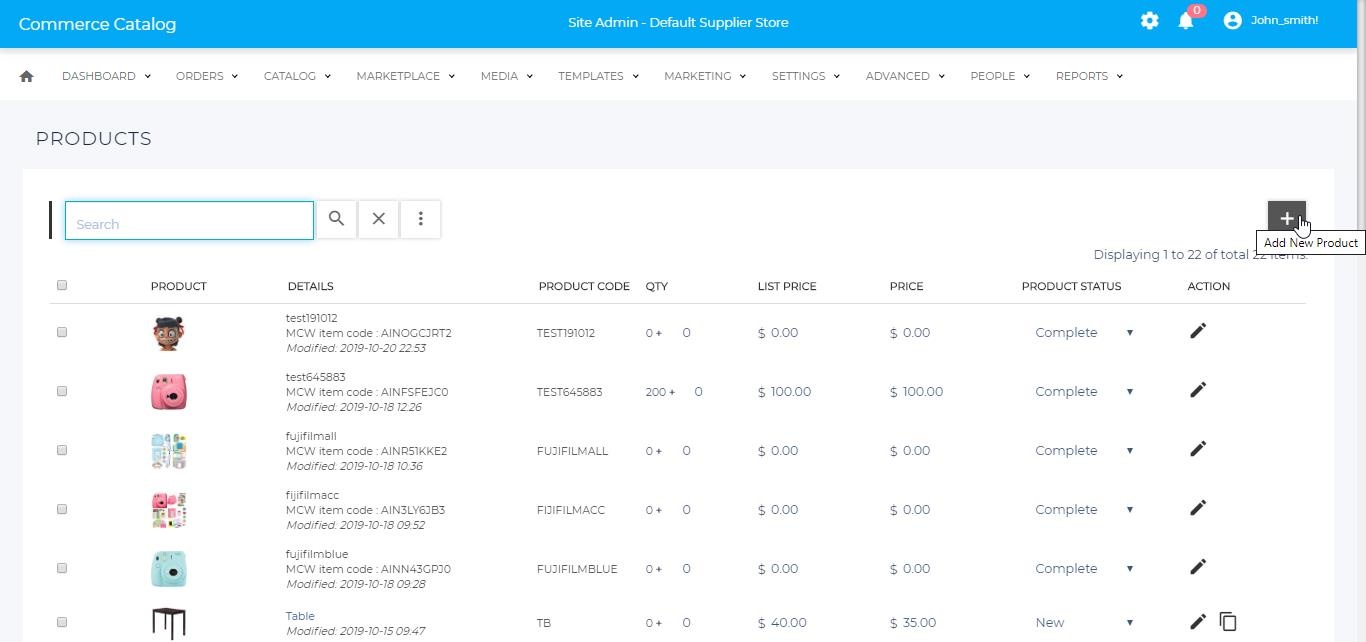
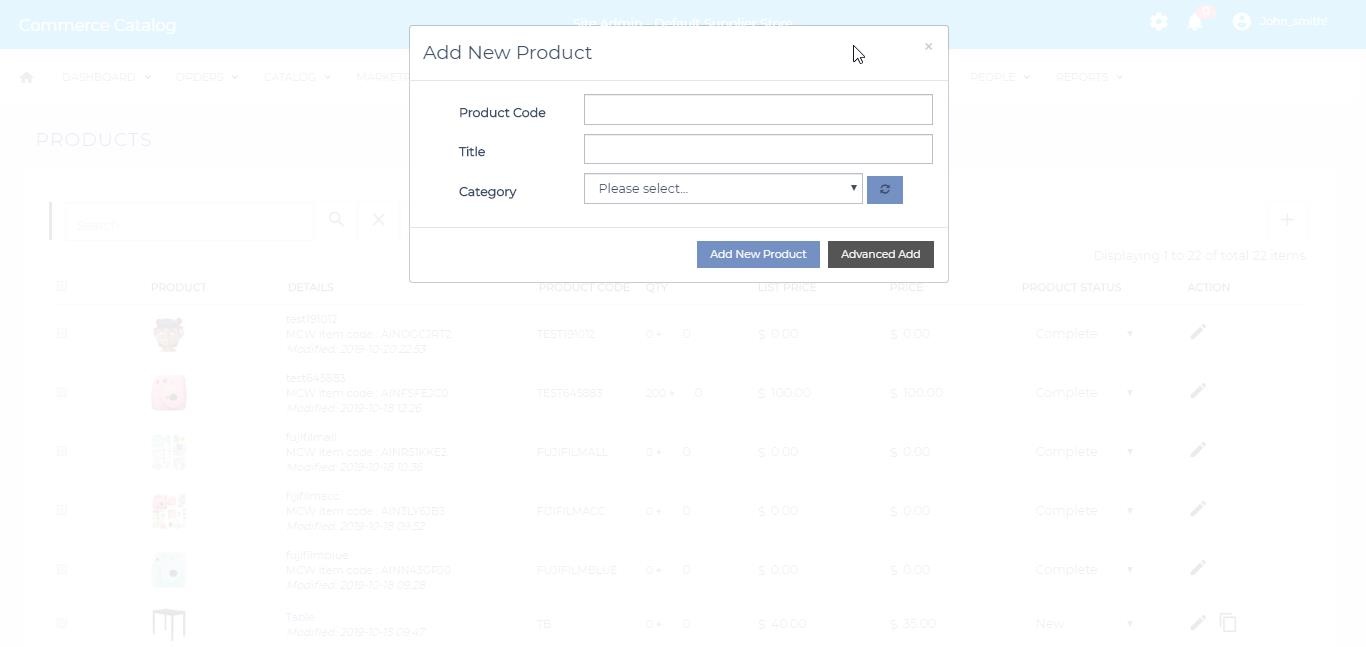
The ‘Add New Product’ pop-up window will contain the following fields:
| Fields | Description |
|---|---|
| Product Code | Used for admin and search purposes, this code is a unique identifier for the item. Enter the desired Product Code for the new product being created.The product code cannot contain special characters except for dashes (example: ABD-123) and it is limited to 50 characters.This field is required. |
| Title | The title of the item. The customer will see this title on the item’s page, the basket and in the store catalog.This field is required. |
| Category | The category to which the item belongs. The category drop-down will contain all of the categories previously created. This is a required field.For details on Categories, please refer to the Categories document under the Catalog tab.Once the category is selected, a Sub Category selection may appear. This dropdown will contain subcategories of the parent category if any was created. *Note Sub Category can be left blank |
Steps to create a new product:
- Click Add Product button.
- Enter the details in the pop window that appears (Refer table 3).
- Select the category from the drop-down, which will contain all of the categories previously created. For details on Categories, please refer to the Categories document under the Catalog tab.
- Select Sub Category selection that may appear. This drop-down will contain sub categories of the parent category if any was created. Sub Category can be left blank
- Click the Add Product button to add the new product. A page similar to the simple edit page will appear, Refer Simple Edit option section of the document for details.
- Enter the details and Click Ok to save it.
Editing a Product #
There are 2 different types of item edit pages, the Simple Edit and the Advanced Edit page.
Note : It is also possible to switch between Simple and Advanced editing by clicking on the ‘Simple Edit Product’ or ‘Advanced Edit Product’ links respectively beside the Product Code in the first section of the page.
Simple Edit #
The Simple Edit page is displayed by default after adding a new product or by clicking the edit icon for the specific product. All the core settings necessary to set up an item can be found within the simple edit option.
Follow the steps below to Edit a product:
- Go to Catalog > Products
- Go to an item with a status other than ‘Complete’ and click on the Edit icon
on Manage Products page
- Modify the product’s information and enter the details (Refer table 4).
- Click the ‘Save’ button to save the changes. The page will refresh and if all the changes are valid, a pop-up will be displayed with the following message “SAVED Successfully!”.
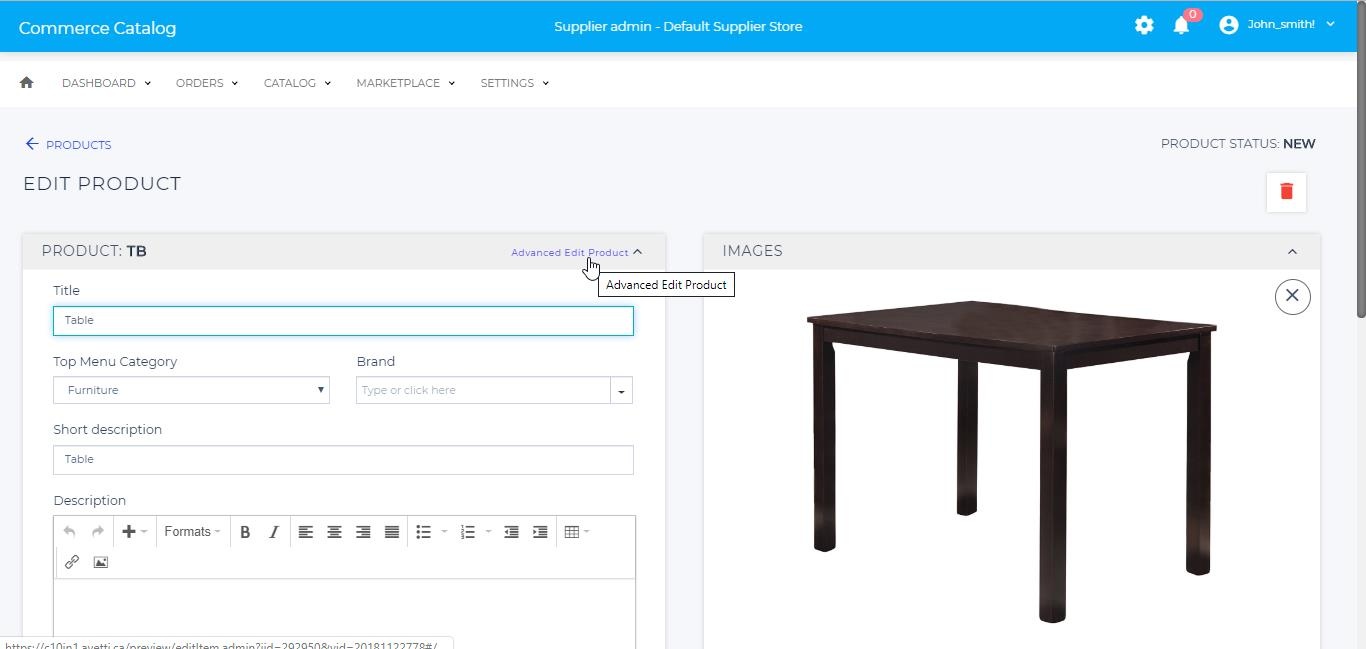
The ‘Simple Edit’ admin page consists of the following sections:
Product Details
| Fields | Description |
|---|---|
| Title | The item title can be entered/modified here. This is a required field with a maximum of 45 characters. |
| Top menu Category | The main category for the product is specified here. The drop-down menu will show all the available categories previously created.Every product is required to have a top menu category. |
| Brand | This field is not required and its what we call a Multi-Valued Property. When a new brand is created here, a new value is added to the multi-valued properties and they can be used as filters on the front-end.Choose a brand name previously created or create a new brand name. Only one brand name can be added. |
| Short Description | The short description will appear on the Products details page on the front-end, therefore, the shopper will be able to see it.The short description has a limit of 255 characters. File |
| Description | The description will be displayed on the item page underneath the title. You can enter a descriptive text for the product and add format to it using the HTML rich text editor. Which is very useful to make the description bold, italic, aligned to the left, show as a bullet or numbered list, etc. |
Pricing and Inventory
| Fields | Description |
|---|---|
| List Price | The original price of the product or current recommended retail price. Normally used for marketing purposes.Setting up a List Price will display on the Product Detail page of the front-end the list price and the actual price, stating the % discount the customer gets on the current offered price.The List Price is a required field and it must be a positive number. |
| Price | The actual price of the product in the store. The price cannot be higher than the List Price and it will be displayed beside or under the List Price on the Product Detail page on the front-end.The Price is a required field and it must be a positive number. |
| In Stock (Shop) | The In-Stock (Shop) quantity is the inventory that has already been supplied to the Marketplace (after setting the product to Complete status).The inventory qty can be modified here after the product has been supplied, however, it’s most frequently used to set the first in-stock quantity when the product is created. |
| Product Code | Read-only field, displaying the product code. It can not be changed and it’s used as an informative field. |
| Barcode (ISBN, UPC, GTIN) | A secondary code commonly used if the product is sold in different stores. This code can be shared by other suppliers and can be used to identify the same product sold by different suppliers.This is an optional field with a maximum of 255 characters. |
| Product Weight | In this field, you can enter the weight of the item and select the measuring unit as pounds or kilograms.Item weight may or may not affect shipping rates. It depends on the shipping rates setting that are being used in the store.For more details on Shipping Rates, please refer to the Shipping Rates document under the Settings tab.This is an optional field and the weight must be a positive number. |
Sale Pricing
Note : This section is only used to apply a specific price to a product in a limited period of time. Entering information on these fields will create a new nondefault price record on the product and the price will change on the front-end when specified.
| Fields | Description |
|---|---|
| Sale Price | The price of the product after it has been reduced for the sale.Setting up a Price here, will change the product price for a specific period of time on the Product Detail page of the front-end.The Sale Price is an optional field and it must be a positive number. If should only be defined when the product is on Sale. |
| Start Date | This will be the initial date that the product will be on sale. Only numbers are accepted on this field and the date can be selected by clicking on the down arrow. The date picker tool will be opened for the supplier to choose the start date. |
| End Date | This will be the final date that the product will be on sale. Only numbers are accepted on this field and the date can be selected by clicking on the down arrow. The date picker tool will be opened for the supplier to choose the end date. |
Settings
| Fields | Description |
|---|---|
| Taxable | The drop-down menu will have all the available taxable options previously configured on the Tax Rates admin page. Select this option if the product is taxable or not (the taxable option is set to Yes by default).For more details on Taxes, please refer to the Taxes document under the Settings tab. |
| Shipping Group | The Shipping Rate Group is a set of Shopping Providers that the item can be shipped from.The drop-down menu will have all the available Shipping Groups options previously configured. Each product in the store is associated with a Shipping Rate Group. It’s important to select a particular shipping group for the product because this will affect the shipping calculation when a product is orders.The Default Group is whatever shipping provider was set as default.Shipping providers are set under Settings | Shipping Rates. For more details on shipping providers, please refer to the Shipping Rates document under the Settings tab. |
| Product Type | Specify whether the item is a physical shippable item or a virtual downloadable item or service.There is one main difference between downloadable and shippable items:The tax will be calculated for the billing address if the item is downloadable.If the item is shippable, the tax is calculated for the shipping address. |
Images
| Fields | Description |
|---|---|
| Images | Upload here the main image of the product that the shopper sees when browsing for products, as well as in the item and basket pages.To add an image, click on the ‘Browse Files’ button in this section. The Navigation panel will be opened to select the main image.The permitted formats are only .jpg and .jpeg and the image name should not contain special characters with the exception of dashed and underscore.Once the image file was selected, click open to upload the image. The product image should be displayed in this section right after the image is uploaded correctly. |
Additional Images
| Fields | Description |
|---|---|
| Additional Images | A product can have multiple images. By adding additional images, an image carousel will be generated on the item page displaying the thumbnails of the additional images.The process to add additional images is the same as on the main image. Click on the box underneath Additional images title where the ‘Upload Image’ text is and select the desired images files.Multiple files can be selected here at once. After the images are selected, click open to upload the images.When the images are correctly uploaded, the following pop-up message will be displayed: “Product Images Uploaded”The images on this section can be removed, reordered and more images can be uploaded.There is no need to save the page after the images are uploaded. |
Categorization
| Fields | Description |
|---|---|
| Collection | Create or add to a collection of items that can be selected or searched |
| Category | Add other categories where the product belongs other than the Top Category |
| Tag | Add descriptive tags that help find the product |
Note: All the fields in this section can be left blank but are used to enhance the searchability of products. They can also be commonly used as a Facet on a category page and they are known as Multi-Valued Properties.When a new option is created on any of these fields, a new value is added to the multi-valued properties and they can be used as filters on the front-end.
Availability
| Fields | Description |
|---|---|
| Product Status | The Product Status defines the condition the product is in, this helps organize each product according to its states. Products can have different states which will determine the visibility of products on preview and shop instances. This can be modified on the Items States Settings admin page.Currently, the following statuses are used on the supplier store:New : When the product is created, the New status is added by default if no other status is defined. The product with this status can be seen only in the Preview instance and only on the supplier store.Properties Imported : The status of the product can change to Properties imported when the supplier is certain all the product properties have been added to the specific product. This status will not change anything on other instances and the products with this status will only be seen on Preview.Prices Imported: Similar to Properties imported status, the supplier should change the status of the product to Price Imported, when all the prices of the product have been correctly added.Images Uploaded: This status can be used when the item’s images have been uploaded and approved by the supplier to show on the Marketplace. However, this status will not change or send updates to the Marketplace.In Progress: The product is currently being worked. This status can be used to differentiate between new items but not quite complete.Errors Found : Use this status code to automatically flag an item if there are errors such as missing titles, descriptions, page titles, images or prices set to 0. It is recommended that each item is validated at least once before setting it to Complete.Complete : This status code is the most important one and it can be used when the item’s data (such as the descriptions and options) have been approved by the supplier. When the product is set to Complete, the product information such as price, inventory, images, description, SEO URL, variations, among others, will be supplied and sent to the MCW. Only after the product is set to Complete on the supplier store, it will be available on the MCW so then the MCW could send it to the Marketplace store.Remove : Check.Hide : This status is used to display this item on the Preview store, but do not display it on the Live store.As mentioned before the names and visibility of these states can change. To learn more about the Product States and how to modify them refer to the manual. |
| Available | Check this box to make the item available in the store. If unchecked, accessing the item page will display a “Product not found” message. |
Note:
- Brand, Collection, Category and Tag can all be left blank but are used to enhance search-ability of said product. Brand, for instance, is commonly used as a Facet in a category page.
- Variations are created when a product is available in different versions. For example Size or Col
- For more in depth setting for price and inventory, use the corresponding sections under the Catalog tab in the admin page. For details on pricing and inventory, please refer to the corresponding documents under the Settings tab.
Advanced Edit #
The advanced edit option provides several extra options to set up a product. In order to access the Advanced Edit page, from the Manage Items page, click on the Product Title or on the Advanced Edit Product link located on the items page.
The following page will be displayed:

Advanced Edit admin page includes different tabs to help the supplier add and modify the product’s detailed information easily and efficiently:
| Tab | Description |
|---|---|
| Product Data | Add/Edit the products general information such as descriptions, settings, prices, SEO settings, availability, dimensions |
| Images | Add/Edit the products images, two sections will be displayed: Main Image and Additional Images-On a Supplier store:Only two sections will be displayed: Main Image and Additional Images-On a MCW store:Three sections will be displayed: Main Image, Additional Images, and Additional Images Settings. |
| Variations | Add/Edit variations of the product. Variations are created when the same product is available in different versions. For example Size or Color options. |
| Content Blocks | Add/Edit content blocks for the product. Content Areas or Blocks will allow you to control and personalized the Items Description page within your store. The content area can be set for a limited period of time in case of sale banners. |
| Videos | Add/Edit videos for the products. Videos are a great way to showcase the product in a more dynamic way. The shopper would be able to see the video of the product usually on the image carousel on the Item Description page.Note: In order for the video to show on the Item Description page additional template changes might be needed. |
| Properties | Attach/Detach item properties. Item Properties are used to define the special features of the items. For example, the author of a book, the URL of the product’s website, product’s brand, UPC code, among others. |
| Multi-Valued Properties | Attach/Detach multi-valued properties. Multi-Valued Properties are used when a property has multiple values and those values can be shared with multiple products. They are usually used for facets. |
| Tags | Attach/Detach product’s tags. Tags can be used to enhance the search-ability of the product. They are usually used for facets. |
| Inventory | Add inventory qty to the product. |
Product Data tab #
Product Section
The Product section on the Advanced Edit admin page consists of the following fields:
| Fields | Description |
|---|---|
| Title | The item title can be modified here, usually in English. This is a required field with a maximum of 45 characters. Characters “\\”, “?”,”=” are not allowed in this field |
| Title (Different Language) | This field might not be displayed on your supplier store. If there are different languages fields shown in this section, they were previously configured under Settings | Languages admin page.Enter the product name or title of the product for the respective language, this will be shown on the Product Details page on the front-end when the language changes accordingly. |
| Short Description | The short description will appear on the Products details page on the front-end, therefore, the shopper will be able to see it.The short description has a limit of 250 characters. |
| Top Menu Category | The main category for the product is specified here. The dropdown menu will show all the available categories previously created.Every product is required to have a top menu category. |
| Category | This field is a Multi-Valued Property. Choose a category name previously created or create a new category name. Only one can be added. |
| Brand | This field is a Multi-Valued Property. Choose a brand previously created or create a new brand name. Only one can be added. |
| Collection | This field is a Multi-Valued Property. Choose a collection previously created or create a new collection. Only one can be added. |
| Tag | This field is a Multi-Valued Property. Choose a tag previously created or create a new tag name. Only one can be added.The tags can be placed on the corners of an item’s thumbnail on home/category pages. |
| Barcode (ISBN, UPC, GTIN) | A secondary code commonly used if the product is sold in different stores. This code can be shared by other suppliers and can be used to identify the same product sold by different suppliers.This is an optional field with a maximum of 255 characters. |
| Product Weight | In this field, you can enter the weight of the item and select the measuring unit as pounds or kilograms.Item weight may or may not affect shipping rates. It depends on the shipping rates setting that are being used in the store.For more details on Shipping Rates, please refer to the Shipping Rates document under the Settings tab.This is an optional field and the weight must be a positive number. |
| Home Featured | Enabling the Home Featured for the product will make that product appear on the homepage of the store.In order for the products to be shown in the respective section, it must be: a) highlighted, and b) added to the respective category page. In the store, this process is automated, so when the item is checked as Home Featured, it will show up in the Featured section of the homepage without any additional changes. |
| Category Featured | Category Featured items will appear in the featured items section on that item’s category. |
| New | Products highlighted as New will appear in the new items section on the home page.*Note: Templates changes are needed to support each type of Highlight item. |
Settings
The Settings tab on the Advanced Edit admin page consists of the following fields:
| Fields | Description |
|---|---|
| Product Type | Specify whether the item is a physical shippable item or a virtual downloadable item or service.There is one main difference between downloadable and shippable items:The tax will be calculated for the billing address if the item is downloadable.If the item is shippable, the tax is calculated for the shipping address. |
| Shipping Group | The Shipping Rate Group is a set of Shopping Providers that the item can be shipped from.The dropdown menu will have all the available Shipping Groups options previously configured. Each product in the store is associated with a Shipping Rate Group. It’s important to select a particular shipping group for the product because this will affect the shipping calculation when a product is orders.The Default Group is whatever shipping provider was set as default.Shipping providers are set under Settings | Shipping Rates. For more details on shipping providers, please refer to the Shipping Rates document under the Settings tab. |
| Taxable | The dropdown menu will have all the available taxable options previously configured on the Tax Rates admin page. Select this option if the product is taxable or not (the taxable option is set to Yes by default).For more details on Taxes, please refer to the Taxes document under the Settings tab. |
| Display Using Template | The template this product’s page will be based upon. The dropdown will display all available item templates. By default, itemtemplate.vm is the template used for the item page.To modify the itemtemplate.vm template or other templates click on the ‘Edit’ link on this page or go to go to Template > Manage Templates. |
| Hide Item from Search Results | The item will not show up as a result of a relevant search on the front-end even if the proper Item Code is given. |
| Package Price Enabled | Set this feature to enabled if the price of this item already includes packaging charges. |
| Customization Product Code | |
| Featured Product Category Link Text | |
| Availability Date | |
| Forecast Availability | |
| Preorder Product | |
| Hide Item from Search Results | The item will not show up as a result of a relevant search on the front-end even if the proper Item Code is given. |
| Package Price Enabled | Set this feature to enabled if the price of this item already includes packaging charges. |
Descriptions
The Descriptions tab on the Advanced Edit admin page consists of the following fields:
| Fields | Description |
|---|---|
| Descriptions 1, 2, 3, and 4. | The descriptions are used to add more detailed information to the product, each description will appear on the Item Description page on the front-end depending on how each template is laid out.A description could be used, for example, as a language description or as a description of the product’s image.The itemtemplate.vm can be modified to show the descriptions on different sections of the Item Description page. |
Price
The Price tab on the Advanced Edit admin page consists of the following fields:
SEO Settings
The SEO Settings tab on the Advanced Edit admin page consists of the following fields:
| Elements | Description |
|---|---|
| SEO Headline | Enter a brief description of the item which will be used by search engines to rank the site. The same will appear for other languages also. |
| Short Description | The short description of the item. |
| Short Description (language) | Same thing as the short description but in a different language. This field might not be displayed on your store. |
| Page Title | Enter the title of the page which will be displayed in the tab browser. This title is shown on the customer’s tab. The best page title to use is often simply the name of the item itself. The same will appear for other languages also. |
| SEO URL | This text is used in the URL for this item page |
| SEO/Page Title/Meta Desc/Keywords Locked | If this is checked, the above SEO URL will remain unchanged even if an auto-generated request is made. If it is unchecked, whatever value is in the SEO URL field will be replaced by the auto-generated value. |
| Edit Multilingual Content for other languages | These buttons are used to edit the descriptions and titles in the other languages.To add a language, go to the bottom of the Advanced | Site Admin Preferences page. |
| Meta Description | This is a 100-word description of the item used by search engines to rank and describe the page for the item. The same will appear for other languages also. |
| Meta Description (language) | Same thing as meta description but in a different language |
| Meta Keywords | This is a short list of keywords for the item that may be used by some search engines to rank the site. |
| Meta Keywords (language) | Same thing as meta keywords but in a different language |
Images
The Images tab on the Advanced Edit admin page consists of the following fields:
| Elements | Description |
|---|---|
| Images | Upload here the main image of the product that the shopper sees when browsing for products, as well as in the item and basket pages.To add an image, click on the ‘Browse Files’ button in this section. The Navigation panel will be opened to select the main image.The permitted formats are only .jpg and .jpeg and the image name should not contain special characters with the exception of dashed and underscore.Once the image file is selected, click open to upload the image. The product image should be displayed in this section right after the image is uploaded correctly. |
Availability
The Availability tab on the Advanced Edit admin page consists of the following fields:
| Elements | Description |
|---|---|
| Product Status | Is the state of the product. For more information check workflow state under the simple edit section of this page. |
| Available | Check this box to make the item available in the store.If unchecked, the product will not be available for sale on the store and the item page will displays the “Product not found” message. |
| Start Date | The initial date that the product will appear in the store. |
| End Date | The date the product will be removed from the store. |
Promotions
The Promotions tab on the Advanced Edit admin page consists of the following fields:
| Fields | Description |
|---|---|
| Discount Level | Specify if the item has a discount and what discount group it is part of.Discounts are created in the Marketing | Customer Discount page. |
Dimensions
The Dimensions tab on the Advanced Edit admin page consists of the following fields:
| Fields | Description |
|---|---|
| Length | The physical length of the item used for shipping purposes. Length should be a positive number and cannot contain more than 9 digits. |
| Width | The physical width of the item used for shipping purposes. The width should be a positive number and cannot contain more than 9 digits. |
| Height | The physical height of the item used for shipping purposes. Height should be a positive number and cannot contain more than 9 digits. |
| Units | Dropdown menu to choose the measurement units of the products. |
Steps to edit products information from Advanced Search < Products
- Go to the Catalog > Products
- Go to an item with a status other than ‘Complete’ and click on the Title link, located on the Details column on Manage Products table
- Advanced edit/Products admin page will open on the same window. Modify the product’s information and enter the details (Refer table 5).
- Click on the Save button to save the changes. The page will be refreshed and the changes will be saved.
Images #
Note : As mention before, different modes of the Images admin page will be displayed depending on the type of store:
Mode 1. On a Supplier store:
Only two sections will be displayed: Main Image and Additional Images
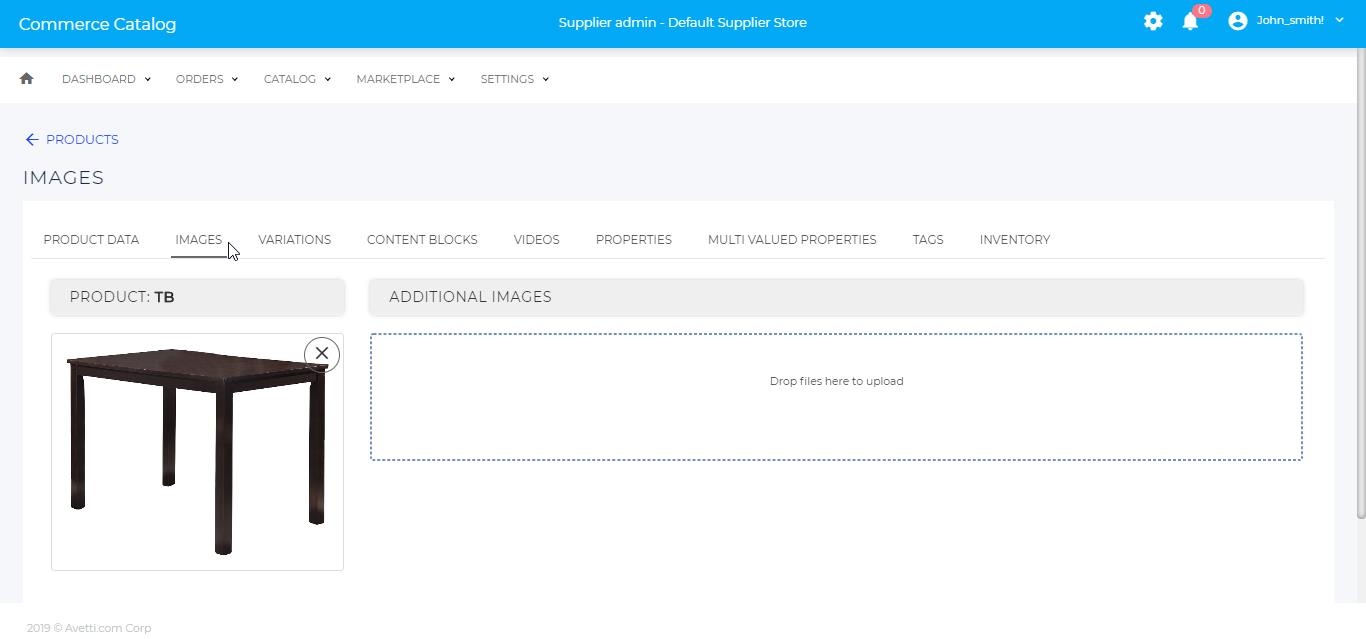
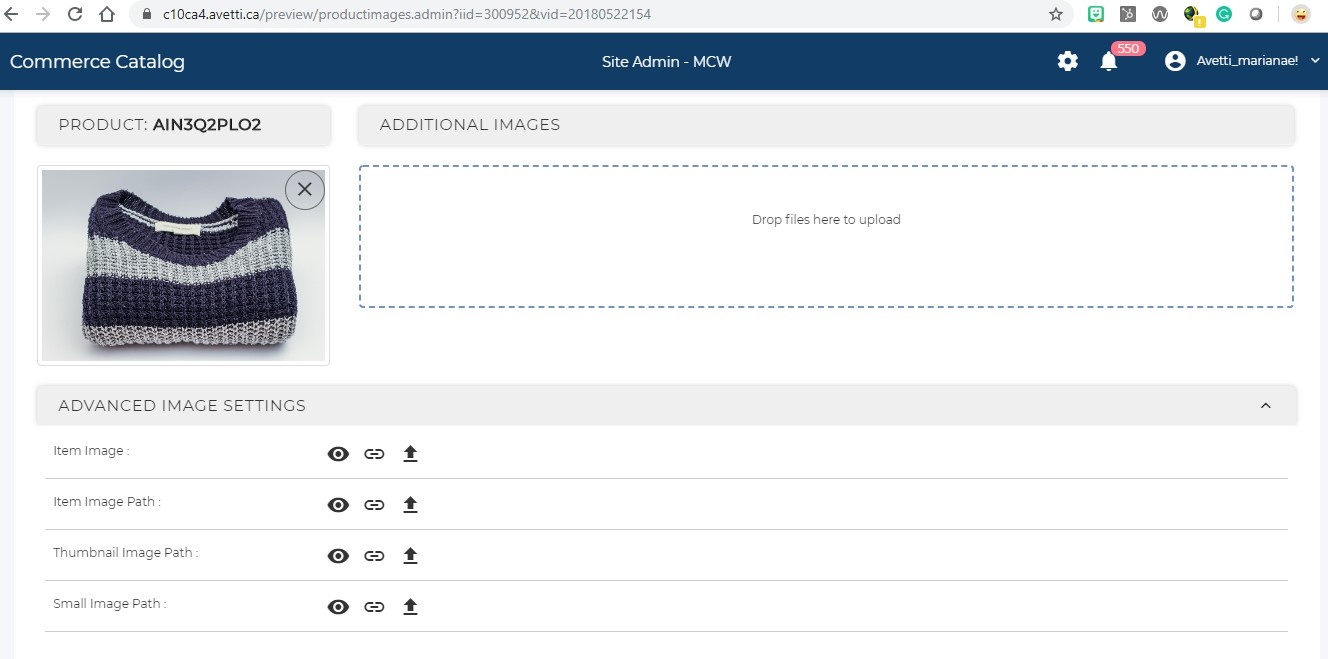
The following sections will be displayed respectively:
Variations #
Variations are created for products that are available in different versions. For example Size or Color options.
Variations can be used to allow a customer to customize their item. Upon changing details, the page will be updated with the item of the customer’s choice.
Example: The store may offer a shirt that comes in different sizes (XS, S, M, L, XL). These sizes are Variations, and they can be configured in many different ways.
There are three ways of attaching variations:
- Going to the Catalog > Variations admin page
- Using spreadsheets which is really useful when attaching a great qty of products.
- Using this Variations admin page from the Advanced edit page.
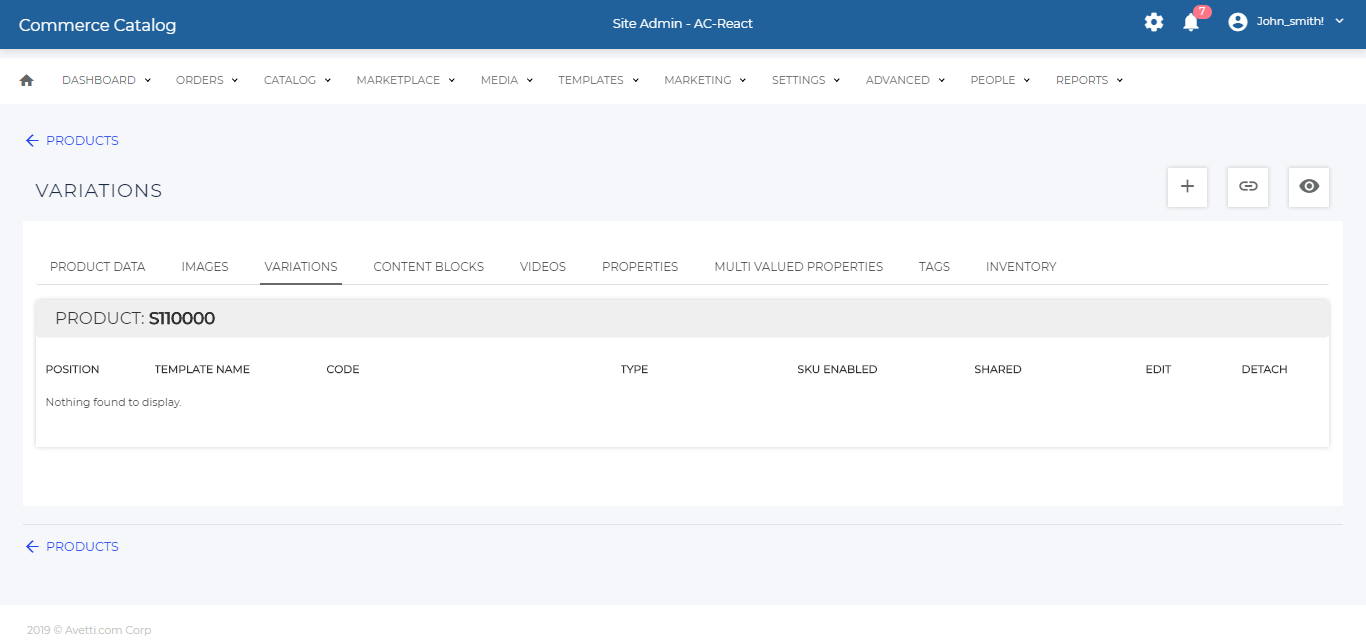
The following elements will be found on the Variations admin page:
| Fields | Description |
|---|---|
| Variations table | The table will show the details of the variations attached to products and will allow us to Edit the actual variation and detached if required.HeadingDescriptionPositionThe position of the variation lists top-bottom displayed on the product’s item page.Example: For a t-shirt to have lists of sizes and colors, the position allows the ability to pick which one is displayed and selected first.Clicking on the position header will sort the variations by position. This is useful when many variations are used on the product.NameThis will be the name of the variation, most common names are Size and Color, but this can be specified by the supplier when creating the variations.This is the name the shopper will see on the Items Description page on the front-end.CodeThe Variation code is the unique identifier for the variations, it’s useful when multiple variations have the same name but are used for different products.TypeThe variation type will be displayed on this column. There are four different types of variations: list, text, multi-select and multi-qty input. The various types will be explained in the next row.SKU EnabledOnly the List variation type can be SKU enabled. This means that the parent product requires a unique child item for each of the different variations combinations available. It allows each child item or SKU to have different prices, inventory, images, and titles.Items that are not SKU-enabled will instead have a suffix added to the Item Code.SharedThis column is here to let us know if this variation is already shared with other products.EditIt allows the ability to edit the actual variation and variation options.DetachThis option will remove the variation from the product.NOTE: If the variation is detached from the parent item, the child products will also be detached from the parent. |
| Add button | Use this button to create new variations. There are four types of variations.List: Great for selecting one option from a preconfigured list. Use this Product Option type for options like size or color.Text: Useful for allowing the customer to personalize their item to greater detail. An example item that may use this is a sweater that allows the customer to enter their name on the item or a ring that they can engrave a name or phrase into.Multi-Select: Creating this variation will allow the shopper to choose multiple variations at the same time (for example: choose multiple sizes of the same product)Multi Qty Input: When creating this variation, a checkbox will display before each variation option. This variation includes a feature called “Min Selected Qty” when enabled, the shopper needs to select at least that number of checkboxes.Note: Additional .js and .vm modifications might be needed for the last two options.After clicking on the Add button you will be able to select which type of variation to create, specific sections to fill out will be displayed depending on the type of variation. |
| Attach button | Use this button to attach previously created variations.After clicking on this button, the Link/Copy Variation section will be displayed showing all the available variations.When a variation is attached to the item, it will be moved to the product variations table. When the variation is detached, it will be moved back to the Link variation table. |
| View | The View button will open the products attached variation table, showing the variations options and the child products. |
General steps to attach variations #
There are a few steps to follow to successfully attach a parent and child products to variations.
- Create new variations
- Attach the variation to the parent product
- Attach the variation to the child product
- Go to the parent product and attach the variation option to the child product
- If the child product is not previously created, create the child product from the ‘Attach Variation’ pop-up
- View the attached SKUs.
Create new variations #
There are four ways of creating new variations
- Add a new variation from Catalog > Variations admin page
- Add a new variation from Catalog > Products Advanced Edit > Variations admin page
- Add a list variation
- Add a text variation
- Add a multi-select variation
- Add a multi qty input variation
- Copy an existing variation from Catalog > Products Advanced Edit > Variations admin page
- Use the Variations spreadsheet to create many variations at the same time
Add a new Variation – List #
As mentioned before, the list variations are used when there are different options of the same product. These options can have different prices, titles, descriptions, etc.
- Creating a List variation will allow us to have a pre-configured list of options for that particular variation.
- For each different option and combinations, we would need to have a unique child item called SKU. This will allow each child item or SKU to have different prices, inventory, images, and titles.
By clicking Add List button the following fields will be displayed:
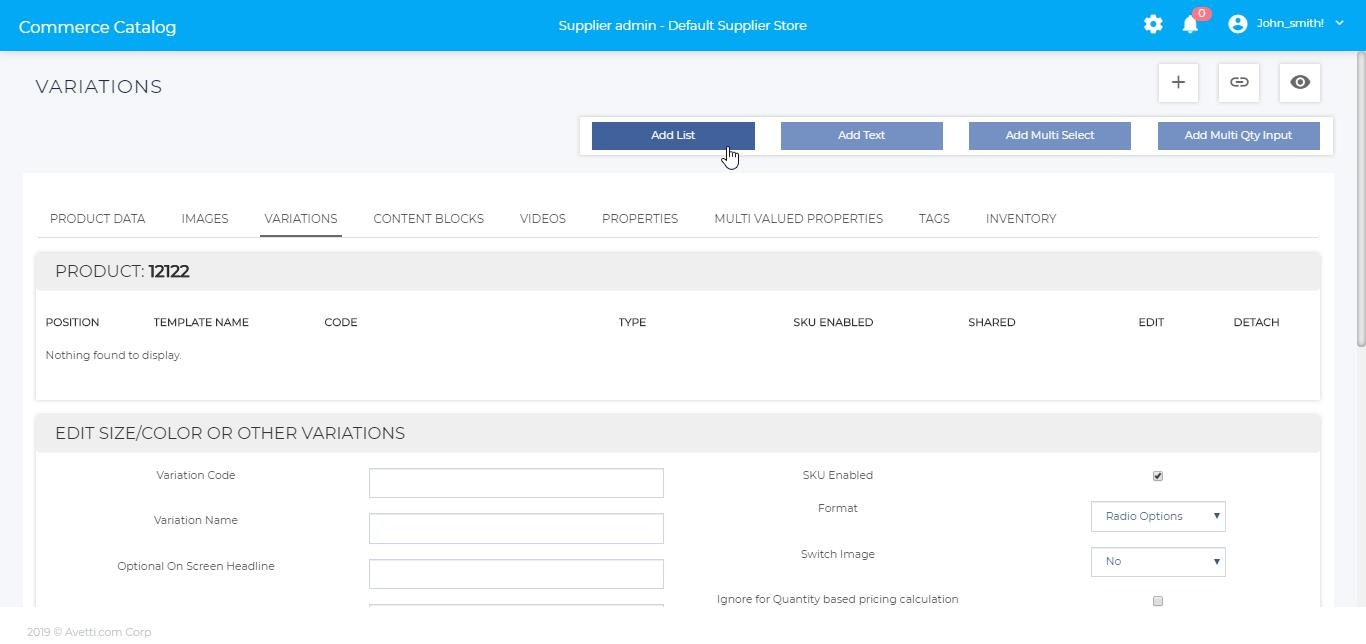
To open the EDIT SIZE/COLOR OR OTHER VARIATION section, from the Advanced Edit > Variations tab, click on ‘Add’ > Click on the ‘Add List’ button.
The section will open under the Variations table, displaying the following fields:
| Fields | Description |
|---|---|
| Variation Code | This is a unique code that the supplier needs to specified for the new Variation. This is used for admin purposes. |
| Variation Name | This is a brief description of the variation, such as “Color”. This is the title/description that the customer will see on the Shopping Cart after they have made their selection. |
| Optional On Screen Headline | This is the title/description that the customer sees on the basket page after they have made their selection. |
| Optional Descriptive On-screen Text | This is the title/description that the customer sees when they select the option on the product’s details page on the front-end. |
| Track Inventory | When the customer chooses an option, text will appear displaying the number of units available with that variation. This will only function as long as there is an existing Inventory for the item and Hide Available Inventory from Shopper is unchecked (refer to the Inventory guide).Note: Template changes are required to display in-store. |
| SKU Enabled | This is a unique feature for the List variation. Only the List variation type can be SKU enabled.This means that the parent product requires a unique child item for each of the different variations combinations available. It allows each child item or SKU to have different prices, inventory, images, and titles.If this feature is unchecked, instead of resolving to a SKU, the item will simply add a suffix to the Item Code depending on what Item Options are selected. The SKU is configured in the parent item. |
| Format | Select the format for which the variation will appear. Such as; Radio buttons, Drop-down list, colors (displays the color of the product).Radio buttons show the customer all of the options at once, but it can take up a large amount of space the more options are added.Dropdown Lists are better for items with several Product Options because only one option is shown at a time and the shopper has the ability to choose from any option on the dropdown menu.On the other hand, the Color format will display a box with a specific color on the Item Description page. |
| Switch Image | When this feature is enabled, the image of each SKU will change accordingly. |
| Ignore for Minimum Order quantity calculation | Ignore for Minimum Order quantity calculation: If an item is set to have a minimum order quantity (shopper can’t add to cart fewer items than the specified amount), checking Ignore for Minimum Order quantity calculation will not count different options as different products.For example: Suppose the store has a Shirt with Color and Size options. The parent is set to have a minimum order of 10 shirts. If we check “Ignore for Minimum Order quantity calculation” for all color options, then no matter what color the shopper selects, it will count towards the minimum quantity. So if the user selects 4 blue shirts, 3 green shirts and 3 red shirts, all of the SAME SIZE, then it passes the minimum quantity check. But if from these 10 shirts 9 are large and 1 is medium, then it won’t pass the check because the size option is not set to ignore quantity for the child items. |
| Ignore for Quantity based pricing calculation | Consider the same example used to Ignore for Minimum Order quantity calculation. For quantity based pricing, if the price break starts at, for example, quantity 10 (as a setup for all child items), the shopper gets a price break as soon as 10 shirts are added to the basket, no matter what colors were selected. |
| Position | The position will determine the display order of the variation option on the front-end. |
| Default | If the variation option is set as default, it will be the first option shown on the Item Description page on the front-end when viewing the product. |
| Text Shopper Sees | The text that will be displayed on the drop-down menu or radio button or color, displayed for each variation option on the Item Description page on the front-end when viewing the product. |
Add a new Variation – Text #
An example product that may use this is an engagement ring, with a text variation, a customer will be able to enter a name or date or a brief message. This information will be saved on the Order Properties in order for the supplier to view and apply to the product.
By clicking Add Text button the following fields will be displayed:
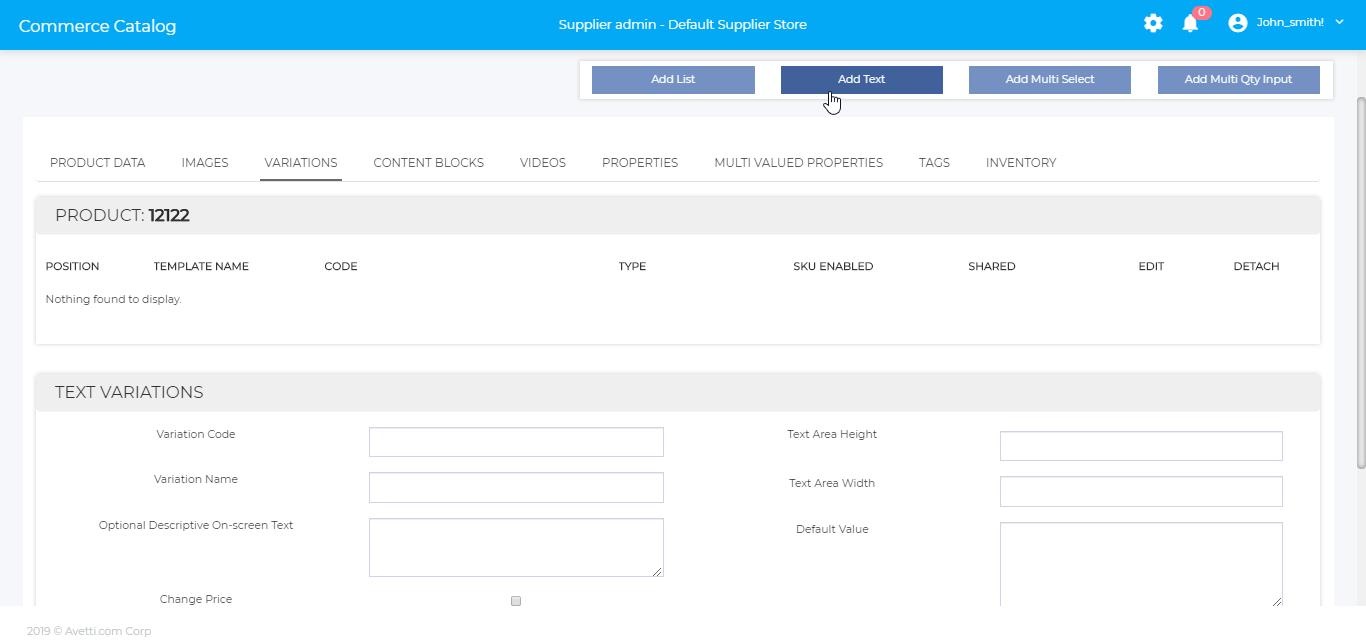
To open the TEXT VARIATION section, from the Advanced Edit > Variations tab, click on ‘Add’ > Click on the ‘Add Text’ button.
The section will open under the Variations table, displaying the following fields:
| Fields | Description |
|---|---|
| Variation Code | This is a unique code that the supplier needs to specified for the new Variation. This is used for admin purposes. |
| Variation Name | This is a brief description of the variation, such as “Selected Logo” or “Enter message”. This is the title/description that the customer will see on the Shopping Cart after they have made their selection. |
| Optional Descriptive On-screen Text | This is the title/description that the customer sees when they select the option on the product description page on the front-end. |
| Change Price | Change price is a text field that will allow the user to enter a value in their currency. The amount in this textbox will be added to the customer’s basket. Typically, this will be used for donations. When the customer checks out, the amount they added in this text field will be added to the price of the item. The value entered in by the customer is affected by discounts. If the customer enters a negative number, the value will still be taken in as a positive value. |
| Text Area Height & Text Area Width | This will determine the default size of the variation textbox that appears on the product description page. The customer can adjust the size of the textbox on their own |
| Default Value | The default text will appear in the variation text-box on the product description page.In most cases leave this blank because the customer has full control of what should be in there. |
Add a new Variation – Multi Select #
Creating this variation will allow the shopper to choose multiple variations at the same time (for example: choose multiple sizes of the same product)
By clicking Add Multi Select button the following fields will be displayed:
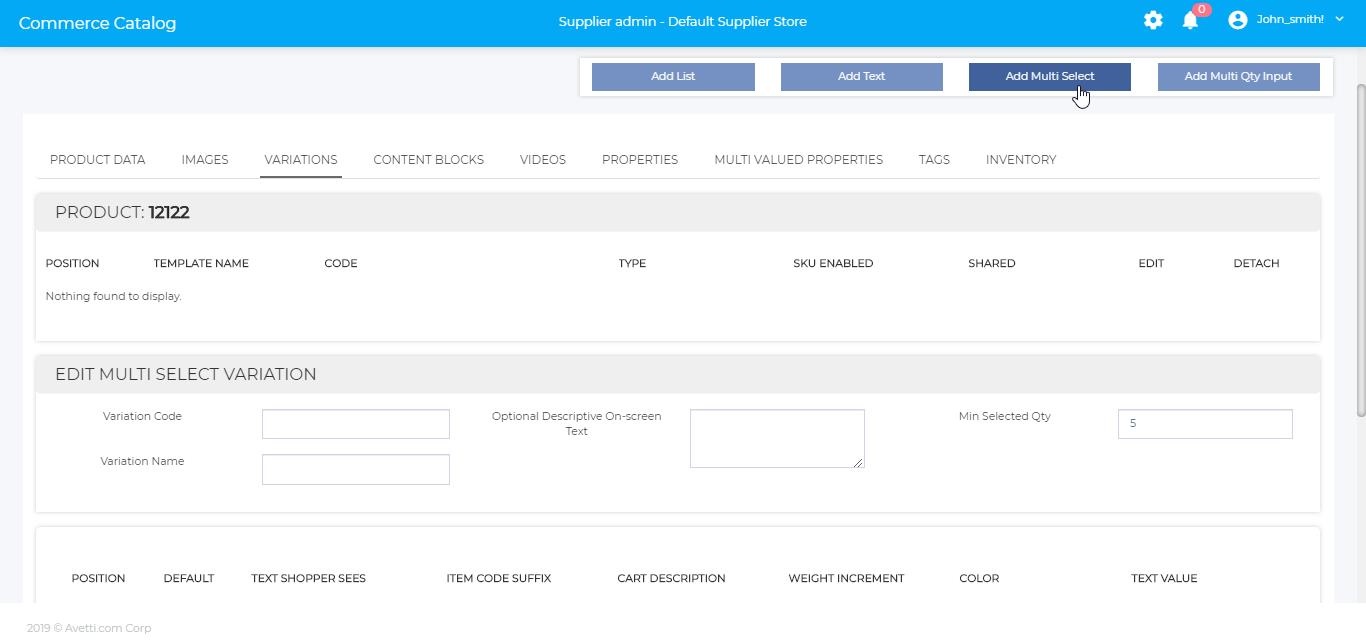
| Fields | Description |
|---|---|
| Variation Code | The unique identifier for the new Variation |
| Variation Name | Name of the Variation |
| Optional Descriptive On-screen Text | Text that describes the item option |
| Position | The position of the text/product in the Variation |
| Default | Which item/product is the selected default when first viewing the product |
| Text Shopper Sees | The text the drop-down,radio button or color use to display each Variation for the shopper. |
Note: Template changes might be needed for this variation to appear on the Product Detail Page – front-end
Add a new Variation – Multi Qty Input #
By clicking Add Multi Qty button the following fields will be displayed:
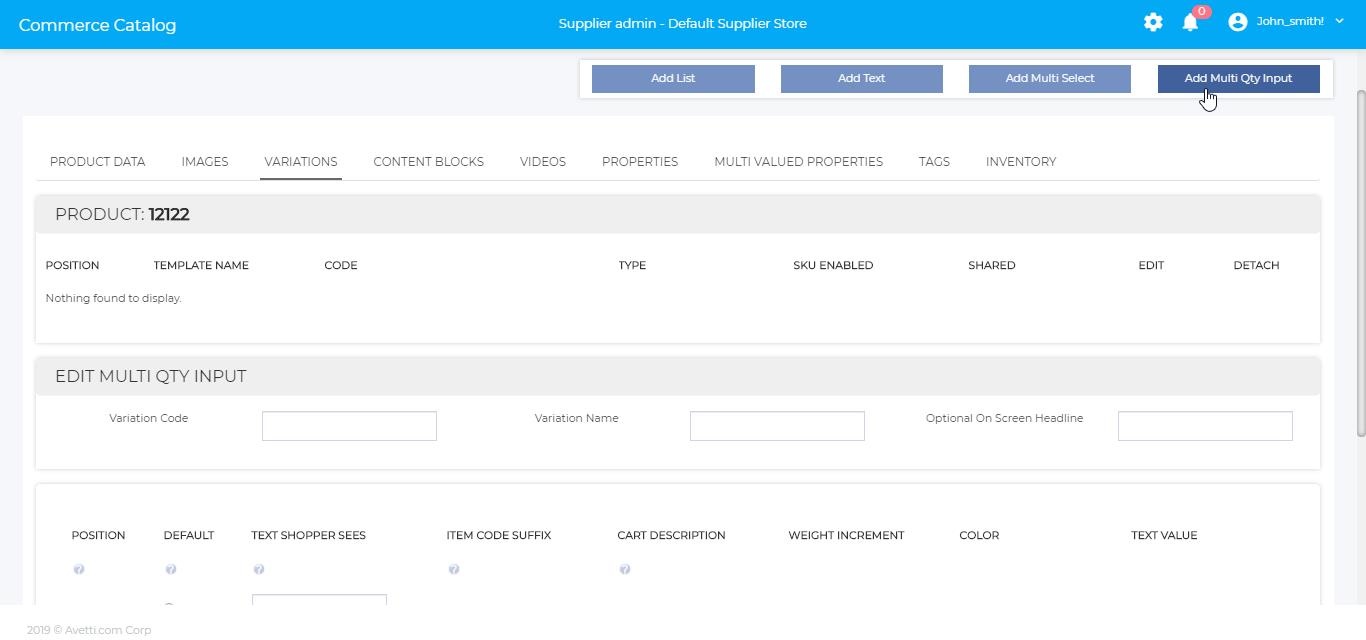
To open the VARIATION section, from the Advanced Edit > Variations tab, click on ‘Add’ > Click on the ‘Add Milti Qty Input’ button.
The section will open under the Variations table, displaying the following fields:
| Fields | Description |
|---|---|
| Variation Code | This is a unique code that the supplier needs to specified for the new Variation. This is used for admin purposes. |
| Variation Name | This is a brief description of the variation, such as “Size” or “Color”. This is the title/description that the customer will see on the Shopping Cart after they have made their selection. |
| Optional On-screen Headline | This is the title/description that the customer sees when they select the option on the product description page on the front-end. |
| Position | The position will determine the display order of the variation option on the front-end. |
| Default | If the variation option is set as default, it will be the first option shown on the Item Description page on the front-end when viewing the product. |
| Text Shopper Sees | The text that will be displayed on the drop-down menu or radio button or color, displayed for each variation option on the Item Description page on the front-end when viewing the product. |
Table 10 – Description of Fields under Add Multi Qty Input Page
Note : Template changes might be needed for this variation to appear on the Product Detail Page – front-end
Attach a Variation #
One of the first steps to successfully create a product with variations is to attach the variation to the parent and child products.
Prerequisites: The variation should be previously created.
To attach a variation for a parent or child product, follow these steps:
- From the supplier store, go to Catalog > Products > Advanced Edit > Click on the ‘Variations’ tab.
- The Variation admin page will open on the same window. Click on the Attach button.
- Two buttons will be displayed: “Attach Variation” and “Attach SKUs’, click on Attach Variation
- The ‘Link/Copy Variations’ section will be displayed showing all available variations. Check the checkbox beside the name of the variation. Many variations can be checked at the same time.
- Click the Link button found at the button of the page to attach the variations to the product.
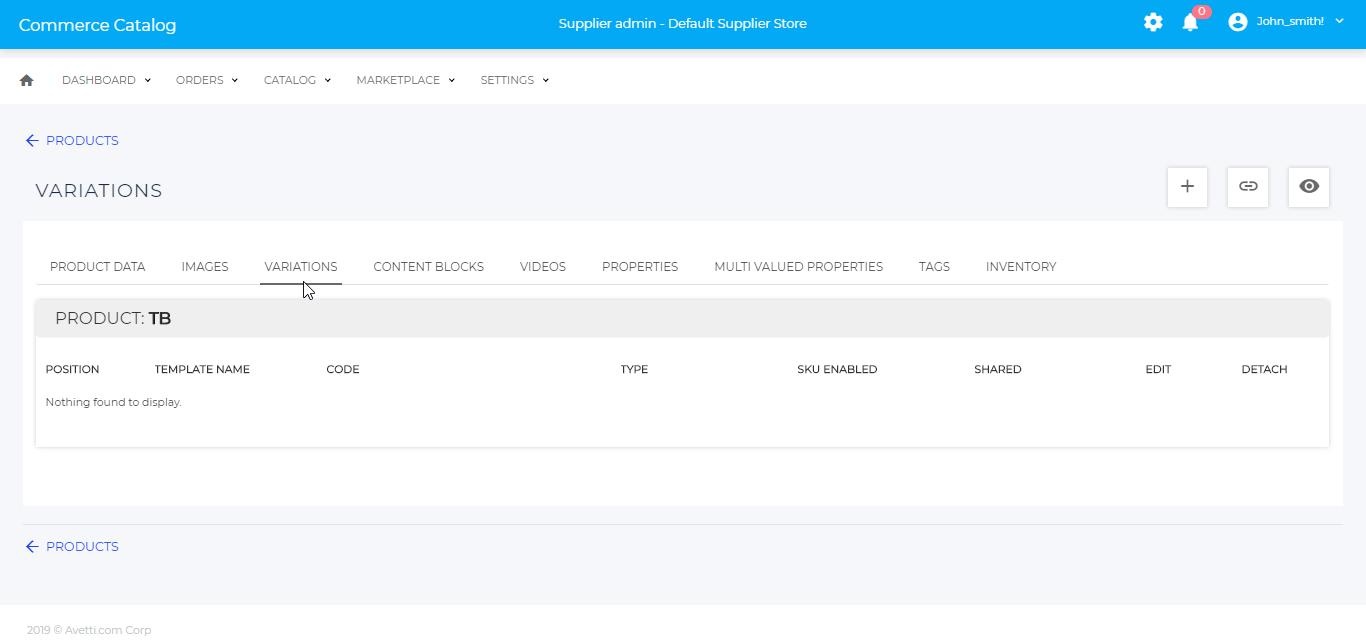
Note: In order to be able to attach a parent and a child product, both need to have the same variations linked.
Attach Variations Options or SKUs #
After attaching the variations to the parent and child product, the next step is to attach the variation options from the parent item to all child items.
Additional child items can be created from this page as well.
Attach a variation option to a child product previously created
- From the supplier store, go to Catalog > Products >Choose a parent item > Advanced Edit > Click on the ‘Variations’ tab.
- The Variation admin page will open on the same window. Click on the Attach button.
- Two buttons will be displayed: “Attach Variation” and “Attach SKUs’, click on Attach SKUs. Note: If the ‘Attach SKU’ button is not displayed, this means the product doesn’t have any variations attached yet.
- After clicking on Attach SKU, the ‘Create Sku items for product’ pop-up will be displayed on the same window
- Enter the required information and click on ‘Create SKU item’
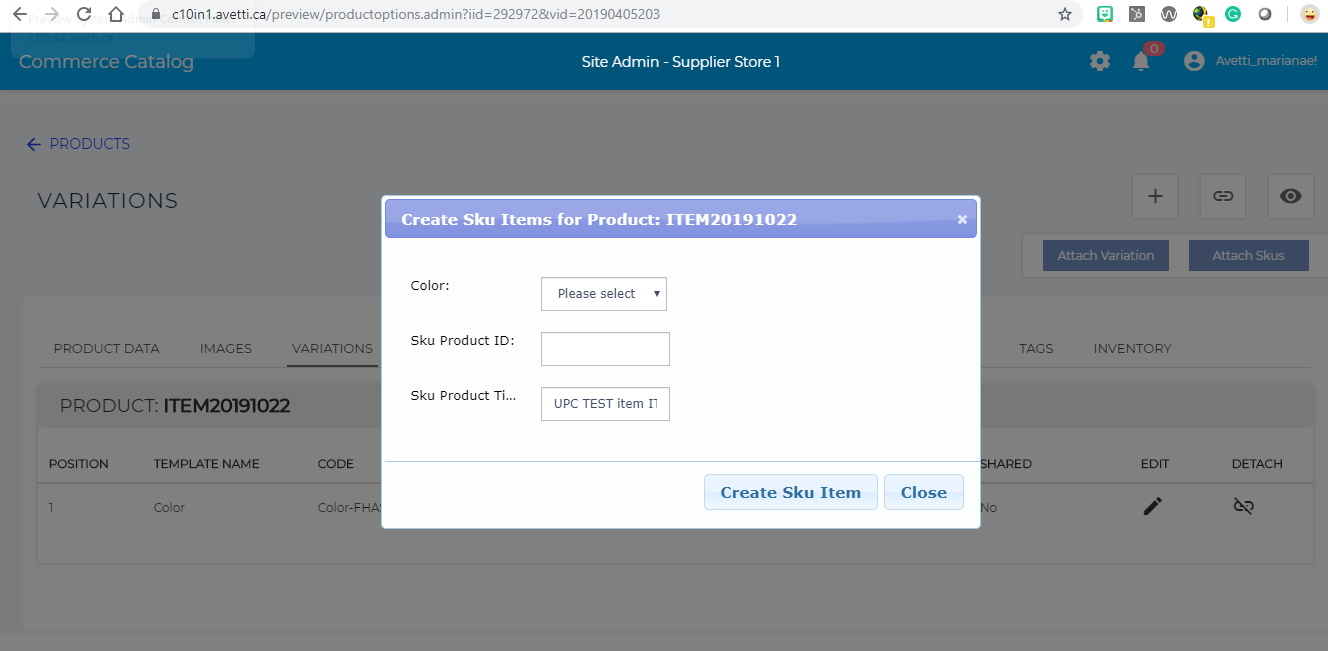
| Fields | Description |
|---|---|
| Variation (Color, Size) | Here you will see a dropdown menu for each variation attached to the parent item with all the different options set for the variation.It could be only one dropdown or many.Choose the variation option for the particular child product.The parent can have multiple child products, however, the child products cannot have repeated variations options. |
| SKU Product ID | Enter an existing child product code to link this child product to the parent product. |
| SKU Product Title | Enter the product title for the child product if different from the parent product. |
| Create SKU Item button | Click on the button to create the link between the parent and child products and to specify the variation option for the particular child. |
| Close | Click on this button to cancel the action and close the pop-up window. |
Attach a variation option to a new child product
It is possible to create a new child product from this page, this feature was created as a simpler way to create and attach the child product to a parent and a variation option if the item does not exist.
- From the supplier store, go to Catalog > Products > Choose a parent item > Advanced Edit > Click on the ‘Variations’ tab.
- The Variation admin page will open on the same window. Click on the Attach button.
- Two buttons will be displayed: “Attach Variation” and “Attach SKUs’, click on Attach SKUs.
- After clicking on Attach SKU, the ‘Create Sku items for product’ pop-up will be displayed on the same window.
- On the SKU Product ID field, enter a nonexisting product code.
- Specify the variation option for the new child product or SKU and specify the product title.
- Click on ‘Create SKU Item’
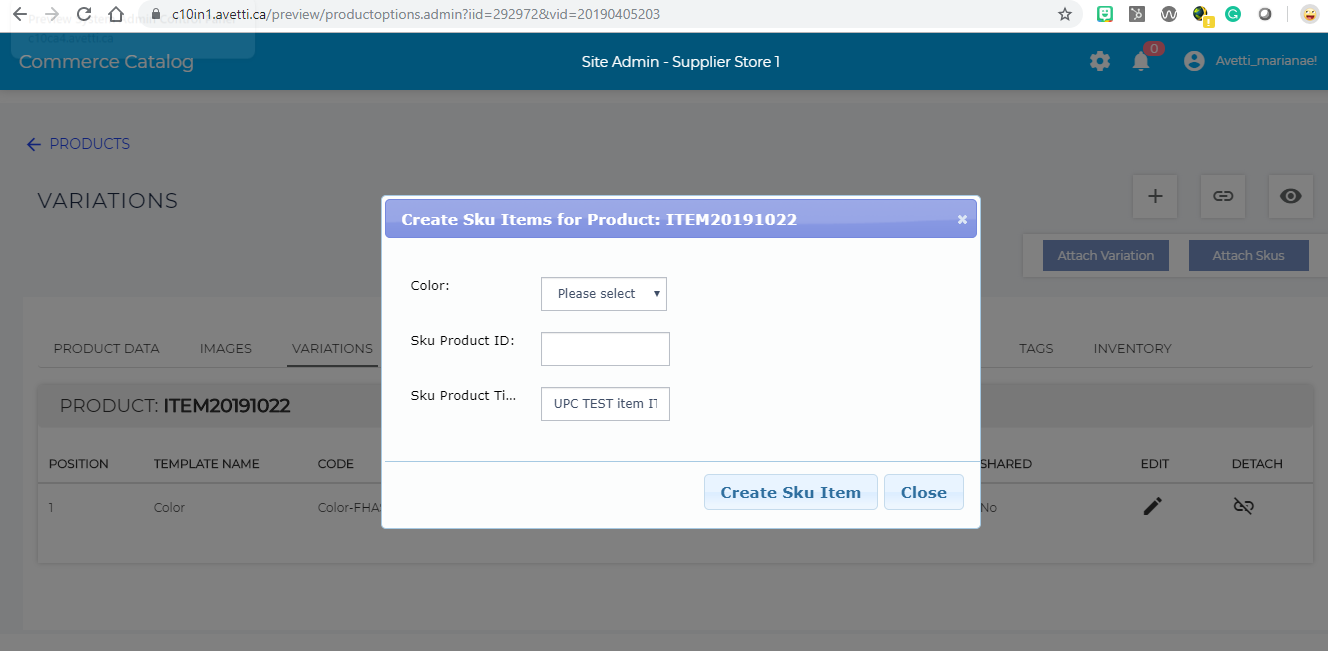
Note:
- The new child or SKU product will be a copy of the parent product
- The child product will be attached to the parent
- The child product will have the same variations as the parents
- The child product will be linked to the variation option specified on the pop-up.
View Variations #
The View button will open the products attached variation table, showing the variations options and the child products.
- When no products are attached or no variations are linked to the product, the table will be empty.
- When viewing this table as a parent, all the child items or SKU will be displayed on the table with the different combinations of the variations. The child items can be updated and remove from the parent.
- When viewing the table as a child item, the title of this section will display “PRODUCTS ATTACHED TO” and the parent item code. The item code is a link that when clicked the parent Advanced page will be opened on the same window. Only one row will be displayed on the table describing the child item variation.
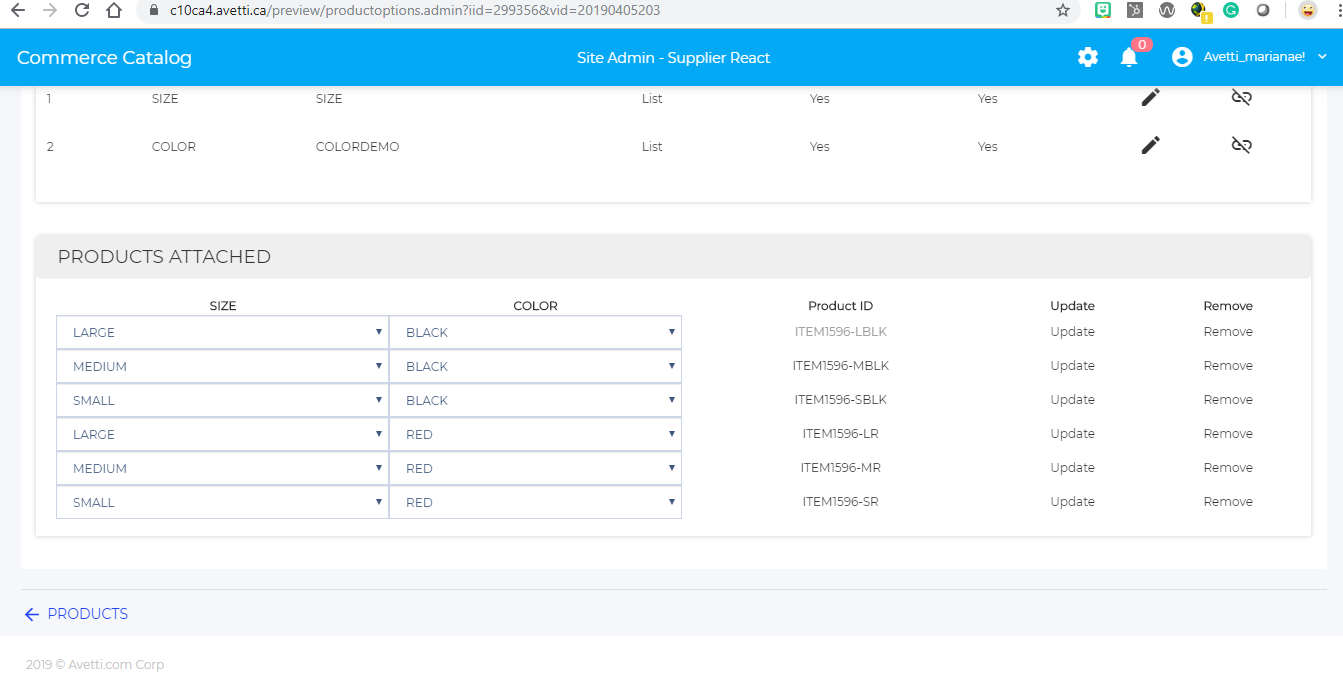
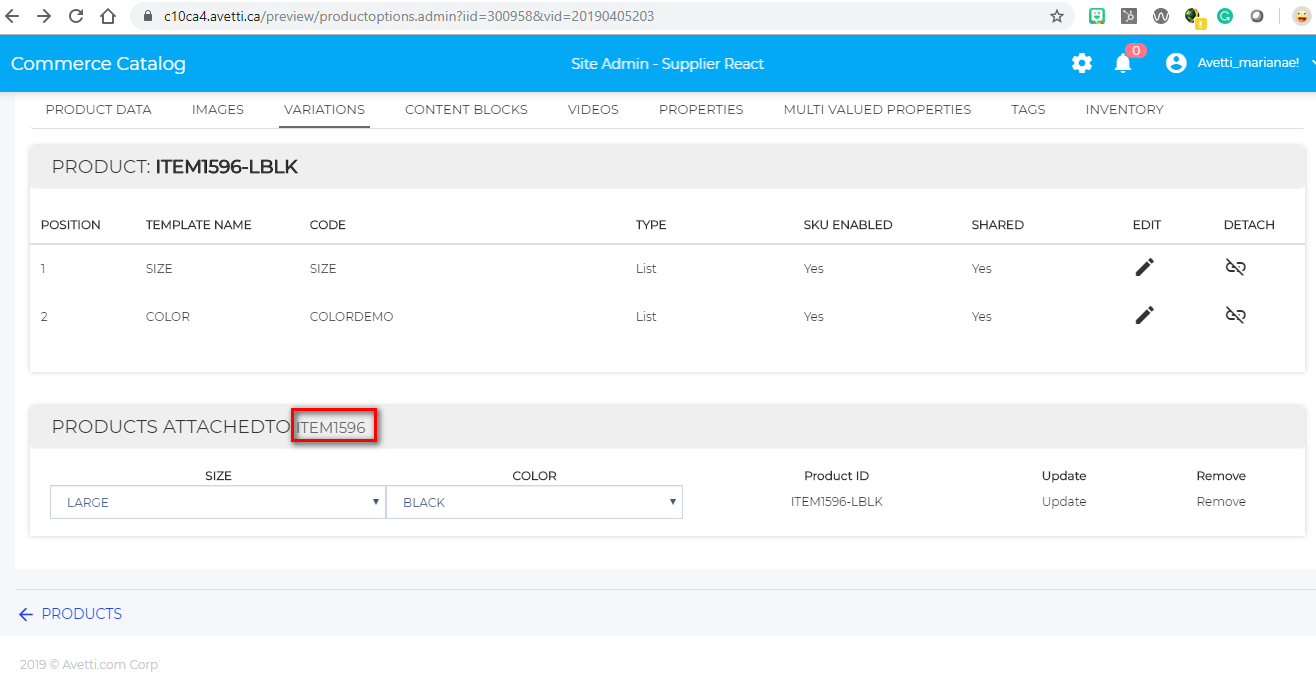
Table 8.2 – Image showing the Products attached table (child view)
Update and Remove SKUs
Update and Remove SKU
Update link: Use this link to modify the variation option for the particular child item. First, change the new option using the dropdown menu for each variation you would like to modify. Click on the Update link. The child product will have a different variation option.
Remove link: Click on the remove link to detach the child product from the variation option and from the parent product. The child product will still be attached to the same variation.
Content Blocks #
The Content Blocks feature will allow you to control and personalized determined web page within your store. This will apply for categories, item templates, and so on
Adding New Content Block
To get to the Content Blocks in Advanced Edit click the Content Blocks tab.
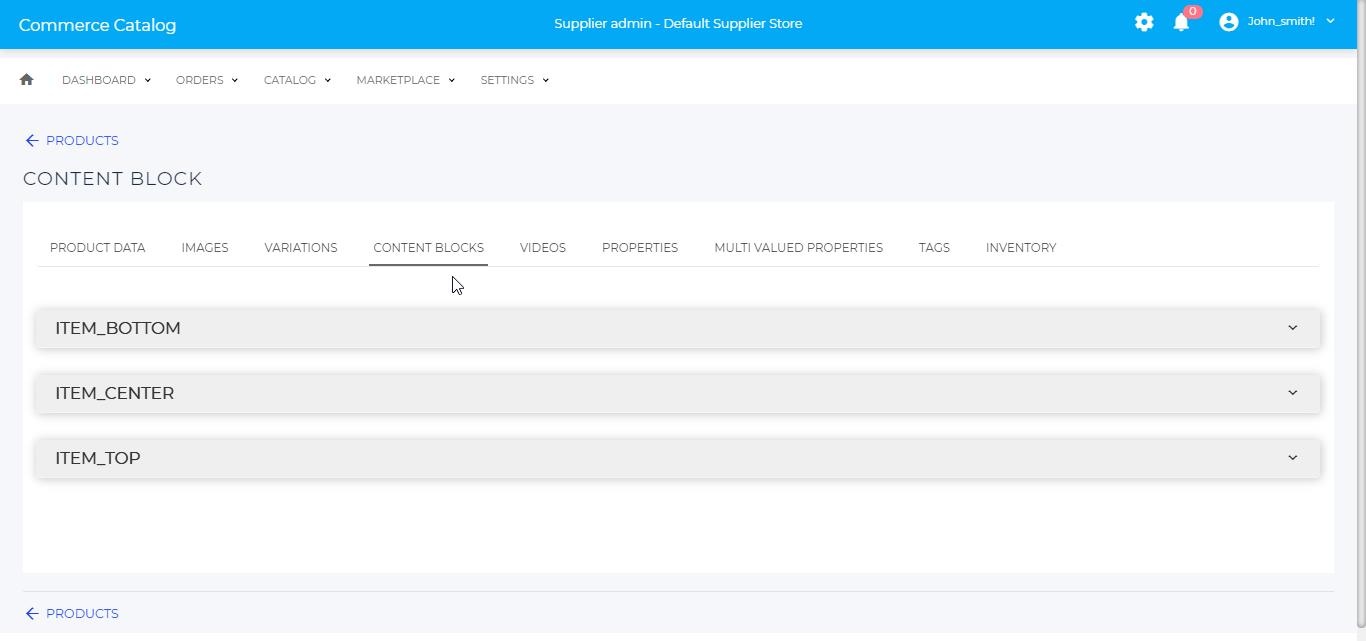
To add a new content area, go to the specific section: ITEM_TOP, ITEM_CENTER or ITEM_BOTTOM.
The following fields will be displayed:
| Fields | Description |
|---|---|
| Start Date | When the long description will appear |
| End Date | When it will inactive on the page |
| Active | When checked means the Content Block will be active on the product page |
| Priority | The priority means how the Content Block will be treated with other Content Blocks if the priority is higher, it will appear before other Content Blocks of the same category with less priority. |
| Select From Existing Name Content | Using a content group that was already created. |
| Group | Select the group used for the Content Block and its name. |
| From Group | Select what group is being copied |
| To Group | The name of the new group |
| Create New Content | Creating a new Content Block |
| Group | The name for the new Content Block and the new file name for that Content Block. |
| Content Skin/Language | The template where the Content Block is going off. |
| Use Rich Text Editor | Allows for normal text to be added to the description, removing the check will allow html code to be added to the long description. |
| Long Description | The text and or image being displayed on the page. |
Note: To have full access to adding Content Blocks you must make changes to the template to accept Content Block changes.
Videos #
To get to the Videos in Advanced Edit click the Videos tab.
- To add a video to the product click the Add button on the page. Once clicked this page will display:
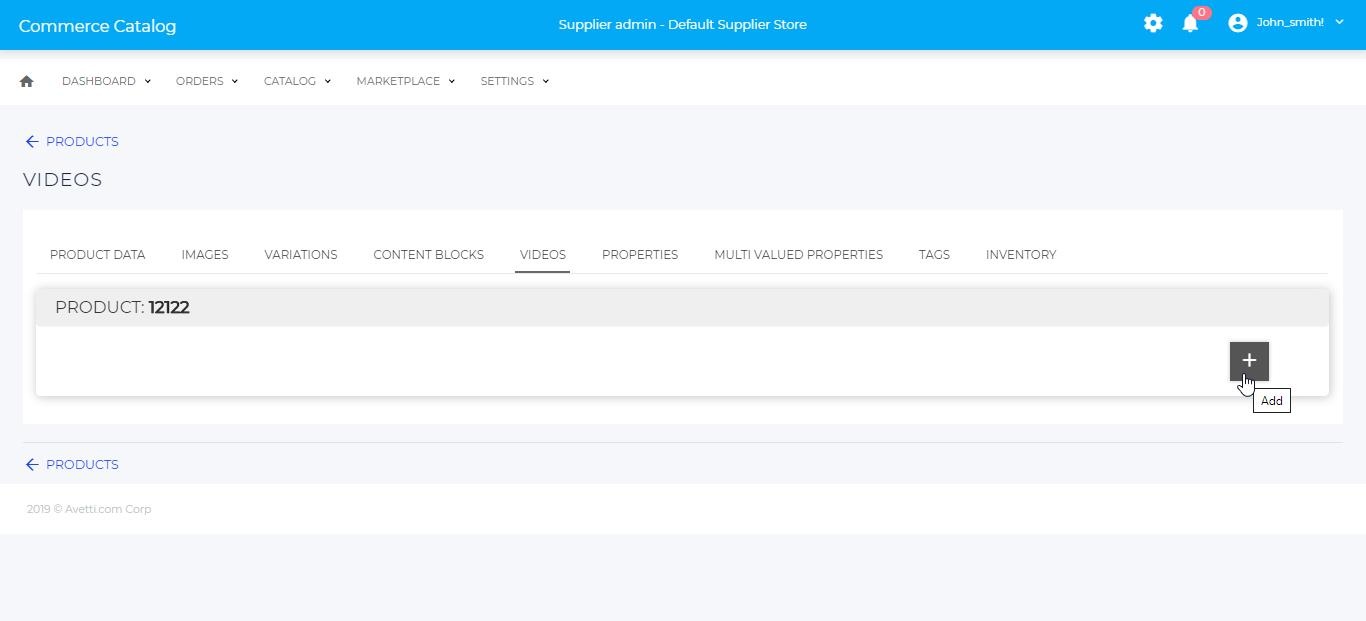
| Fields | Description |
|---|---|
| YouTube Video Link URL | YouTube link of the video |
| Title | The title that is giving to the video that is display for the product |
| Video Code | Unique identifier code for the video |
| Active | If the video is active or not (displaying the video or not displaying the video on the product page).Once the video is added, click the Add button to add the video to the product. |
Properties #
To get to the properties in Advanced Edit click the Properties tab.
If no default country has been selected the following will appear:
To remove this click the Click here link provided and once clicked the page will redirect to Manage Countries page there set the default country for the site. For more information on Manage Countries go to Settings | Shipping Countries.
If a default country has been set the following page will appear:
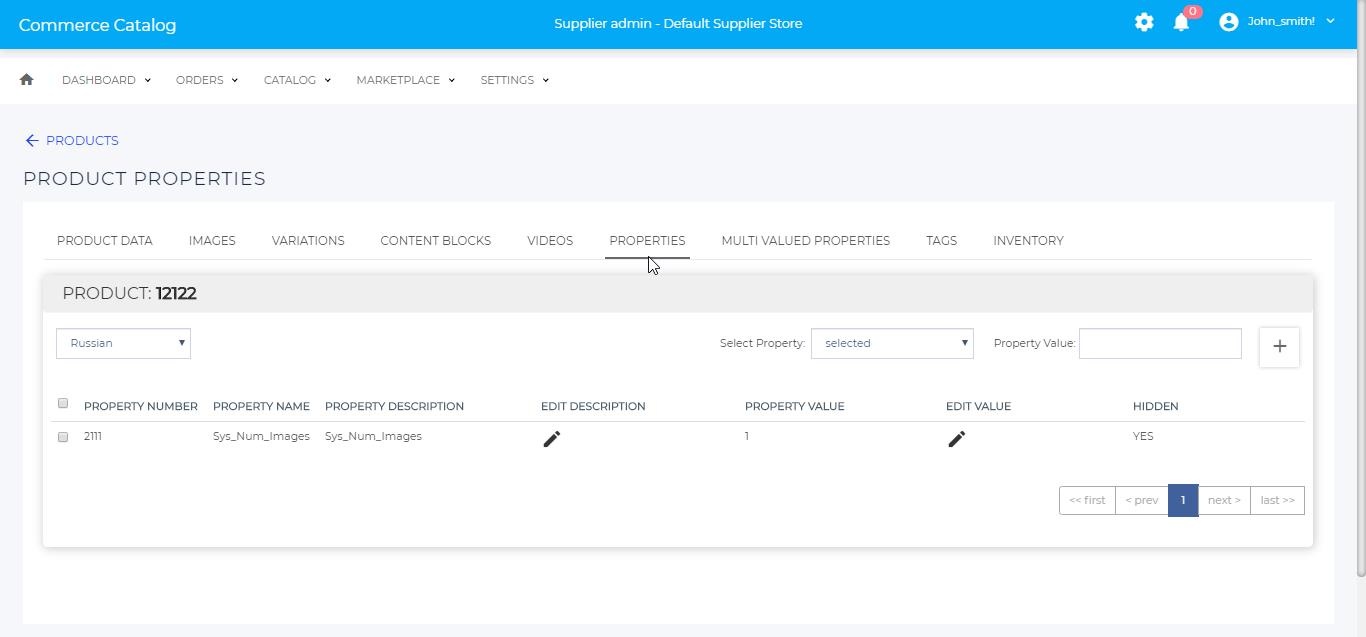
Properties displays the default properties attach to the product. To remove the properties select the property by checking the checkbox and click the Detach button. To add a new property select a property using the Select Property dropdown, once a property is selected, add a property value using the Property Value text field the property is used as the value that will display property value on the page where the property is created and if the property is not hidden, for information on property go to Settings | Item Properties. Once completed click the Attach button to add the property to the product, click the Save button to save changes made to the properties.
Multi Valued Properties #
To get to the mutli valued properties in Advanced Edit click the Multi Valued Properties tab.
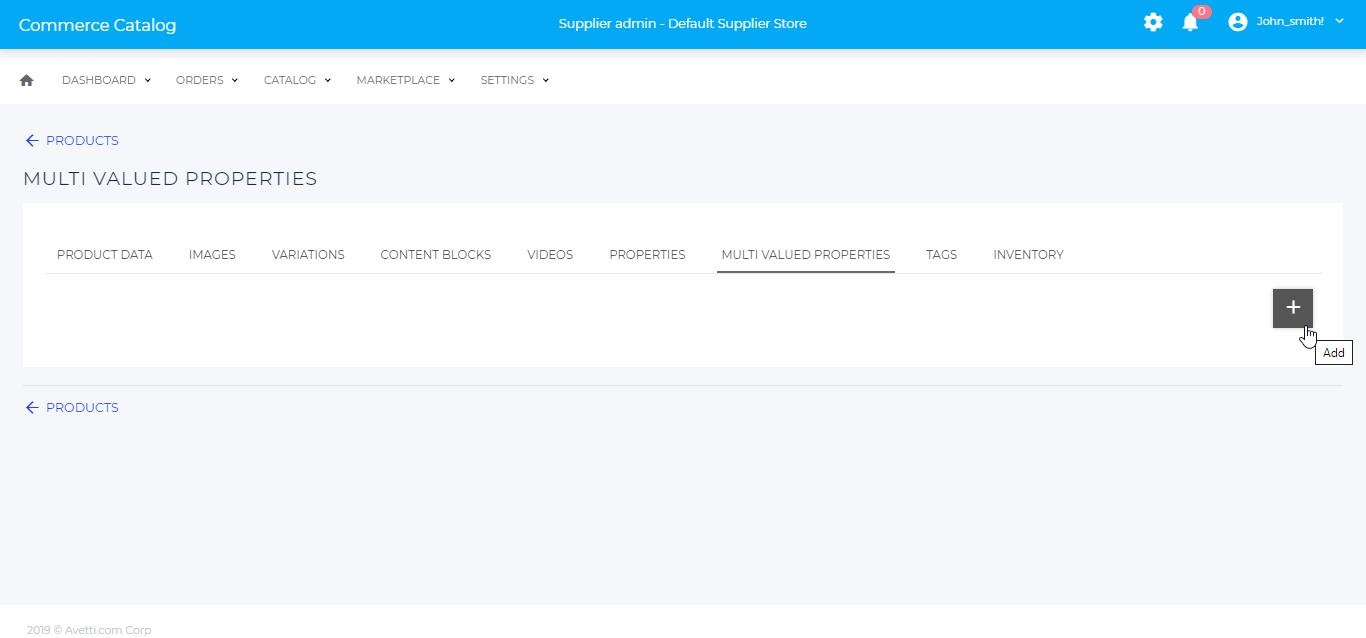
For information on Multi Valued Properties go to (Settings | Multi Valued Properties)
Inventory #
To get to the inventory in Advanced Edit click the Inventory tab.
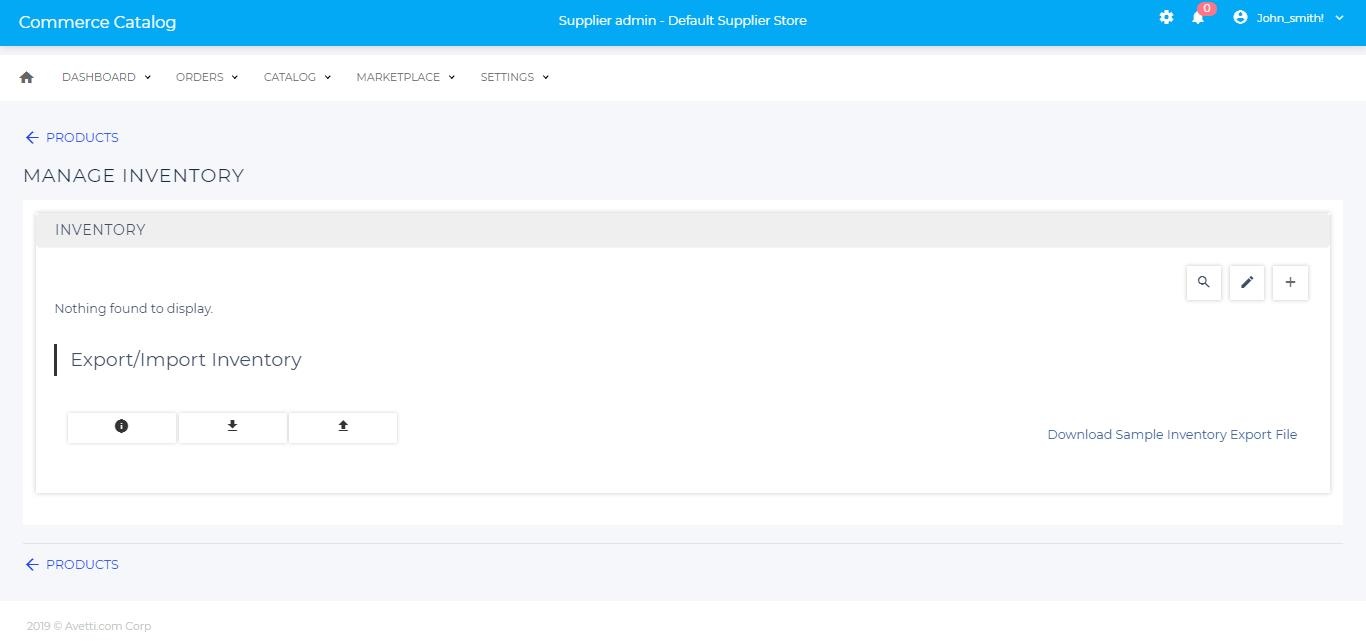
The inventory is used for the stock of the product.
- Click Add button to add another inventory.
- Click Edit link beside the product name to edit the inventory of the product.
- Enter the details (Refer table 12).
- Click Ok or Update to add or update the inventory to the product.
| Fields | Description |
|---|---|
| On Order | This value increments for each quantity of the item as an order is placed and this decrements the In Stock value. |
| Quantity In Stock | Specify the current quantity of the item the store has in stock. If the customer adds this item to their cart, the value in this field will decrease by the quantity added to the customer’s cart. The value will return to the original amount if the customer does not complete the order within 30 minutes. If the customer chooses “On order placed only”, the value in the Quantity in Stock field will only be decreased when the order has been completed |
| Arrival Date of Next Shipment of Additional Inventory | Set the date of the expected arrival for the next shipment containing this item |
| Distributor | Select the Distributor associated with this inventory record — only if distributors are set up on store |
| Default Delivery Option | Select the default delivery option for shipping to the customer. In most cases, it’s best to let the customer decide to let them find the best option for their needs, so leave it on Selected by Shopper. Ship Partial means that the store will ship the remaining stock of the item and automatically make another shipment to the customer when the rest of the customer’s order is in stock. Ship Complete means no shipment will be made until the entire order is in stock. Ship Partial/Complete is only available as a delivery option if the number of units the customer requires is greater than the Quantity in Stock value, but less than the Quantity in Next Shipment value. |
| Minimum Re-order Quantity | If the Quantity in Stock value is below the value in this field, this item will appear in the Inventory Reorder Report so that you are alerted to get more stock in this item. This will help ensure the product doesn’t run out of stock for an item. On the Orders | Email page |
| Owned by Customer | If the product is supplied by other stores, check this checkbox |
| Discontinued | If the item is discontinued and there is not enough stock to fill the order, the customer will receive a message stating that the item is no longer available |
| Minimum Order Quantity | Enter the minimum number of units that the customer must order to qualify to purchase this item. The ability to set a maximum number of units that the customer can purchase in a single order by specifying a negative number is also available. The default value of 0 disables this feature |
| Quantity in Next Shipment | Enter the expected quantity of the units for the item coming in the next shipment |
| Drop Ship Delivery Days | Enter the estimated number of days it will take for the product to be drop shipped to the customer. |
| Customer Code | Enter the customer code, name, or location of the client if the Owned by Customer is checked |
| Pick Pack Days | Enter the average number of days it takes to pack the item from the warehouse and ship it. |
| Minimum Drop Ship Quantity | Drop Shipping means that the item will be shipped from the supplier directly to the customer. Enter the minimum number of units that the customer must order to qualify for drop shipping. |
| Hide Available Inventory from Shopper | Check this checkbox to hide the current inventory of the item from the customer. If left unchecked, the customer will see a message such as “Available: 5” when adding the item to their basket |
| In Stock Buffer Qty | Available stock equals Quantity in Stock minus In Stock Buffer quantity. For example, if Quantity in Stock is 5 and In Stock Buffer quantity is 3, actual available stock is 2. This concept has been introduced because merchants often come across situations where physical stock becomes 0 for low inventory levels. |
| Enable Must Deliver By Date Prompt on Basket | Allows the customer to specify a “Must Have By” receive date for the item |
Delete A Product #
- Check the checkbox, once checked the area around the checkbox will turn red meaning that that product is selected.
- Click Delete button to delete the products. Products cannot be recovered once deleted.
Searching For A Product #
From the Manage Items page, displayed on the page is a Search button, click on that button for the following to appear:
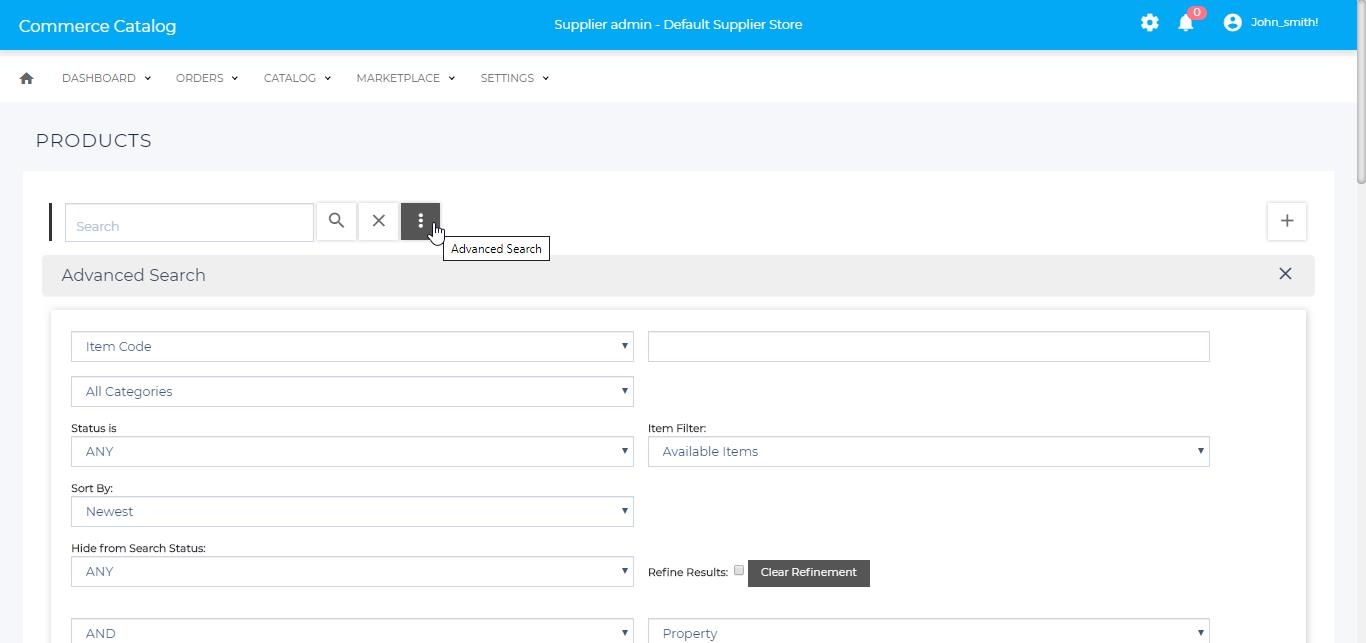
- Use the search box or click
to open the advanced search page.
- There are many different ways to search for a product. Note all search methods don’t have to be used at the same time, use as many as needed to refine the search to find selected products (Refer table 13).
- Click Clear button to clear the search.
| Criteria | Description |
|---|---|
| Product Code | The unique identifier for the product allows to specific products containing the item code |
| Product ID | Search the product by it’s ID found in the link URL of the product. |
| Title | The title of the product, any product containing that title in their name. |
| Price | Search for the specific price of the item, either for sale change or any change for that certain price. |
| All Categories | Search results to contain products of the specified category |
| Status | Allows the ability to search for products within the certain status. Example: Live & Preview |
| Product Filter | Allows the products to be searched by available, available meaning if the products is being displayed on any store or not, helpful if you want certain products to appear or not appear on any store. |
| Sort By | Keeps all products but sorts them by the selected type Newest (Recently Created Products – Oldest), Oldest (Oldest – Recently Created Products), Title A-Z, Title Z-A, Item Code (Item Code A-Z), Item ID . |
| Hide From Search Status | Searches for items that have Hide From Search Status checked or not. |
| Refine Results | Allows only products checked off as refined to be visible when the Refine Result checkbox is checked, if no product checkbox is checked for refine then the Refine Result will show all products when the checkbox is checked. To clear all the refined products, click Clear Refinement button. |
| AND | The products has to have that property |
| OR | The product may or may not have that property. |
| Property | Is the properties created at Setting | Item Properties page. |
| is | The property value must equal this value |
| is not | The product should not have value equal to the value set. |
| Value | The value of property, this will change based on the property value, the value could be weight, size etc all depending on what the value was called in the property. |
| Add more | Adds more search criteria for the propertySame layout as the original property, this helps to refine the products property searches as now the product must contain either or, or both of the properties.The ability to add more properties is also available to a max of 5 properties. |