Also available in these formats:
Overview #
This manual provides an administrator with the necessary steps to set inventory records for the items in the Supplier store.
An inventory record stores the inventory level for the products on the Supplier store. This record and the price record will be used for this item on the MCW and marketplace stores.
Objectives #
By the end of this guide, you will learn
- How to add/delete inventory records
Inventory Overview #
Avetti commerce has an advanced inventory system that makes use of inventory records to handle customer orders. When a customer makes an order for an item, the system first checks if an inventory record is present.
- If no record is found, it means the item is always on stock.
- If an inventory record exists, then the inventory is tracked and the shopper could be prevented from ordering the item based on certain properties that are set.
Note
There is a separate table called invhist (inventory history) table which stores inventory added to the basket by shoppers but not yet ordered.
Out of Stock Behavior #
Some merchants never tell the customer a product is out of stock. They just advise that it will take longer to ship. However if you are selling a discontinued item or a limited qty item then you do need to advise if a product is out of stock.
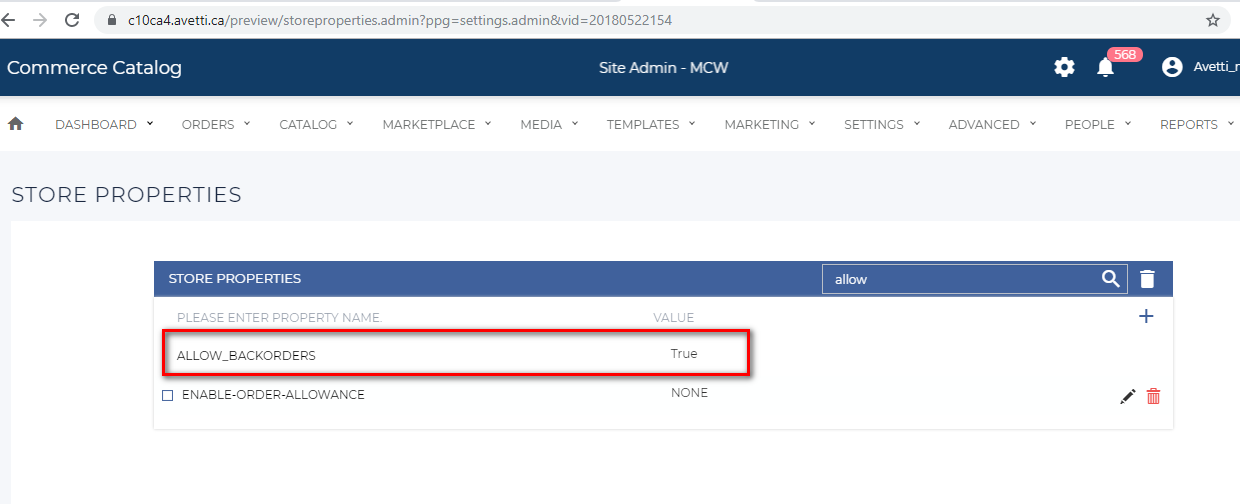
To define the out of stock behavior, we use certain properties. You can configure the out of stock behavior with a True or False using the property ‘ALLOW_BACKORDERS’ under Settings | Store properties or checking the ‘Allow Backorders on Site’ setting under Advanced | Admin Preferences .
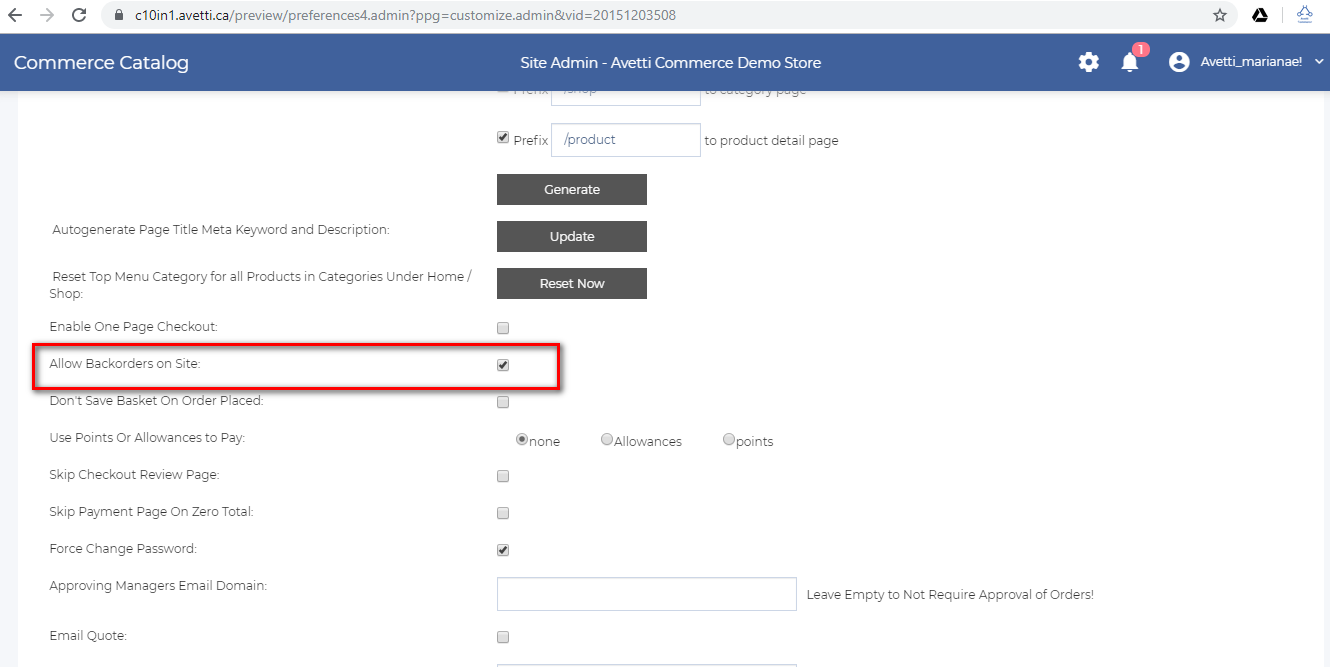
If the property does NOT exist or is set to FALSE or is not checked on the admin preferences, then it will mean that the store does NOT allow back-orders and the delivery option pop-up message will display “Sorry there is not enough stock to fulfil your request.” when attempting to add to the cart a qty of an item greater than the instock qty.
A shopper can add an item to the basket even if the item is out of stock if the following conditions are met:
- instock=0 (inventory.instock less than invhist records of inventory in session)
- nextshipqty=0 (inventory.nextshipqty and invhist records of next ship qty inventory in session) inventory.drop ship min qty = 0
- there is an inventory record for this item
- the ALLOW_BACKORDERS flag in the Settings | Store properties is set to TRUE
Note
Inventory.instock refers to the quantity available in stock and inventory.nextshipqty refers to quantity that will be available soon in the next shipment. Inventory.drop ship min qty refers to the minimum quantity that should be purchased for Drop shipment. We will cover these properties in detail later on.
The “Available: xxx” line changes from “Out of Stock” to “Usually Ships in 6 weeks” on the Item Description page if:
- ALLOW_BACKORDERS is set to TRUE
- There is an inventory record for this item AND the inventory.hidden flag is not set to Y
- The above conditions for instock, nextship qty and drop ship qty are all 0.
Besides conditions above, if a discontinued product is still for sale with limited quantity in stock, the customer cannot order this product with quantity more than the amount in stock. Otherwise, it would show the error message, “Sorry this item is only available while supplies last.”
- discontinued is set to true
- ordered quantity> instock + nextshipqty
Note:
The item can be set to Discontinued by going to the inventory record of the particular item and checking the Discontinued flag. This feature is explained later on this guide.
Delivery Options #
Now that we know how the out of stock behavior functions, let’s have a look at the various delivery options available. The following are the various options:
- Ship complete
- Ship partial
- Drop shipping
Ship Partial and Ship Complete #
A complete shipment can be made even if the quantity the shopper desires of an item is more than the instock quantity but less than the instock quantity + the next ship quantity. In this situation the Delivery date is specified as the Next Shipment Delivery Date + PPD. Pick pack days(PPD) is basically the number of days it takes for your staff to pick and pack and assemble an order.
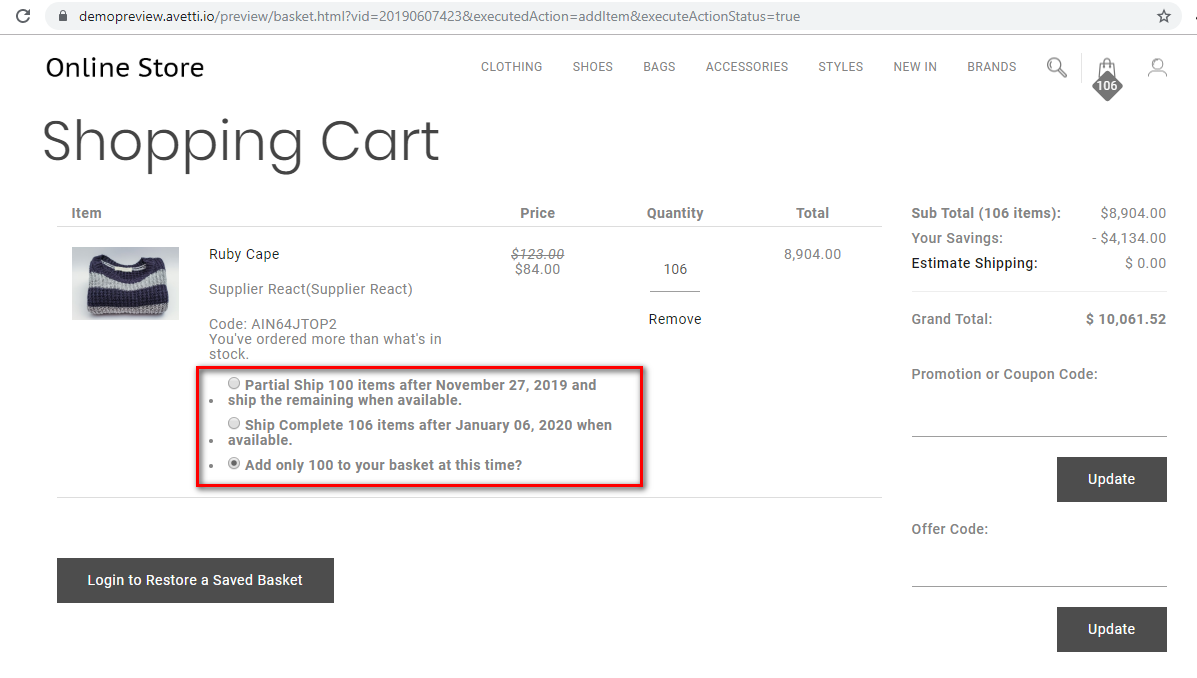
A partial shipment can be done in cases where the shopper requires the in stock quantity to be shipped to him at the earliest and the remaining order quantity shipped on a later date. In this case, the availability message for ship partial has 2 dates. Quantity X (which is what is in stock) and will be delivered today+PPD (pick pack days) and the Quantity Y which is remaining balance will be shipped on the Next Shipment delivery date + PPD (pick pack days).
This partial ship and ship complete feature gives the customer the power to decide if a partial shipment meets their needs. A pop-up will be displayed on Item Description page, showing the shopper the different delivery options.
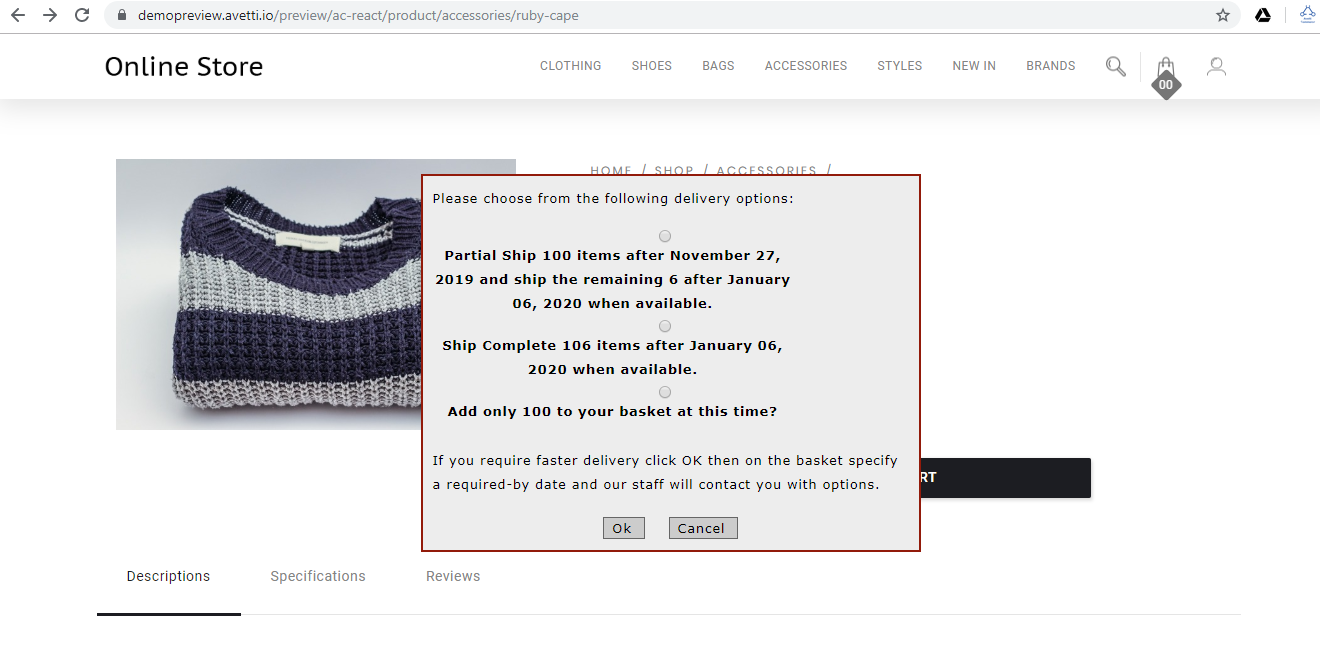
After the shopper decides the best option, it will also be displayed on the shopping cart page under the particular item.
Note:
you may need to contact the customer to charge the customer extra for the additional shipment if Partial Ship is selected.
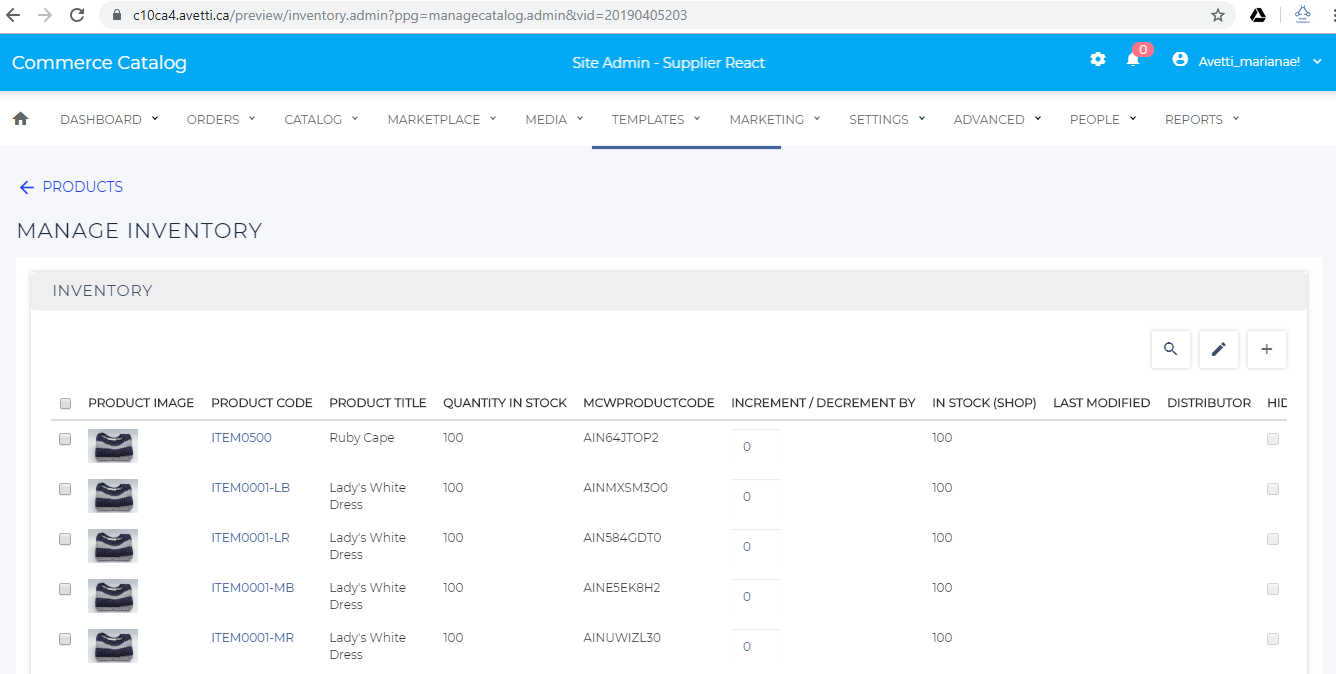
Inventory #
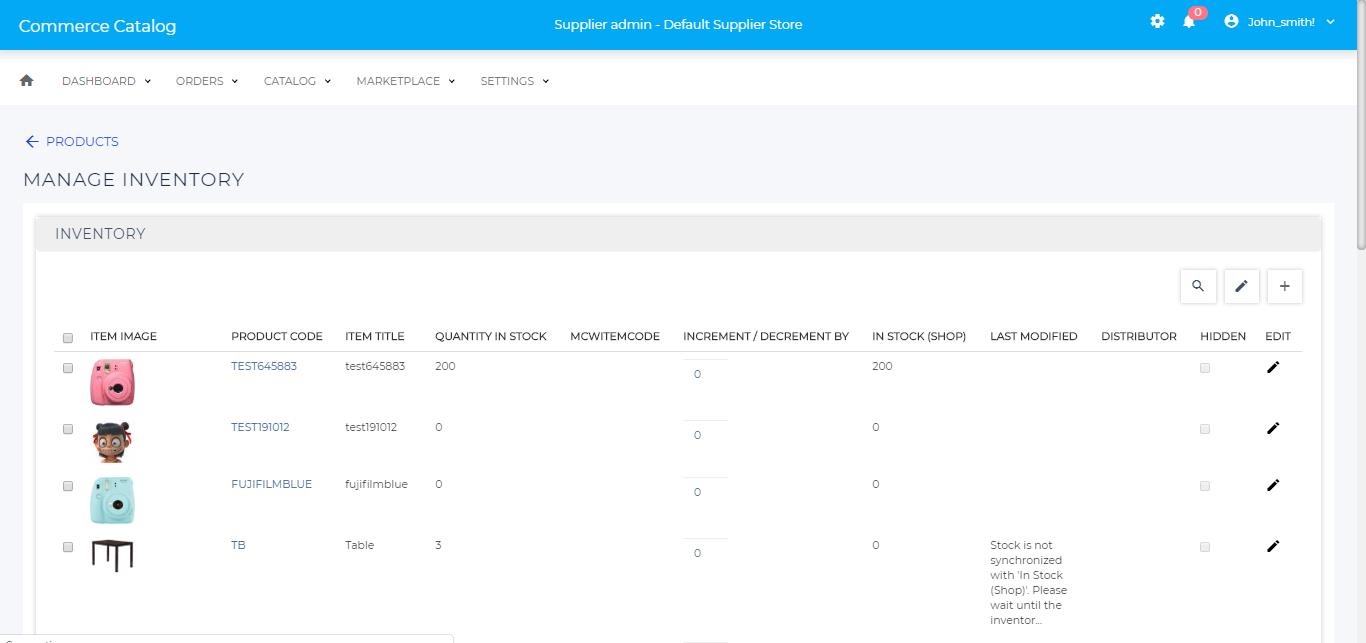
The Manage Inventory admin page is located under Catalog | Inventory. This page is mainly used to view and modify the inventory of all the products on the supplier store.
We can also use this page to search for the inventory of a particular product, create a new inventory record of a product and delete inventory records.
On this page, all previously created inventory records are displayed in a table, as well as, the action to Edit, Copy and Add inventory records.
To access the Manage Inventory page follow these steps:
- Go to the menu and click on Catalog.
- Click on Inventory.
The Inventory administration page contains the following elements:
| Element | Description |
|---|---|
| Search button | When the Search button |
| Set re-order button | This button is used to set a Minimum Re-order Quantity to one or more products.If the In Stock Quantity of an item drops below this level then the item will appear in the Inventory Reorder Report, alerting you to reorder the item.When the ‘Set re-order qty’ |
| Add button | The Add |
| Inventory table | Showing all the inventory records on the supplier store. The Inventory table contains the following columns:HeadingDescriptionCheckboxTo the left of each item, there is a checkbox used to select the item. Selecting multiple products allows applying an action to all selected items at once.You can click on the first checkbox on the header to select all the records at once.Item ImageThe item image will show the small image of each product with an inventory record on the supplier store.Product CodeThis code is given to the product when its created. Only products with an inventory record will be displayed on this table.The table can be sort by Product Code.Item TitleThis column shows the title of each product with an inventory record.The table can be sort by Item Title.Quantity in StockThis column will show the qty in stock of the item before its supplied to the MCW and marketplace. This means that its the inventory on the supplier store.The table can be sort by Quantity in Stock.MCW item codeThis column shows the code from the MCW that is automatically given to the product when its supplied to the MCW. (when the product is set to complete).Increment / decrement byThe column is used to increase or reduce the qty of the inventory directly from this table.Enter a qty in a positive or negative number to add or reduce the inventory. Press the checkmark button to apply the changes.Wait around 5 minutes to check the changes on the Qty in Stock and In Stock (shop) columns. Both columns should have the same value when the inventory is supplied to the MCW and Marketplace.If the Qty in stock is different than the In Stock (shop) qty, it means that the inventory has not been updated on the MCW and Marketplace.If necessary, refresh the page to see the changes in these columns.In stock (shop)This qty is the inventory qty on the Live Marketplace. This qty can be changed directly from the supplier store to supply more items to the marketplace.Last modifiedThis is an informative column, which helps to know what was the last action made on the inventory, the following are examples of the messages that could be displayed:Stock was last decremented by 1 on 2019-11-04 17:31:20.0.Stock is not synchronized with ‘In Stock (Shop)’. Please wait until the inventor…Stock was last incremented by 5 on 2019-11-04 17:32:26.0.It can take approximately 5 minutes for the inventory to be updated on the marketplace after modified on the supplier store.DistributorThis column might be blank on the supplier store. However, when opening the inventory page from the MCW store, the Distributor column will show the inventory records from the different suppliers linked to this MCW.HiddenThe checkboxes on this column cannot be modified, if they are checked, it means that the in-stock value will not be displayed on the front-end.EditClick on the pencil icon |
Creating Inventory Record #
There are a few ways to create new inventory records, for example, from the Catalog | Products page, when the item is created, using spreadsheets or using the Catalog | Inventory page.
To create an inventory record for a new item on the Supplier store, follow these steps:
- Log in as a supplier and access a supplier store.
- Go to Catalog > Inventory
- Click on the Add button on the Inventory Page. The “Add Inventory for Item” admin page will open on the same window.
- Fill out the Inventory form according to the requirements of the item and click on ‘Save’
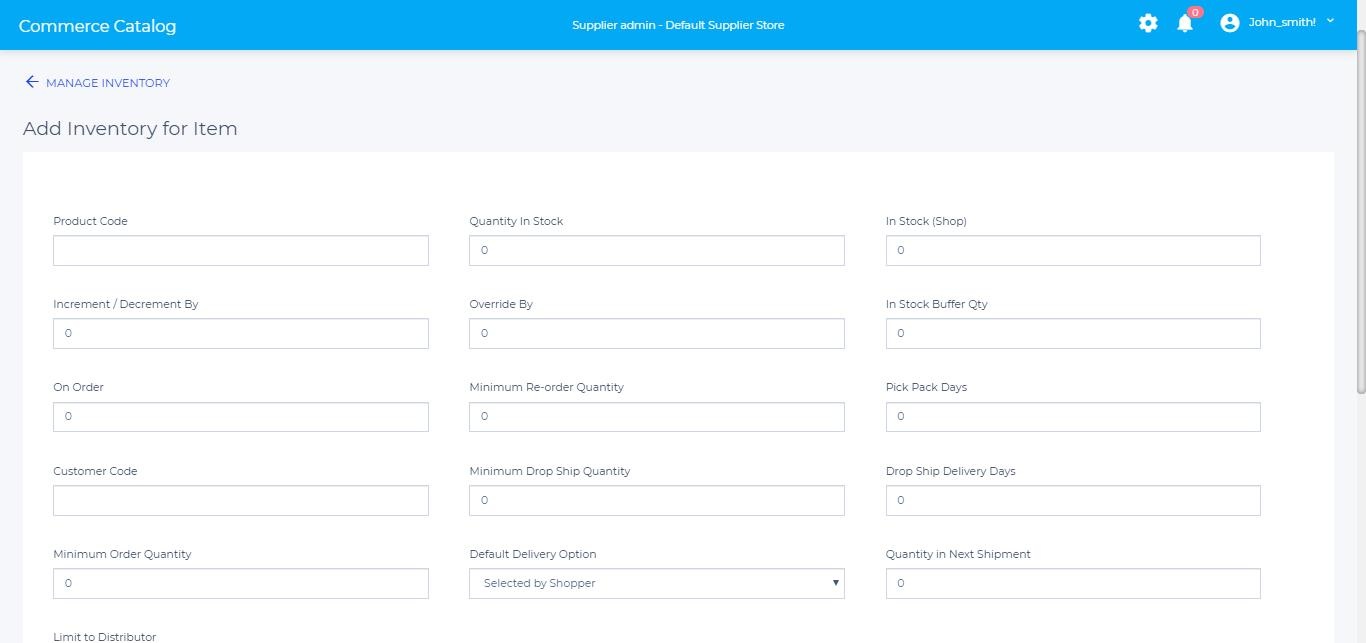
The “Add Inventory for Item” admin page consists of the following fields:
| Field | Description |
|---|---|
| Product Code | Specify the product code of the product you are adding the inventory. This code is given to the product when its created, the supplier should already know the product code of the item to create the inventory record.The product code can be consulted by going to Catalog | Products page.This must be the same code that has been specified for the product throughout the store |
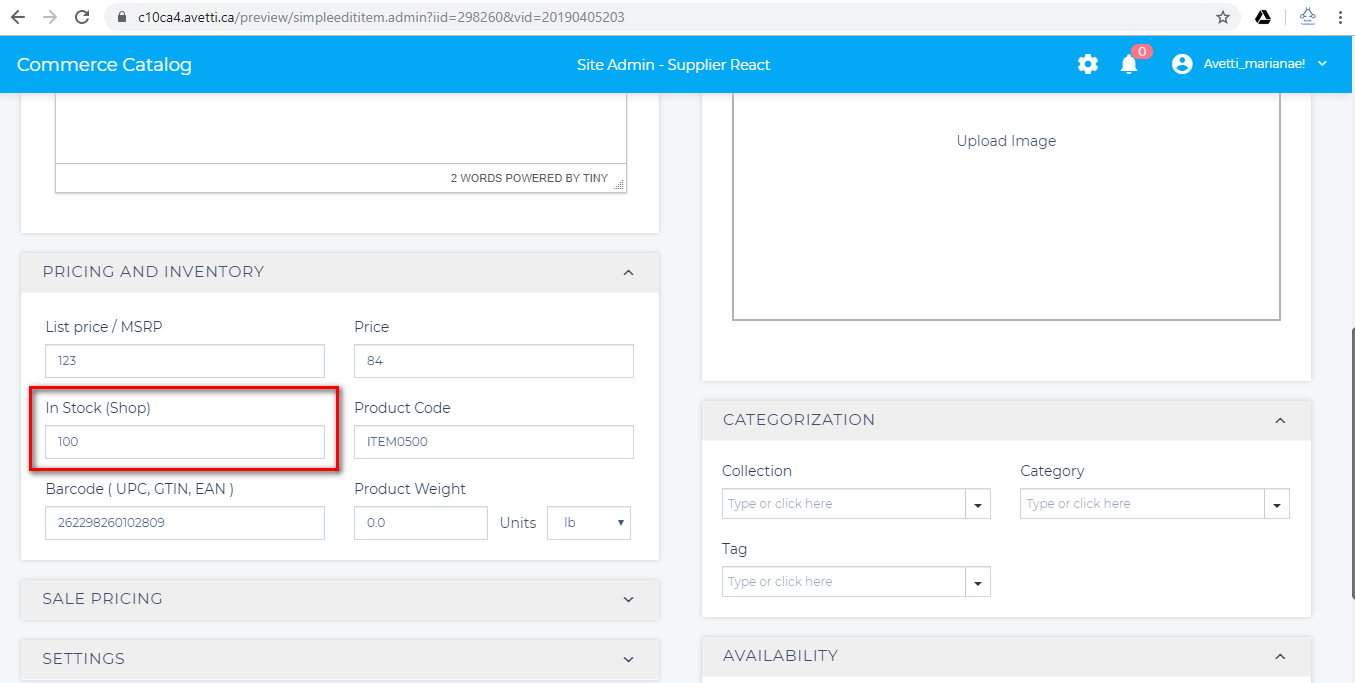
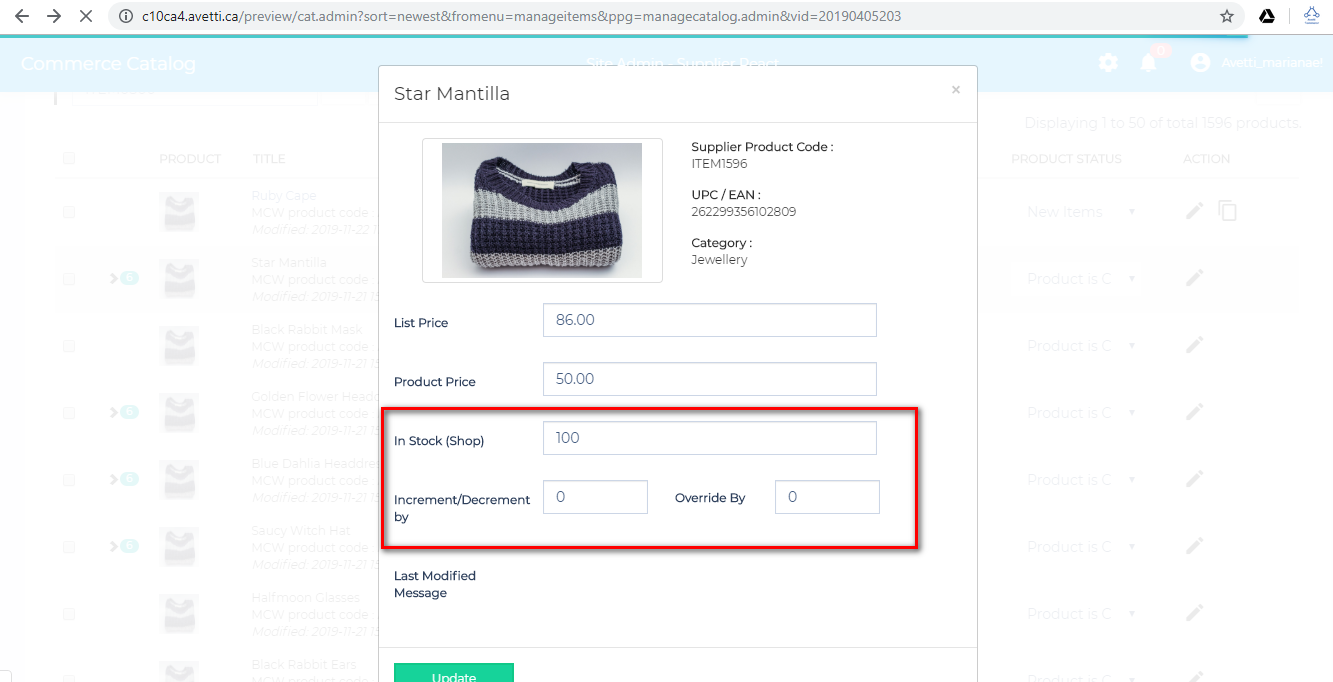
| Quantity In Stock | It is the available stock of the item on the SUPPLIER store. This is the quantity that will be supplied to the Marketplace.This field will be disabled when creating the inventory record so it cannot be modified. |
| In Stock (Shop) | It is the available stock of the item on the MARKETPLACE store. The qty that will be displayed in this field, will be the inventory qty on the MARKETPLACE. originally will be 0, however, when the item changes the status to ‘Complete’ the item and inventory qty will be supplied to the MARKETPLACE. When the Marketplace is updated, the qty on this field will be updated as well. Showing the supplied qty.This field will be disabled when creating the inventory record so it cannot be modified. |
| Increment/Decrement by | This field is used to add or reduce the inventory qty of the item. Use positive values to increase inventory qty and use negative values to reduce the inventory quantity from the supplier store to the marketplace.The supplier will need to enter the qty on this field and press ‘Save’. After the inventory has been increased, the In Stock (shop) field will be updated showing the total qty of the product.The changes will also be automatically applied to the marketplace after a few minutes, then the Quantity In Stock field will be updated showing the total qty of the product (refresh the page after approx 5 min). |
| Override By | The value added on this field, will replace the qty on the In Stock (shop) and the Quantity In Stock. |
| In Stock Buffer Quantity | The value on this field is automatically updated when a shopper buys more product than in-stock products, this is only possible when the marketplace allows back-orders.When a value is displayed here and the in stock qty is incremented, the quantity In stock will be calculated minus the In stock Buffer Quantity.Example: If Quantity In Stock is 5 and the In stock Buffer quantity is 3, the actual available stock is 2. This concept has been introduced because merchants often come across situations where physical stock becomes 0 for low inventory level |
| On Order | This value increments for each quantity of the item as an order is placed and this decrements the In Stock value. It becomes 0 again once the qty is decremented in the In Stock value. |
| Minimum Reorder Quantity | If the In Stock Quantity of an item drops below this level then the item will appear in the Inventory Reorder Report, alerting the supplier to reorder the item. |
| Pick Pack Days | This field specifies the average number of days needed to prepare the shipment for delivery in the warehouse.It is used for calculating shipping time when the product is drop shipped. The default PPD is 2 days and this will be added to the shipping date and the ‘next shipment of additional inventory date’, the customer will see the updated date when adding products to the cart. |
| Quantity in Next Shipment | Enter a number representing the amount of units arriving in your next shipment. Make sure this is a whole number. This qty will decrease if there is out of stock and a customer adds more items to the cart than available (backorder)You can also declare the date this shipment will arrive in the Arrival Date of Next Shipment of Additional Inventory field. The next two fields configure drop shipping. Drop-shipping means that the item will be shipped from your supplier directly to the customer. |
| Minimum Drop Ship Quantity | This is the minimum amount of items that the customer must order in order to qualify for this service.If the product is shipped to the shopper from a third party then it is considered to be drop shipped. Some merchants offer this option for large orders so the Drop Ship Minimum Qty setting determines how large the qty ordered must be before this option appears. If this item is ONLY shipped from the supplier then specify Drop Ship as the default delivery option.Drop shipping has been included for customers to make the items shipping process faster if they were to be shipped out directly from the manufacturer. Drop shipment option will be available to the customer only if he makes an order for a certain minimum quantity that can be specified using the ‘Minimum drop ship quantity’ and ‘Drop Ship Delivery Days’ fields. |
| Drop Ship Delivery Days | The ‘Drop Ship Delivery Days’ which is used to specify the number of days taken for the item to be shipped from the supplier to the customer. So the final delivery date would be Drop Ship Delivery Days + PPD (pick pack days).This can be modified depending on how much time in days a drop shipped will need to be delivered to a shopper. This is an average value for all shoppers. |
| Minimum Order Quantity | This will be the minimum number of items that the shopper must order. This number will be displayed in the ‘Qty’ field on the item page. It can be modified but the customer won’t be able to add to the cart less items than the minimum.If you wish to disable this, simply enter a value of 0. |
| Default Delivery Option | An item can have 4 different delivery options which will be displayed for the user to choose after adding an item to the cart from the item page:Selected by Shopper: Allow the shopper to select their preferred delivery option if necessary.Ship Partial: If the quantity ordered exceeds the available quantity, then the available amount will be shipped and the remainder will be shipped once a new shipment has come in. If there is a New Shipment date and value, it will be displayed on the pop-up for the user to know an approximated time for the next shipment to come in.Ship Complete: If the quantity ordered exceeds the quantity available, the order will not ship until the next inventory shipment has come in. The shopper will be informed if there is a next shipment date.Drop Ship: Force drop-ship.Note:These options are useful if you have entered the Quantity in Next Shipment value; In most cases it is preferable to leave the dropdown selection as Selected by Shopper, so all the available delivered options are displayed for him to choose.If no inventory record exists, the default delivery option for that particular item would be ‘Ship Complete’ |
| Limit to Distributor | Specify the distributor/supplier associated with this inventory record. This column might be blank on the supplier store. However, when opening the inventory page from the MCW store, the Distributor column will show the inventory records from the different suppliers linked to this MCW. |
| Hide Available Inventory from Shopper | If this field is checked the available quantity will not show up to the shopper while making the order from the Item Description page. |
| Enable Must Deliver By Date Prompt on Basket | Check this box if you want delivery date details to be displayed on the basket. |
| Arrival Date of Next Shipment of Additional Inventory | Set the year, month and day on which the next shipment will arrive. This is helpful to inform the user that the item will be restock sometime in the future. |
| Discontinued | If an item is set to discontinued, the customer cannot order this product with quantity more than the amount in stock even if the store allows back-orders.The following error message will be displayed if the shopper attempts to do add a greater qty than the one in stock: “Sorry this item is only available while supplies last.” |
| Owned by Customer | This option is used to specify items supplied by other stores. A third party customer code will also be set that can be used to get the store info about this inventory, which is defined in the message file. For example, ‘demo’ is the third party code filled in the admin page. Administrator needs to define the following line in the shopmessage.properties.vm.inventory.thirdpartystore.DEMO = This item ships from store DEMO |
Note:
The inventory records for items on the supplier store can only be created and updated using the supplier store.
When the item is created and set to Complete state on the supplier store, the inventory on the MCW will automatically be created. This is the inventory that will be seen on the marketplace store.
When the inventory record is modified on the supplier store, wait around 5 minutes to see the changes on the MCW store and on the marketplace store front.
To update inventory there is no need of changing the status of the item as long as it remains as Complete.
Other Settings and Features #
There are many other settings that can be used to define inventory behavior, most of which can be set through the site admin preferences. These settings and features are discussed below in detail.
Make Items Unavaliable on 0 Inventory #
If this feature is set to true, a query will run at 3:30 am every day and all the out of stock items will be set to unavailable on the marketplace.
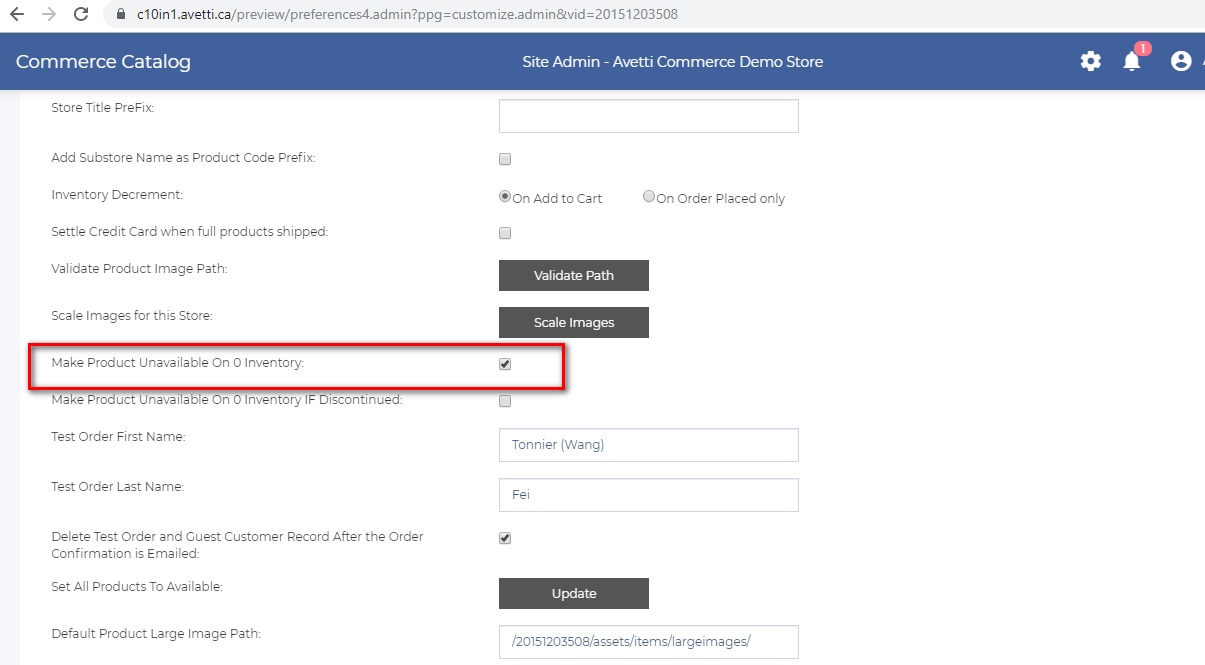
Note: Items with no inventory record will also be set to unavailable.
The feature is called ‘Make Item Unavailable On 0 Inventory’ which can be set under Advanced | Site admin preferences.
This flag if checked, will run at 3:30 am every day and set all items with inventory.instock = 0 to have the item.available flag set to false. By setting this to false the item will no longer show up in the catalog, item page or search results.
This setting is the following springapp-thread.xml:
<bean id=’cronMakeItemUnavOnZeroInvTrigger’ class=’org.springframework.scheduling.quartz.CronTriggerBean’>
<property name=’jobDetail’>
<ref bean=’makeItemUnavOnZeroInv’/>
</property>
<property name=’cronExpression’>
<value>0 30 3 * * ?</value>
</property>
</bean>
Note: The check will ignore any invhist records that list inventory in a shopper session added to cart.
The item will be unavailable, but it will still be present in the admin pages of the store. To hide it, the end date field has to be modified, setting a date on or after which the item will no longer appear.
To do this go to Catalog | Item | Product Data | End date. If the item is available again this date must be removed manually for the item to be displayed again.
When the item is back ‘in stock’ after adding inventory value greater than 0, it will change from unavailable to AVAILABLE automatically and immediately. property is modified to a quantity and the customer will be able to see it and add it to the cart.
Inventory Decrement #
In Advanced | Site admin preferences we have an ‘Inventory Decrement’ flag which will decrements the inventory in two ways:
Inventory Decrement: ( ) On Add to Cart ( ) On Order Placed only
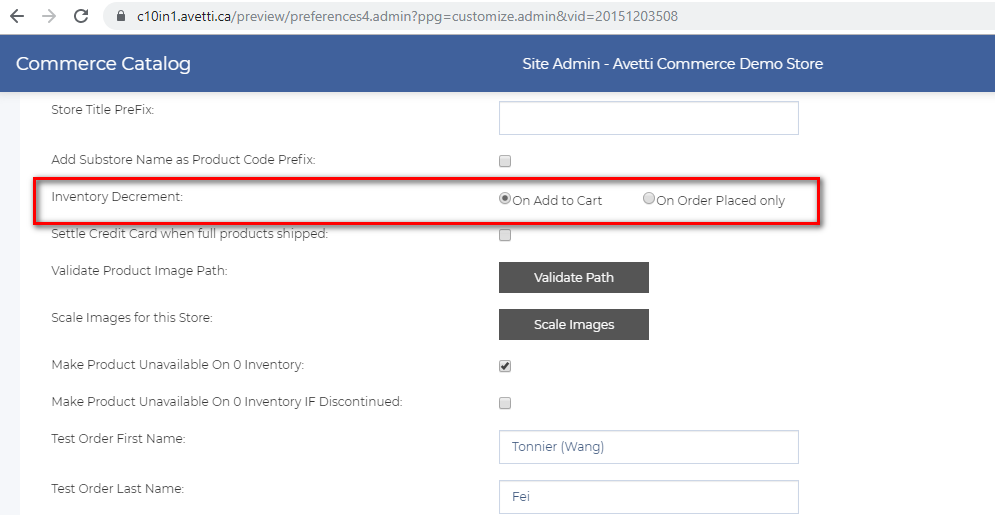
| Options | Description |
|---|---|
| On Add to Cart | This is the option we usually use for the stores. If this option is checked, as soon as items are added to the cart, the inventory record will be decremented.When the items are deleted or updated from the shopping cart, the inventory record will also be updated automaticallyIf there is a limited stock of an item and the store doesn’t allow back-orders, when a shopper adds that qty of an item to the cart, and then another shoppers attempts to add the same qty, it won’t be possible, an error will be displayed informing the shopper that the item is out of stock. This happens because the first shopper has already added to the cart the available stock.If the first shopper decides to delete the qty or change it to a lesser qty on the shopping cart, the inventory for that specific item will be available for the second shopper and the item will be able to be added to the cart, updating the inventory once again. |
| On Order Place only | On the other hand, we have the On Order Place only option. When this option is checked, the inventory record will be affected only when the order is complete.If there is a limited stock of an item and the store doesn’t allow back-orders, when a shopper adds that qty of an item to the cart, and then another shoppers tries to add the same qty, it will be possible. Whoever makes the purchase first will use the available in stock qty, and the inventory record will be decremented. The shopper who attempts to complete the order after, will get an error about the item being out of stock.Some merchants have mail orders, telephone orders and physical stores draw from the same inventory and use ERP integration to the store to advise the store what the current inventory level is hourly. If your ERP system is updating the store frequently and the pool of inventory not exclusive to the online store then set this to “On Order Placed Only” so that orders created will not decrement the inventory value.Note: if “On Order Placed Only” is selected, then the inventory reservation feature that is used for limited quantity items or discontinued items or tickets is not used. |
Inventory Reservations #
This feature has been introduced for items under limited quantity. When a customer adds an item to the basket, the inventory record is decremented and the customer has a predefined time frame of 30 minutes to complete the order. If the order is not made in 30 minutes, the inventory is added back. The time is set as a number of seconds in springapp-servlet.xml
<property name=’inventoryHistoryExpiredTime’><value>1800</value></property>
Note: if an order is partially shipped or shipped complete we also decrement the next ship qty. as well. Also we normally don’t activate the ‘hide available inventory from shopper’ feature when using this feature as the shopper should know how many items are available in stock.
Notify on Restock #
The ‘Notify me’ feature changes the ‘add to cart’ button to be a ‘Notify Me’ button if an item is out of stock (inventory.instock – buffer qty). A shopper that clicks notify me will be redirected to the login/register page then given a message that he will be notified once the item is back in stock. Once it is in stock again (via admin page changes, or inventory webservice updates – single or multiple) then all shoppers that asked to be notified are sent an email to advise them the item is back in stock.
To learn more about this feature, please read Notify on Restock user guide: http://docs.avetticommerce.com/twiki/pub/UserDocumentation/WebHome/Notify_on_Restock_Guide_v1.1.pdf
Note:
The ‘Notify me’ button will only be displayed on the Item Description page on the store front, when the item is out of stock and the store doesn’t allow back-orders.
- The Inventory records are updated on the MCW and marketplace on PREVIEW and SHOP automatically when updating them from the supplier store.
- The Advanced admin preferences should change on SHOP manually
- The Store Properties should be published once they are change on the supplier store so the MCW and the marketplace can be updated.
- If the store is not a supplier, MCW or marketplace, the inventory records from PREVIEW are not going to be updated after publishing the store or automatically. The inventory records need to be set on SHOP using spreadsheets or other options manually.
There are other ways on the supplier store to update the inventory of the items
Using the Catalog Manage Inventory page, previously explained on this manual :
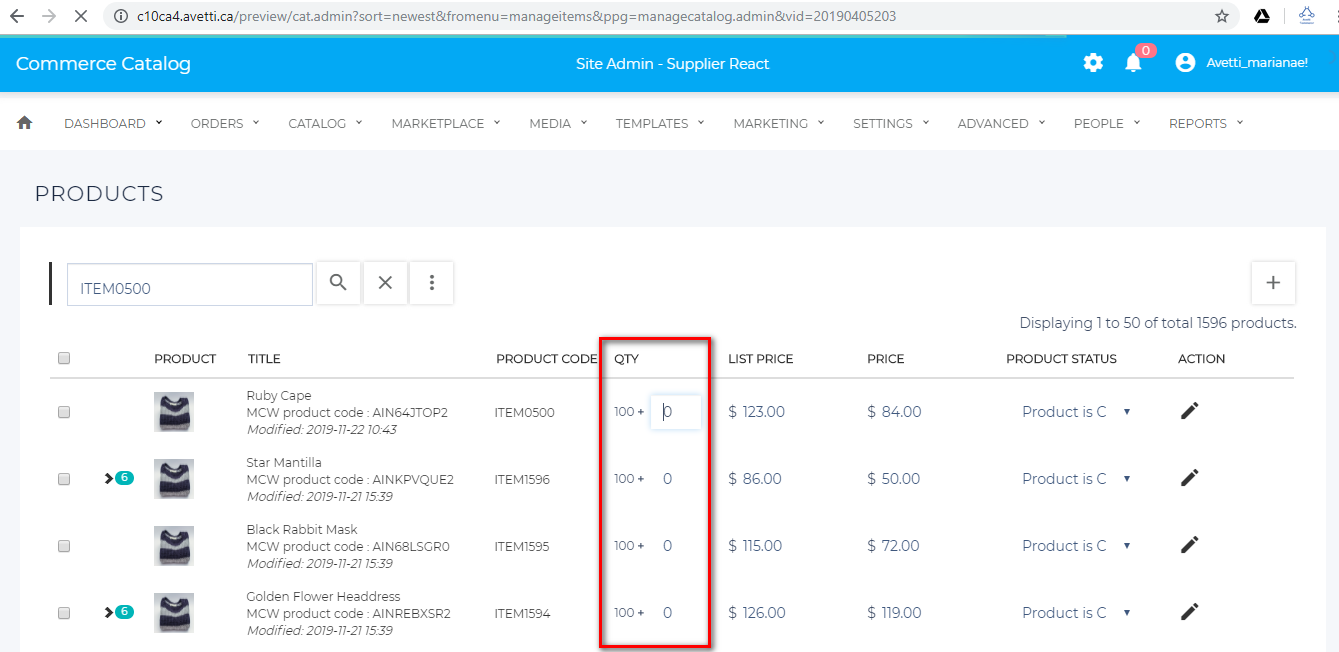
Using the Catalog | Manage Products admin page, qty column to increment the qty of the items
Using the Simple Edit admin page on items with status other than Complete from Manage Products admin page
Using the Edit Product pop-up on the Action column for items set as Complete on the Manage Products admin page.
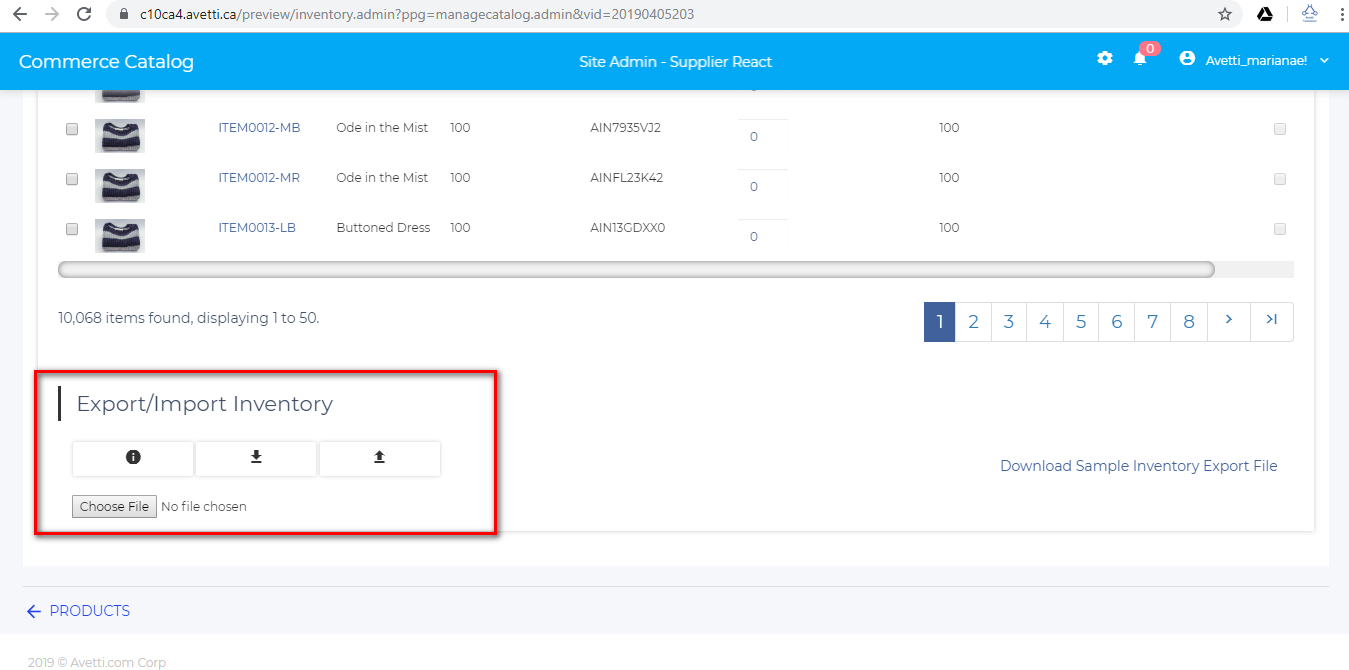
Using an spreadsheet to modify the inventory of many items at the same time on Manage Inventory admin page
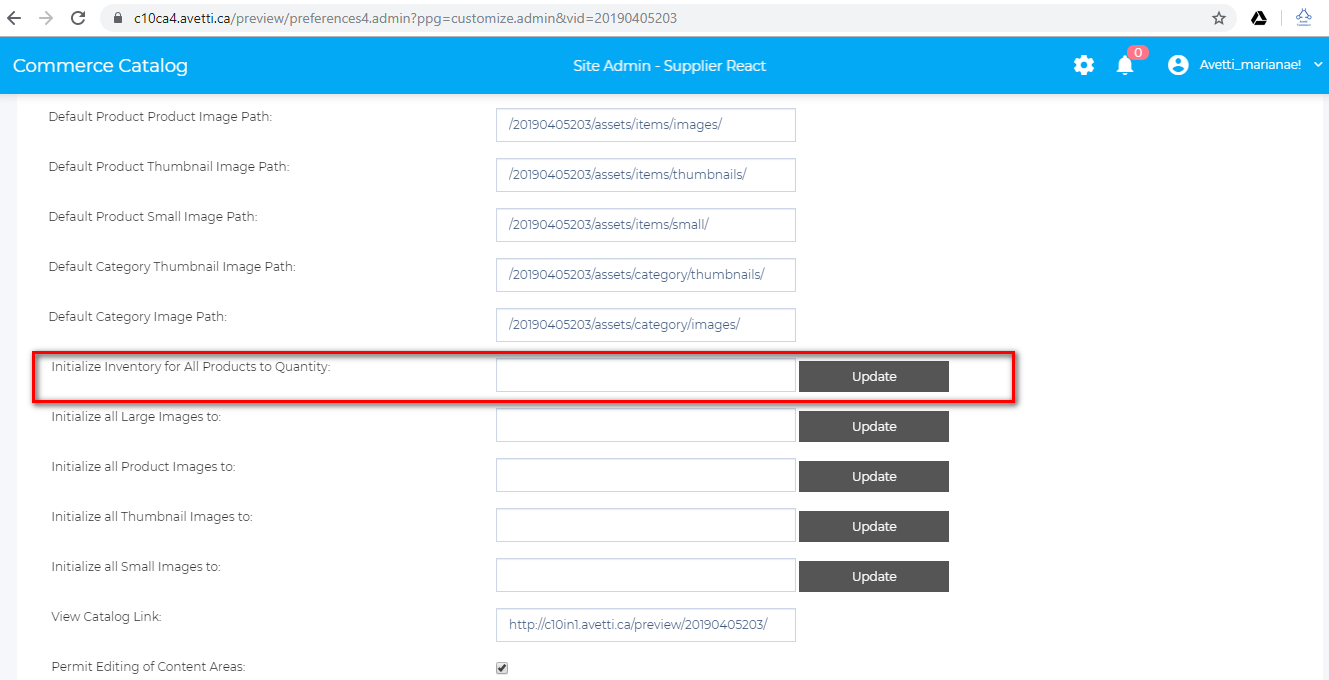
Using the Advanced | Site Admin Preferences | Initialize Inventory for all Products to Quantity to set the inventory of all the products to a particular value.