Also available in these formats:
Overview #
This document provides the necessary steps to configure the categories within Avetti Commerce software. This feature allows the ability to manage the categories and add, delete, attach or detach subcategories. Categories logically define the hierarchical structure of the store catalog and the location of templates. It helps customers to search products easily. Also, categories can be interpreted as pages, the Home page is a category, the about us page is another category and so forth.
Managing the categories #
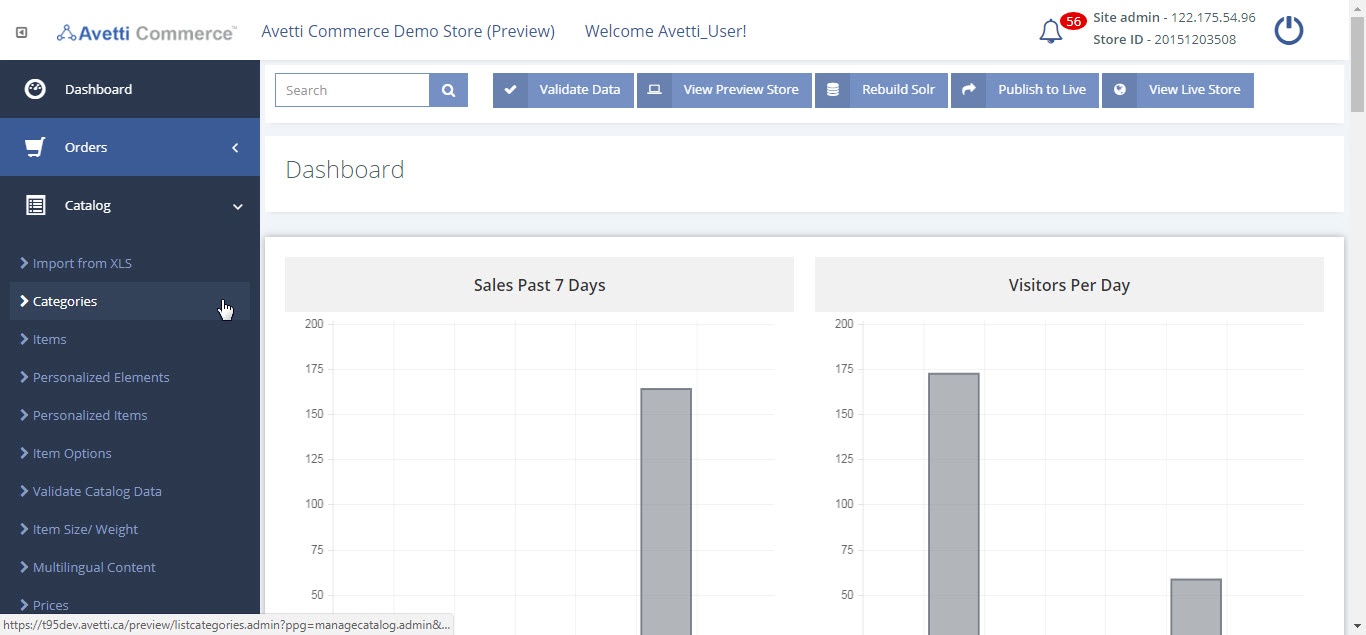
- Go to catalog.
- Click on categories.
Note
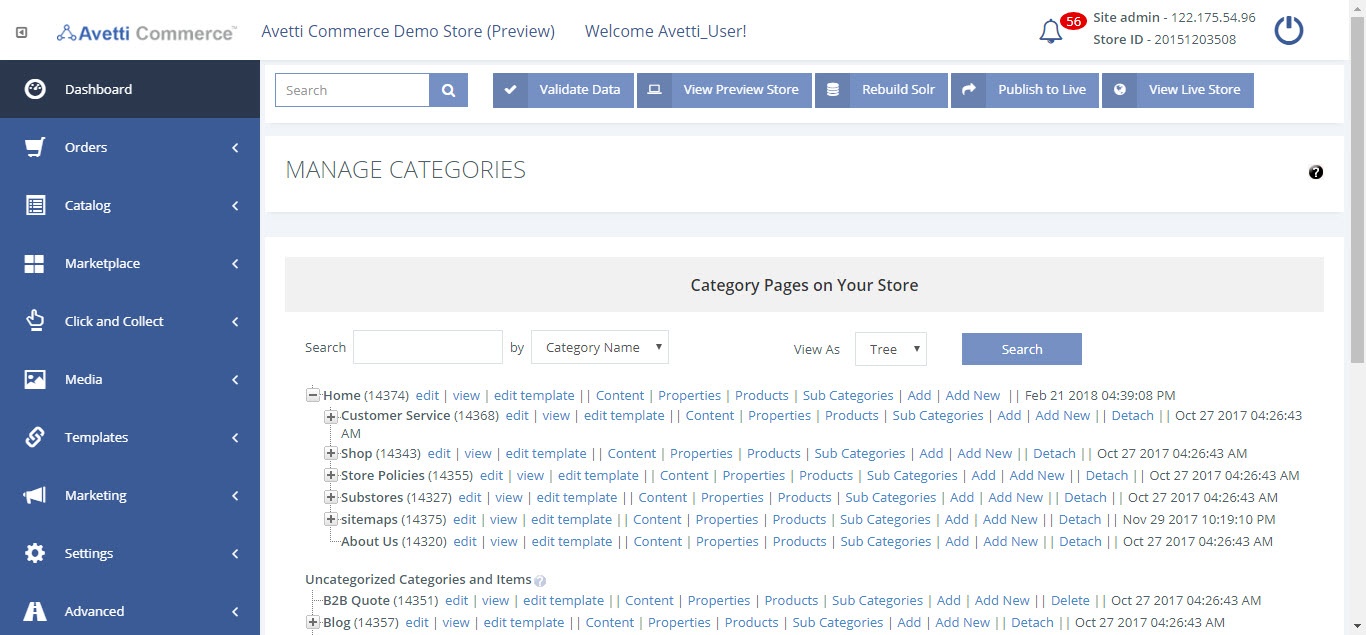
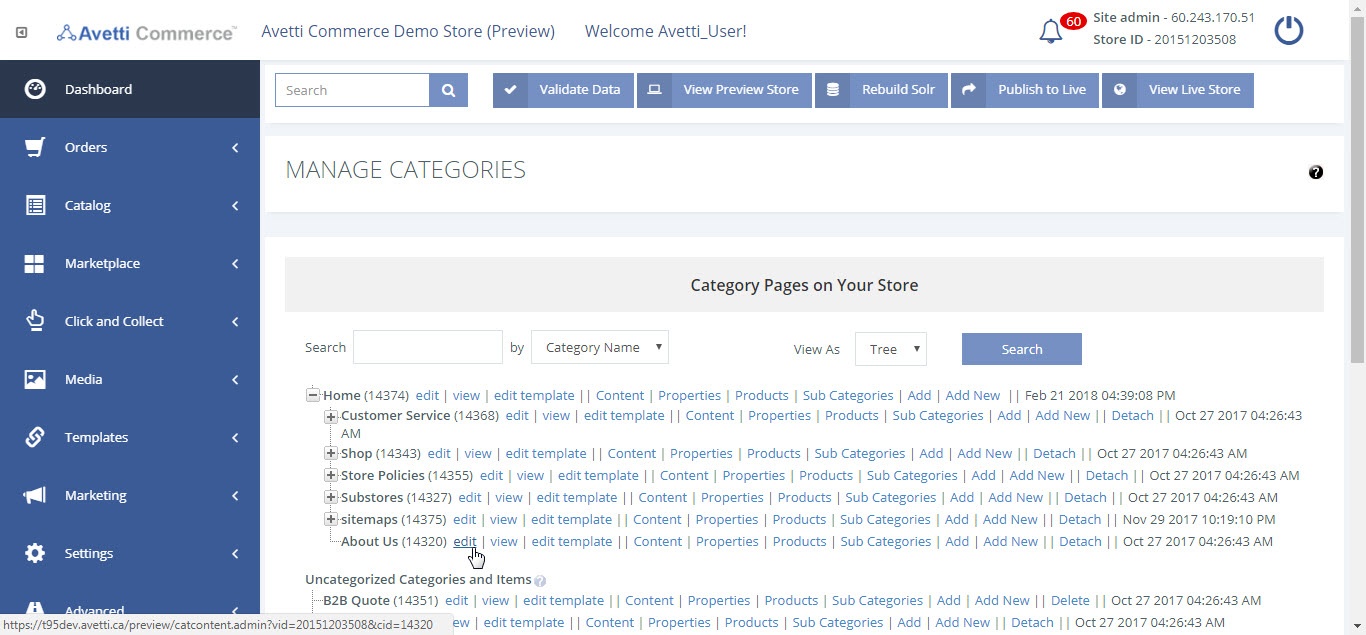
- The Manage Categories page is divided in two sections: the Home and the Uncategorized categories.
- Home is the highest level category which contains every other category in the store, aside from ones that are uncategorized. Home is always the first category.
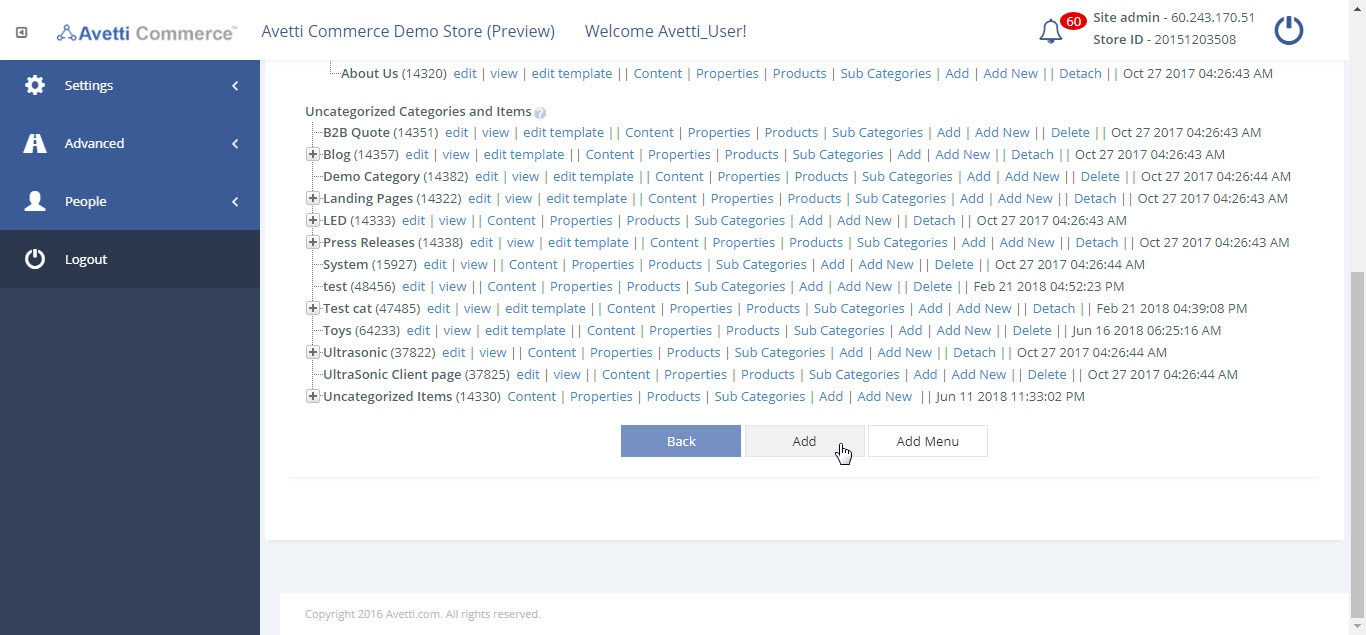
- Uncategorized Categories are categories that do not have a parent / high-level category. If the parent category was deleted from the catalog, the child categories will appear in this section.
- The Category ID is a unique system-generated number that represents the category. It is shown in the parentheses next to the category name.
To delete a category, it must first be detached from its parent category. It can then be deleted from a new link which appears once it has been detached.
Adding Categories #
A new category may be necessary for when the store begins selling a new set of products of a different type. To add a new category,
- Click ‘Add New Categoy’ button to add category (Refer table 1).
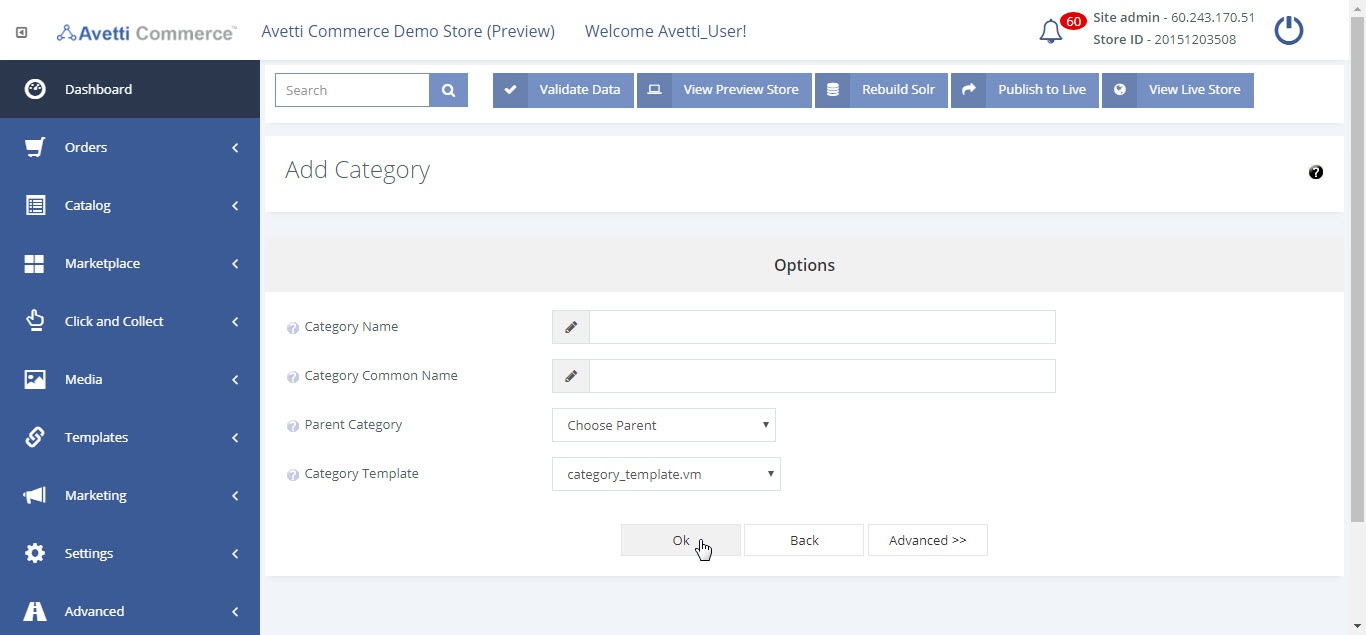
- Enter the details and click Ok.
- Click Advanced to view details about category images (Refer table 2).
Note
- The Manage Categories page is divided in two sections: the Home and the Uncategorized categories.
- Home is the highest level category which contains every other category in the store, aside from ones that are uncategorized. Home is always the first category.
- Uncategorized Categories are categories that do not have a parent / high-level category. If the parent category was deleted from the catalog, the child categories will appear in this section.
- The Category ID is a unique system-generated number that represents the category. It is shown in the parentheses next to the category name.
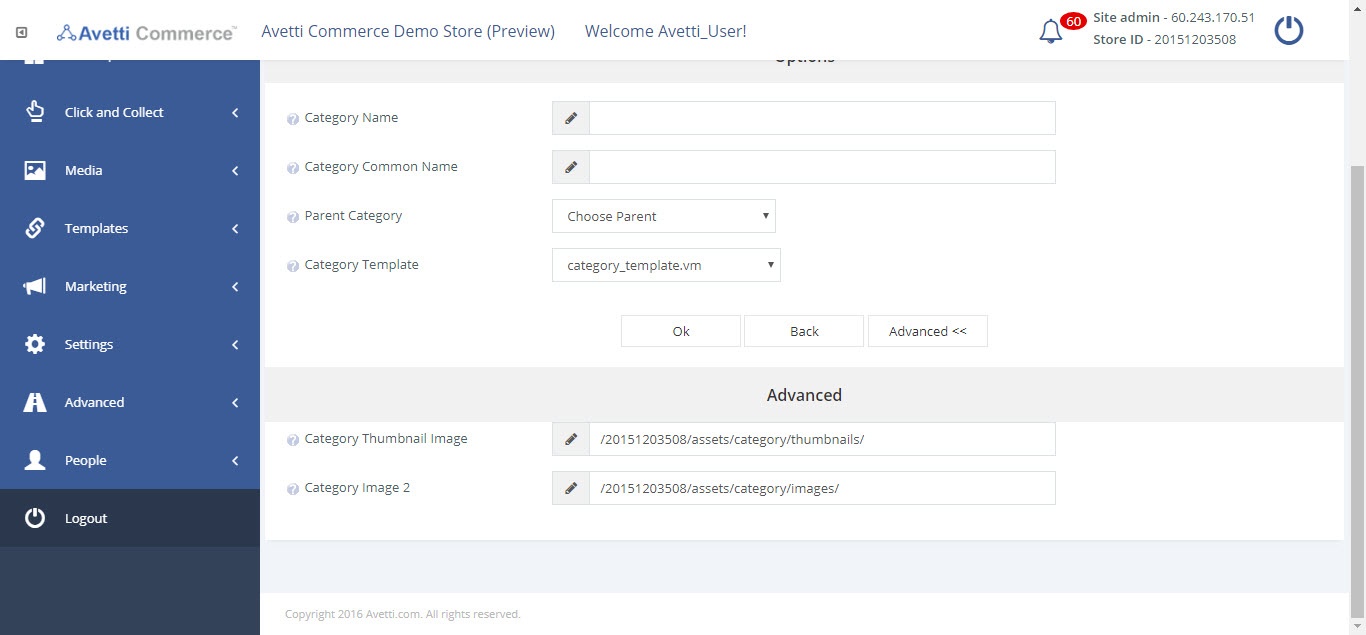
| Options | Description | Example/More details |
|---|---|---|
| Category Name | Enter the name of the category, which is displayed by default as the title (the text on the browser tab) of the page. The name of the category can’t be the same as other category name already created.NoteThe category cannot be changed after it has been created! If an error was made with this name, the category must be deleted to add a new one. | “Home” for the homepage, “Digital Cameras” for the store category page that sells digital cameras.If the name of the store is “My Store”, then the title of the category page may look like “My Store – Digital Cameras”. |
| Category Common Name | Enter the name of the category here which can be seen as the main header of the page. It is also displayed on the category hierarchical diagram (or breadcrumb category) on the corresponding page. | |
| Parent Category | Select an existing category from this list that will be one place higher than the category being created. If the category doesn’t require a parent, simply make the parent category Home | Creating a category called Digital Cameras which is the page customers will visit to purchase Digital Cameras from the store. In this case, Store will be the parent category. Also note that Store has a parent of Home, as Home is the highest level category by default. |
| Category Template | A template can be an entire page, or can be a portion of the page that will be used on multiple pages, such as the header, or navigation.Choose the main category template that will be used for the page. All the content in the selected template will appear on this new category page. Only templates of the category group will appear in this list.If a blank template is required, try static-content.vm if it is available. | For more details about templates, access the Manage Templates document by clicking the following link. |
Table 1 – Description of options for Add page
| Property | Description | Example/More details |
|---|---|---|
| Category Thumbnail Image | The category thumbnail image is an image which was uploaded in /category/thumbnails/ directory in Manage Catalog | Content section.The selected image will be displayed on the page of the site as an image of this category. Attach a thumbnail to associate with this category. The images are by default located in: [vendorid]/assets/category/thumbnails/. | To view the images, go to Media | Manage media and follow the directory tree. |
| Category Image 2 | The Category image is an image which was uploaded in /category/images/ directory in Manage Catalog | Content section.The selected image will be displayed on the page of the site as an image of this category. Attach a large image to this category. The images are by default located in: [vendorid]/assets/category/images/. | To view them go to Media | Manage media and follow the directory.For more information about managing media, refer to the Manage Media Guide. |
Edit Categories #
To edit an existing category,
- Go to Catalog
- Click Categories.
- Click on the Edit link located next to the required category ID.
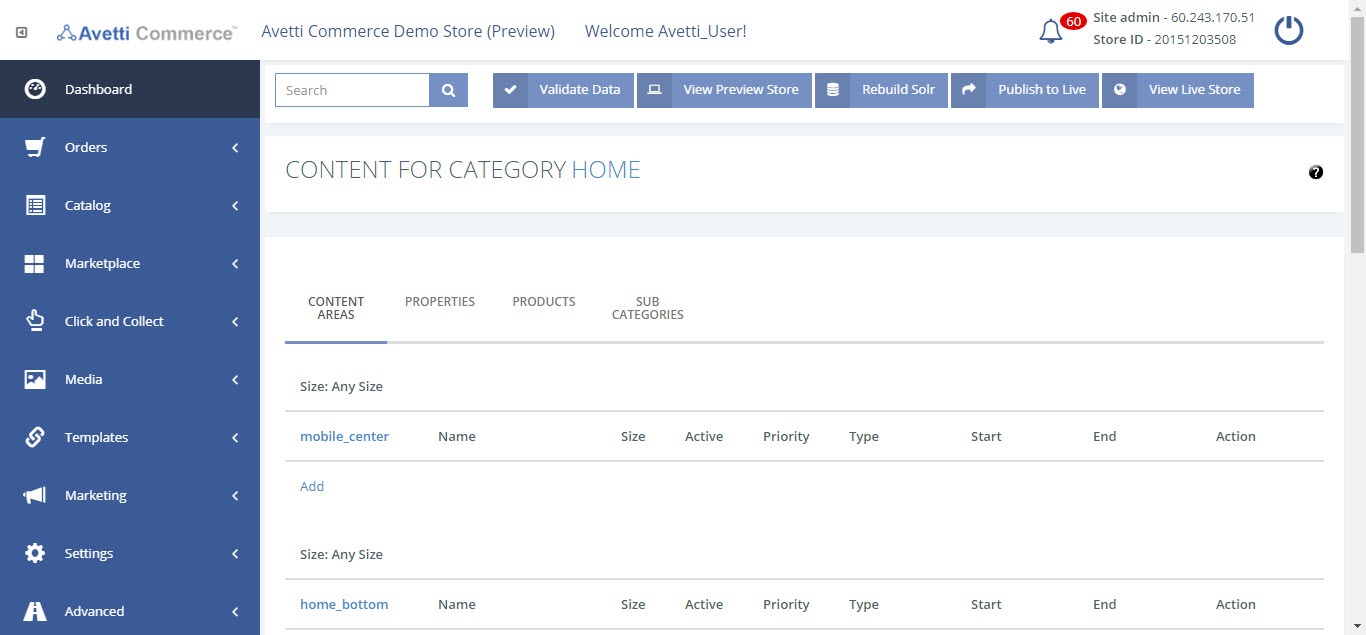
- You can manage and modify features by clicking on the respective tab links (Content Areas, Properties, Products, Sub Categories)
| Property | Description | Example/More details |
|---|---|---|
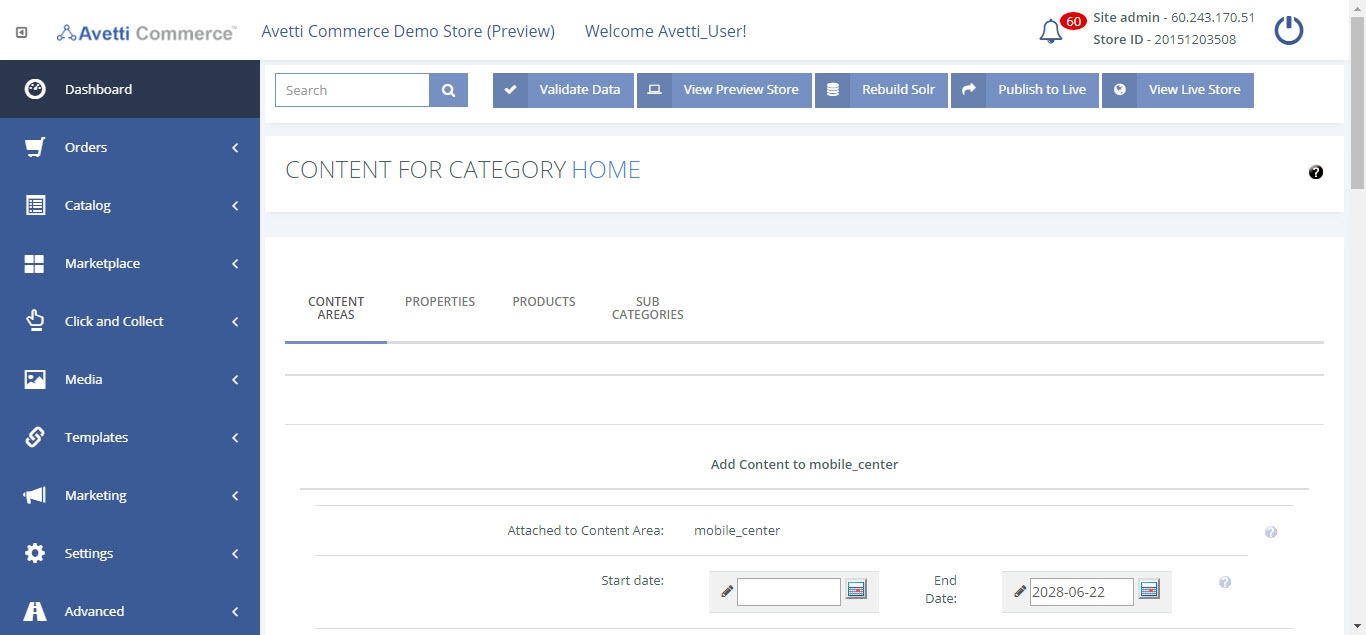
| Content Areas | Content Areas are sections of a webpage that can have content, or templates, placed in them. These sections can be added in different parts of the page. They are often named with a location relative to the main content of the category (such as right, left, bottom, etc.).This page allows the ability to add, detach, edit and copy existing templates to the category. | Use this page to put a new banner on the category page for a big Clearance Sale. |
Adding content #
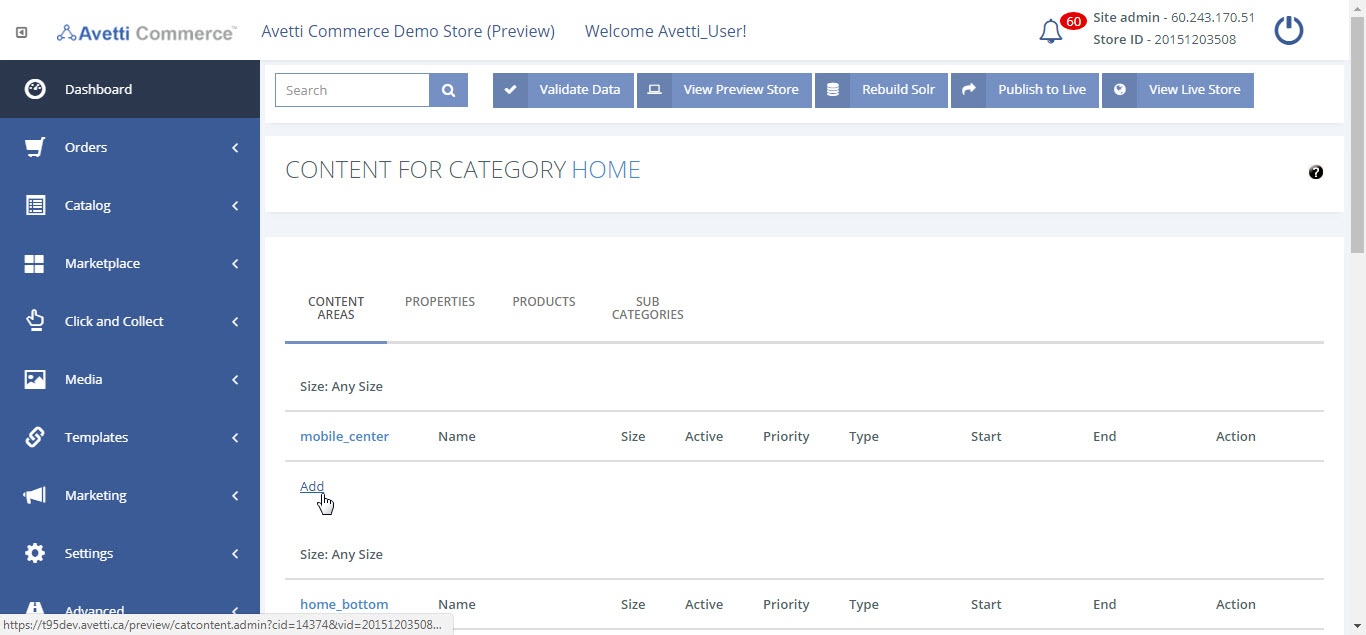
- Click on the Add link under the applicable section.
- There are a number of options on the Add Content page. (Refer table 4)
- Once the content is created, click the ‘Save’ button to save the new content.
| Property | Description | Example/More details |
|---|---|---|
| Content Skin/Language | Select the appropriate skin or theme that this content will be displayed on. Ensure the skin has the correct language as well. | When using the rich text editor, if a picture that has been uploaded to the local store directory, the path will be edited when the content is saved to replace the store’s vendor ID, and skin name with code, to prevent errors if the store, or skin are copied to a new skin with a different name. |
| Long Description | This text area allows the ability to add or edit content from a template. When creating a template (the Create radio button above), enter the content here.When choosing an existing template (Select/Copy), the template contents will appear here after content as already been selected above and update the page. | For more information about the admin page or about Templates, refer to the Templates section. |
| Property | Description |
|---|---|
| Start & End Dates | This can be used, along with the Priority option to setup content on the store to change on a specific day, and only last for a specific amount of time.The start date must be set manually. To have the content appear immediately, enter in either today’s date, or a date in the past. |
| Active | The next option indicates that the content is active on the page.If the box is unchecked, the content will not appear, regardless of other settings. |
| Priority | This dictates which content appears on the page if there are multiple content options for that section of the page. Like other sections of the store where the Priority field appears, the lower the number entered in this field, the higher the priority it has over other content.(Refer table 6) |
Table 5 – Description of options for adding details to content
| Property | Description | Example/More details |
|---|---|---|
| Select from Existing Named Content | Allows selection of an existing content template from a list. First a group will need to be selected, and then the template itself. | Select an existing template/content from the drop down menu, sorted by the group drop-down menu. Select existing content:Have just created a new template for this item and wish to use itWish to use similar templates across multiple items |
| Copy from Existing Named Content | This allows for an existing template to be copied to a new template, under a new name. The existing template that will be copied must first be selected, then a group for the new template, along with a new name, and file name. Copy content is used when there is already an existing template that has many of the details required for this template, but plan on making changes to without affecting the original template. | |
| Create New Content | This option allows for new content to be created using the rich text editor that follows. A name, and file name for the new content must be provided, as it will then be saved alongside the other templates. | If entering HTML, or Velocity code when creating content, uncheck the ‘Use Rich Text Editor’ option to avoid any issues with the code. |
Properties #
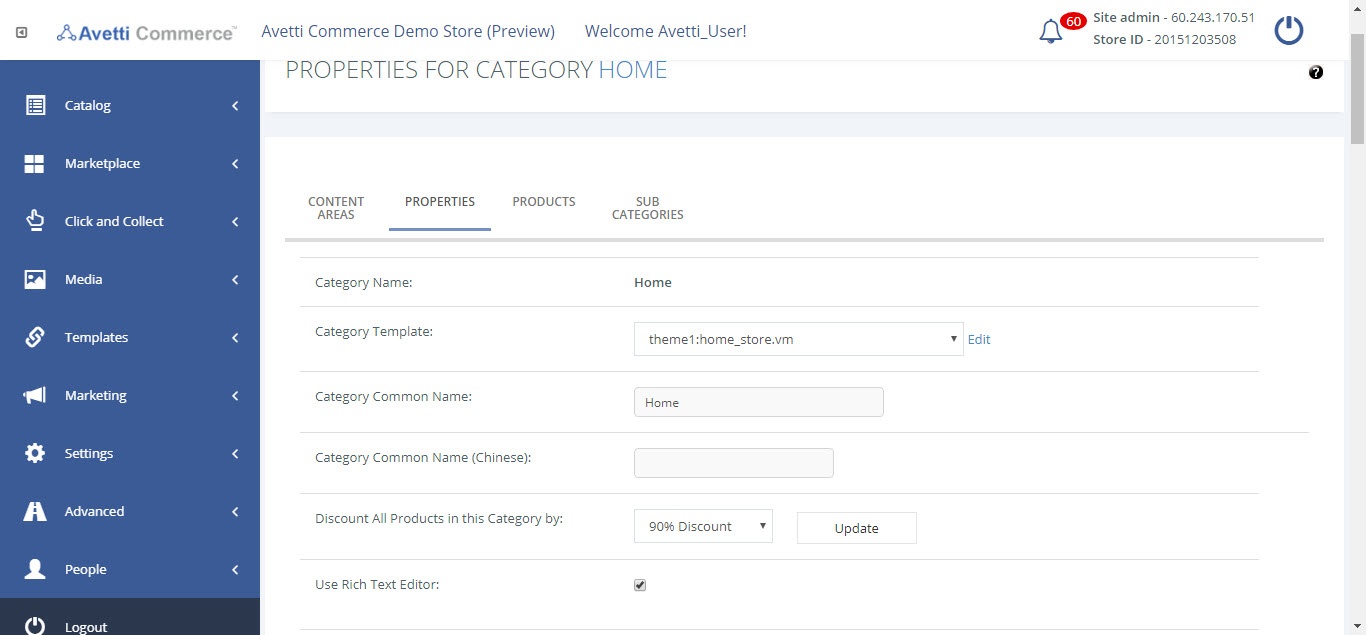
The category properties define the main options for the category.
- Click on the Properties tab to access the Manage Properties page.
| Property | Description | Example/More details |
|---|---|---|
| Category Name | The category name will be already displayed and can’t be modified in this section. | |
| Category Template | A template can be an entire page, or can be a portion of the page that will be used on multiple pages, such as the header, or navigation. Choose the main category template that will be used for the page. All of the content in the selected template will appear on this new category page. Only templates of the category group will appear in this list. If a blank template is required, try static-content.vm if it is available. | By default the category_template.vm is used for categories. |
| Category Common Name | Enter the name of the category here which can be seen as the main header of the page. It is also displayed on the category hierarchical diagram (or breadcrumb category) on the corresponding page and the menu on the store. | |
| Category Common Name (French) | Optional Field. Enter here the category common name on French. To see the translation of the category name in French. | |
| Discount All Products in this Category by | Optional Field. Used to add a discount to all the items / products in this category. If a new option from the drop down menu is selected, click on ‘update’ to refresh the page and save the new selection. | The drop down menu can be modified by going to Marketing | Customer Discounts. |
| Use Rich Text Editor | Optional Field. Select the check box to be able to enhance the format of some fields, such as Category Description, Category Description (French), Additional Category Description, Additional Category Description (French). | |
| Category Description | This is an optional field. In detail, describe the category and the kind of products and services it provides. Use the text editor to change the format of the description, use bullet lists, align, bold and italics. | |
| Category Description (French) | This is an optional field as well. Here the description of the category and the kind of products and services it provides in French. Use the text editor to change the format of the description, use bullet lists, align, bold and italics. | |
| Additional Category Description | If desired, use this additional field to add more descriptions of the category. | |
| Additional Category Description (French) | If desired, use this additional field to add more descriptions of the category in French. | |
| Available | This must be checked in order for the page to be visible. If it is not checked, the page cannot be visited. | |
| Number of Category Images | Select the number of images that will be displayed in each category. | |
| Category Image | The selected image will be displayed on the page of the site as an image of this category. The image can be upload in this section by clicking on the Upload button. The category image is an image which was uploaded in /category/thumbnails/ directory. | To see the images for the categories, go to the Media | Manage Media section and follow the specified address on the field (See Manage Media section). |
| Number of Category Thumbnail Images | Select the number of Thumbnail images that will be displayed in each category. | |
| Category Thumbnail Images | The selected image will be displayed on the page of the site as an image of this category. The image can be upload in this section by clicking on the Upload button. The category image is an image which was uploaded in /category/thumbnails/ directory. To see the images for the categories, go to the Media | Manage Media section and follow the specified address on the field (See Manage Media section). | |
| Page Title | Enter a brief description here which describes the page. The customer can see this title on the tab headers and other locations in their browser as it represents the Title HTML tag. | My Store – Digital Cameras |
| Page Title (French) | Enter a brief description here which describes the page. The customer can see this title on the tab headers and other locations in their browser as it represents the Title HTML tag. | |
| Meta Description | Enter a brief description about the current page which will be displayed on search engine results. It defines the Meta description HTML tags. This can be auto-generated on the Advanced | Site Admin Preferences page, where it will use the name of the page and the first relevant description on the page to use as the Meta Description. | Auto-generated Meta Descriptions will replace what is currently set in the Meta Description. |
| Meta Keywords | For search engines which use Meta keywords, enter relevant words from the page here. | Auto-generated Meta Keywords will replace what is currently set in the Meta Keywords. |
| SEO URL | This text is used in the URL for this category page. The Site Admin Preferences allows the ability to auto-generate this and all the items without a locked SEO URL. | When editing the home page, the SEO URL must be a forward slash character (‘/’). |
| SEO URL Locked | If this is unchecked, the next time an admin auto-generates the SEO URLs, the current SEO URL will be replaced by whatever is generated. If the SEO URL shouldn’t be changed, ensure it is locked so that auto-generated content doesn’t replace it. | |
| Enable a Private Sale for All Products in this Category | Enter a Start Time and an End Time to specify the period of time that the items under this category will be displayed only for the customers that are already register to the store. If the items are still active and available when the date expires, they will become public, so all the other customers will be able to see them, even if they are not registered. | The dates will not be displayed on this fields after updating them, however three properties will be added to the items under the category called: Sys_Private_Sale_Item/Sys_Private_Sale_Starts/Sys_Private_Sale_Ends. The items will be available for private sale under that period of time. |
Products #
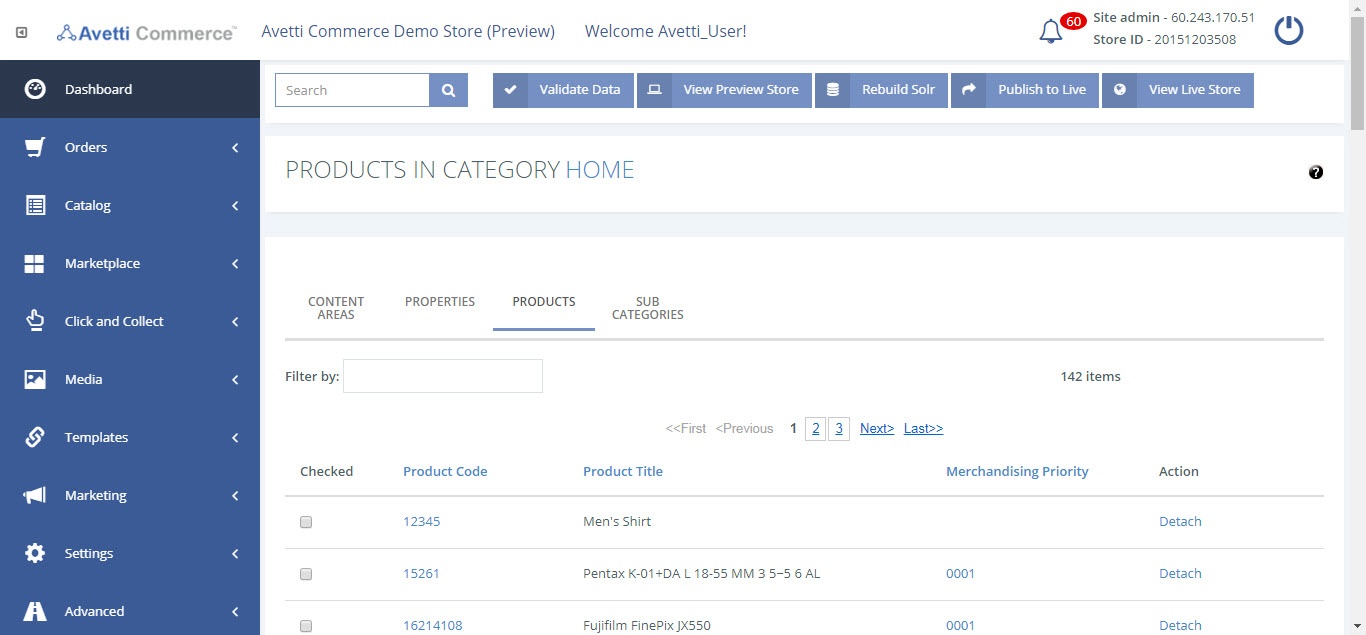
Each product listed here will appear in the new category within a template that displays products.
Example: A template is added in the Content Areas section under category_center called “Cat featured products”, which shows Featured products in a given category. A digital camera (DCAM-Z355) is added to this products section for the same category, and is highlighted as a Featured item on the Edit Item page for the camera. The DCAM-Z355 item will show up in the template under these conditions.
Adding products to the list #
- Go to the field beside Attach Item Code.
- Enter the item code of an existing product.
- Click Attach Item Code button. The item will be added to the list.
- If the product doesn’t exist a pop-up message will be displayed saying “Product XXX does not exist!”
Changing priority of any product #
- Click Merchandising Priority column of that item.
- Enter the priority value for the item and click in Save.
- Repeat the steps for other items.
Note
The priority must be four positive integers, such as 0001 or 1000. This value determines the order in which items are displayed on a category page when they are order by relevance. This means that an item with property value 0100 will be displayed prior to displaying an item with value 0010. So for each item, set the property in order to determine what order needs to be followed while displaying items on category pages.
Changing priority of any product #
The items can also be detached from the product list. There are two options to detach it.
- Find the product on the list.
- Click Detach link or check the checkbox of every item that are to be detached.
- Click on the Detach button. Only the selected items will be detached from the product list.
Detaching products from list #
The items can also be detached from the product list. There are two options to detach it.
- Find the product on the list.
- Click Detach link or check the checkbox of every item that are to be detached.
- Click on the Detach button. Only the selected items will be detached from the product list.
Sub Categories #
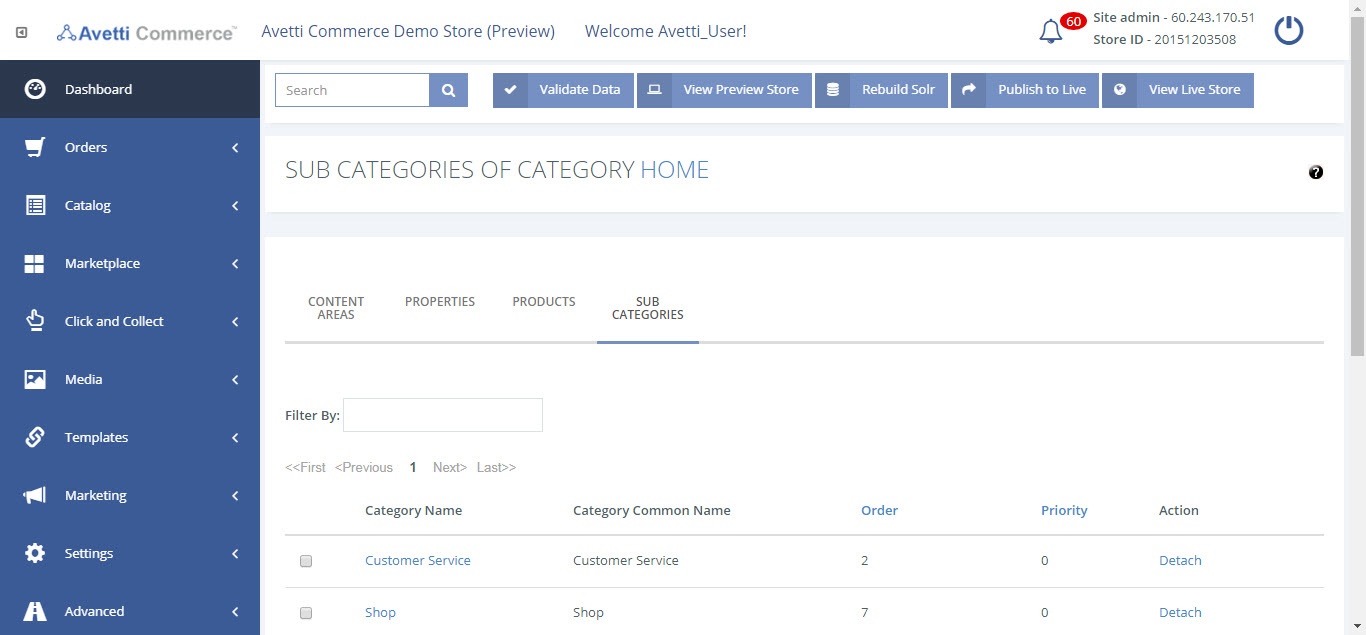
Sub Categories allows the ability to define the parent/child structure of the store. A category that appears in this list will become a child of the category that was selected to edit.
Example: Home is often the main parent for stores, and beyond that may be Shop, which contains the various product categories (such as Digital Cameras and Home Entertainment). Therefore, Home has a Sub Category of Shop. Shop has a Sub Category of the product categories. Digital Cameras will have no children or Sub Categories.
Attaching sub categories #
This allows the ability to attach new sub categories to the existing categories.
- Go to Edit
- Click Sub Categories.
- Click on the ‘+’ icon (Attach) and from the Select drop down select a category, then add a priority.
- Click attach.
Note
- The priority can be any number from 1 to 9999. This value determines the order in which the categories are displayed on a category page. This means a subcategory with property value 100 will be displayed prior to displaying a category with value 10.
- To change the priority of a category go to the Priority column of that specific category and click on the priority. A field will be displayed, change the number if needed and then click on Save.
Detaching sub categories #
The subcategories can also be detached from the subcategories list. There are two options to detach it.
- Find the subcategory on the list.
- Click on the Detach link or select the checkbox of every subcategory that must be detached and click on the Detach button. Only the selected subcategories will be detached from the list.
View #
View simply opens up the store page for the corresponding category. Click this to see the live version. This link will help ensure that viewing and editing are done on the proper category page
Edit Template #
Edit Template will open the template editing page for the corresponding category. Alternatively, the ability to edit templates can be found on the Templates → Manage Templates page.
Menu1 #
The menu1 category is a default category that manages the Navigation. The Navigation is the “Browse Catalogs” section of the main page. Menu1 will be displayed under the uncategorized categories section.
Click on the Sub Categories link. Here, the list of categories that make up the categories of the Navigation will be shown. Attach or detach categories on menu1, and rearrange them by altering the order.
Once changes are complete (no save required), check the Side Nav on any store page to see the changes.
Add Menu #
- Click the Add Menu button located on the Manage Categories page to add a new menu.
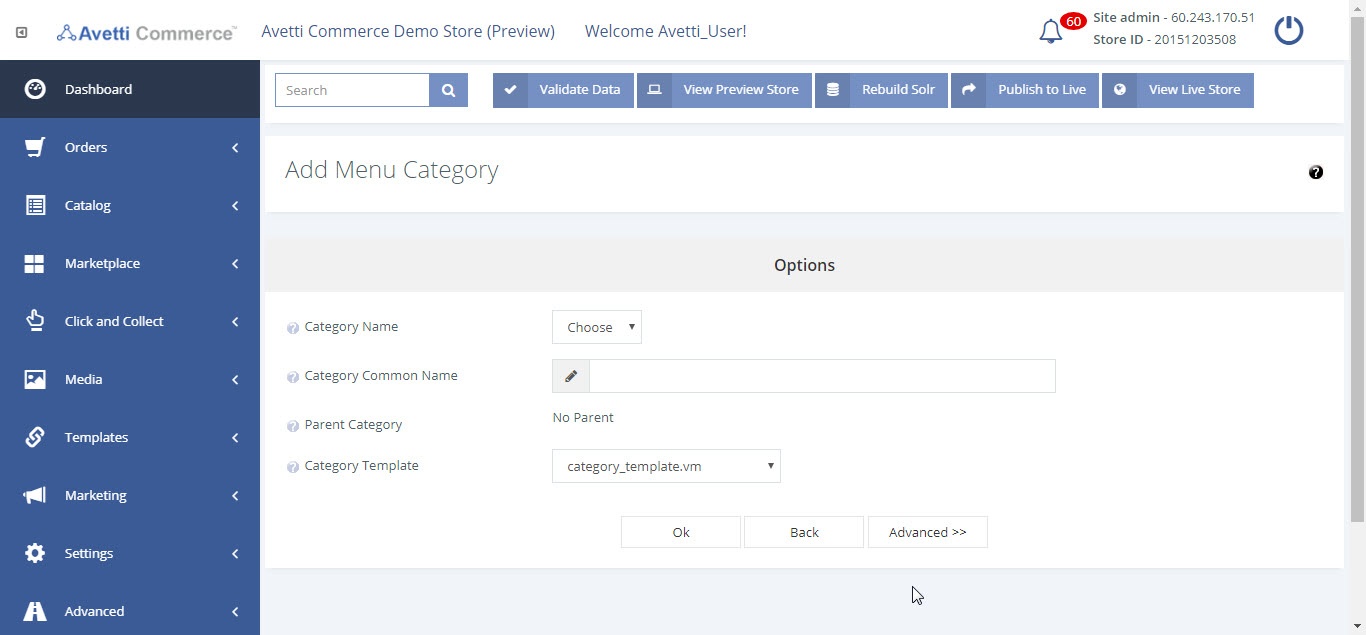
| Property | Description | Example/More details |
|---|---|---|
| Category Name | Enter a new category name. Category full name should be unique and cannot duplicate the name of existed category. | |
| Category Common Name | A category short description is coming as a default like a category full name but can be changed. A category short description is not unique and can be used for another categories. | |
| Parent Category | Parent page or parent category is a category under which a new category created. If a new category does not have upper level (parent) category it should be under Home category. Home category is the main (top level) category of the catalog. | |
| Category Template | A template can be an entire page, or can be a portion of the page that will be used on multiple pages, such as the header, or navigation. Choose the main category template that will be used for the page. All of the content in the selected template will appear on this new category page. Only templates of the category group will appear in this list. If a blank template is required, try static-content.vm if it is available. | See Manage Templates section for more details |
| Category Thumbnail Image (Advanced) | The category thumbnail image is an image which was uploaded in /category/thumbnails/ directory in Manage Catalog | Content section. The selected image will be displayed on the page of the site as an image of this category. Attach a thumbnail to associate with this category. The images are by default located in: [vendorid]/assets/category/thumbnails/. | To view the images, go to Media | Manage media and follow the directory tree. |